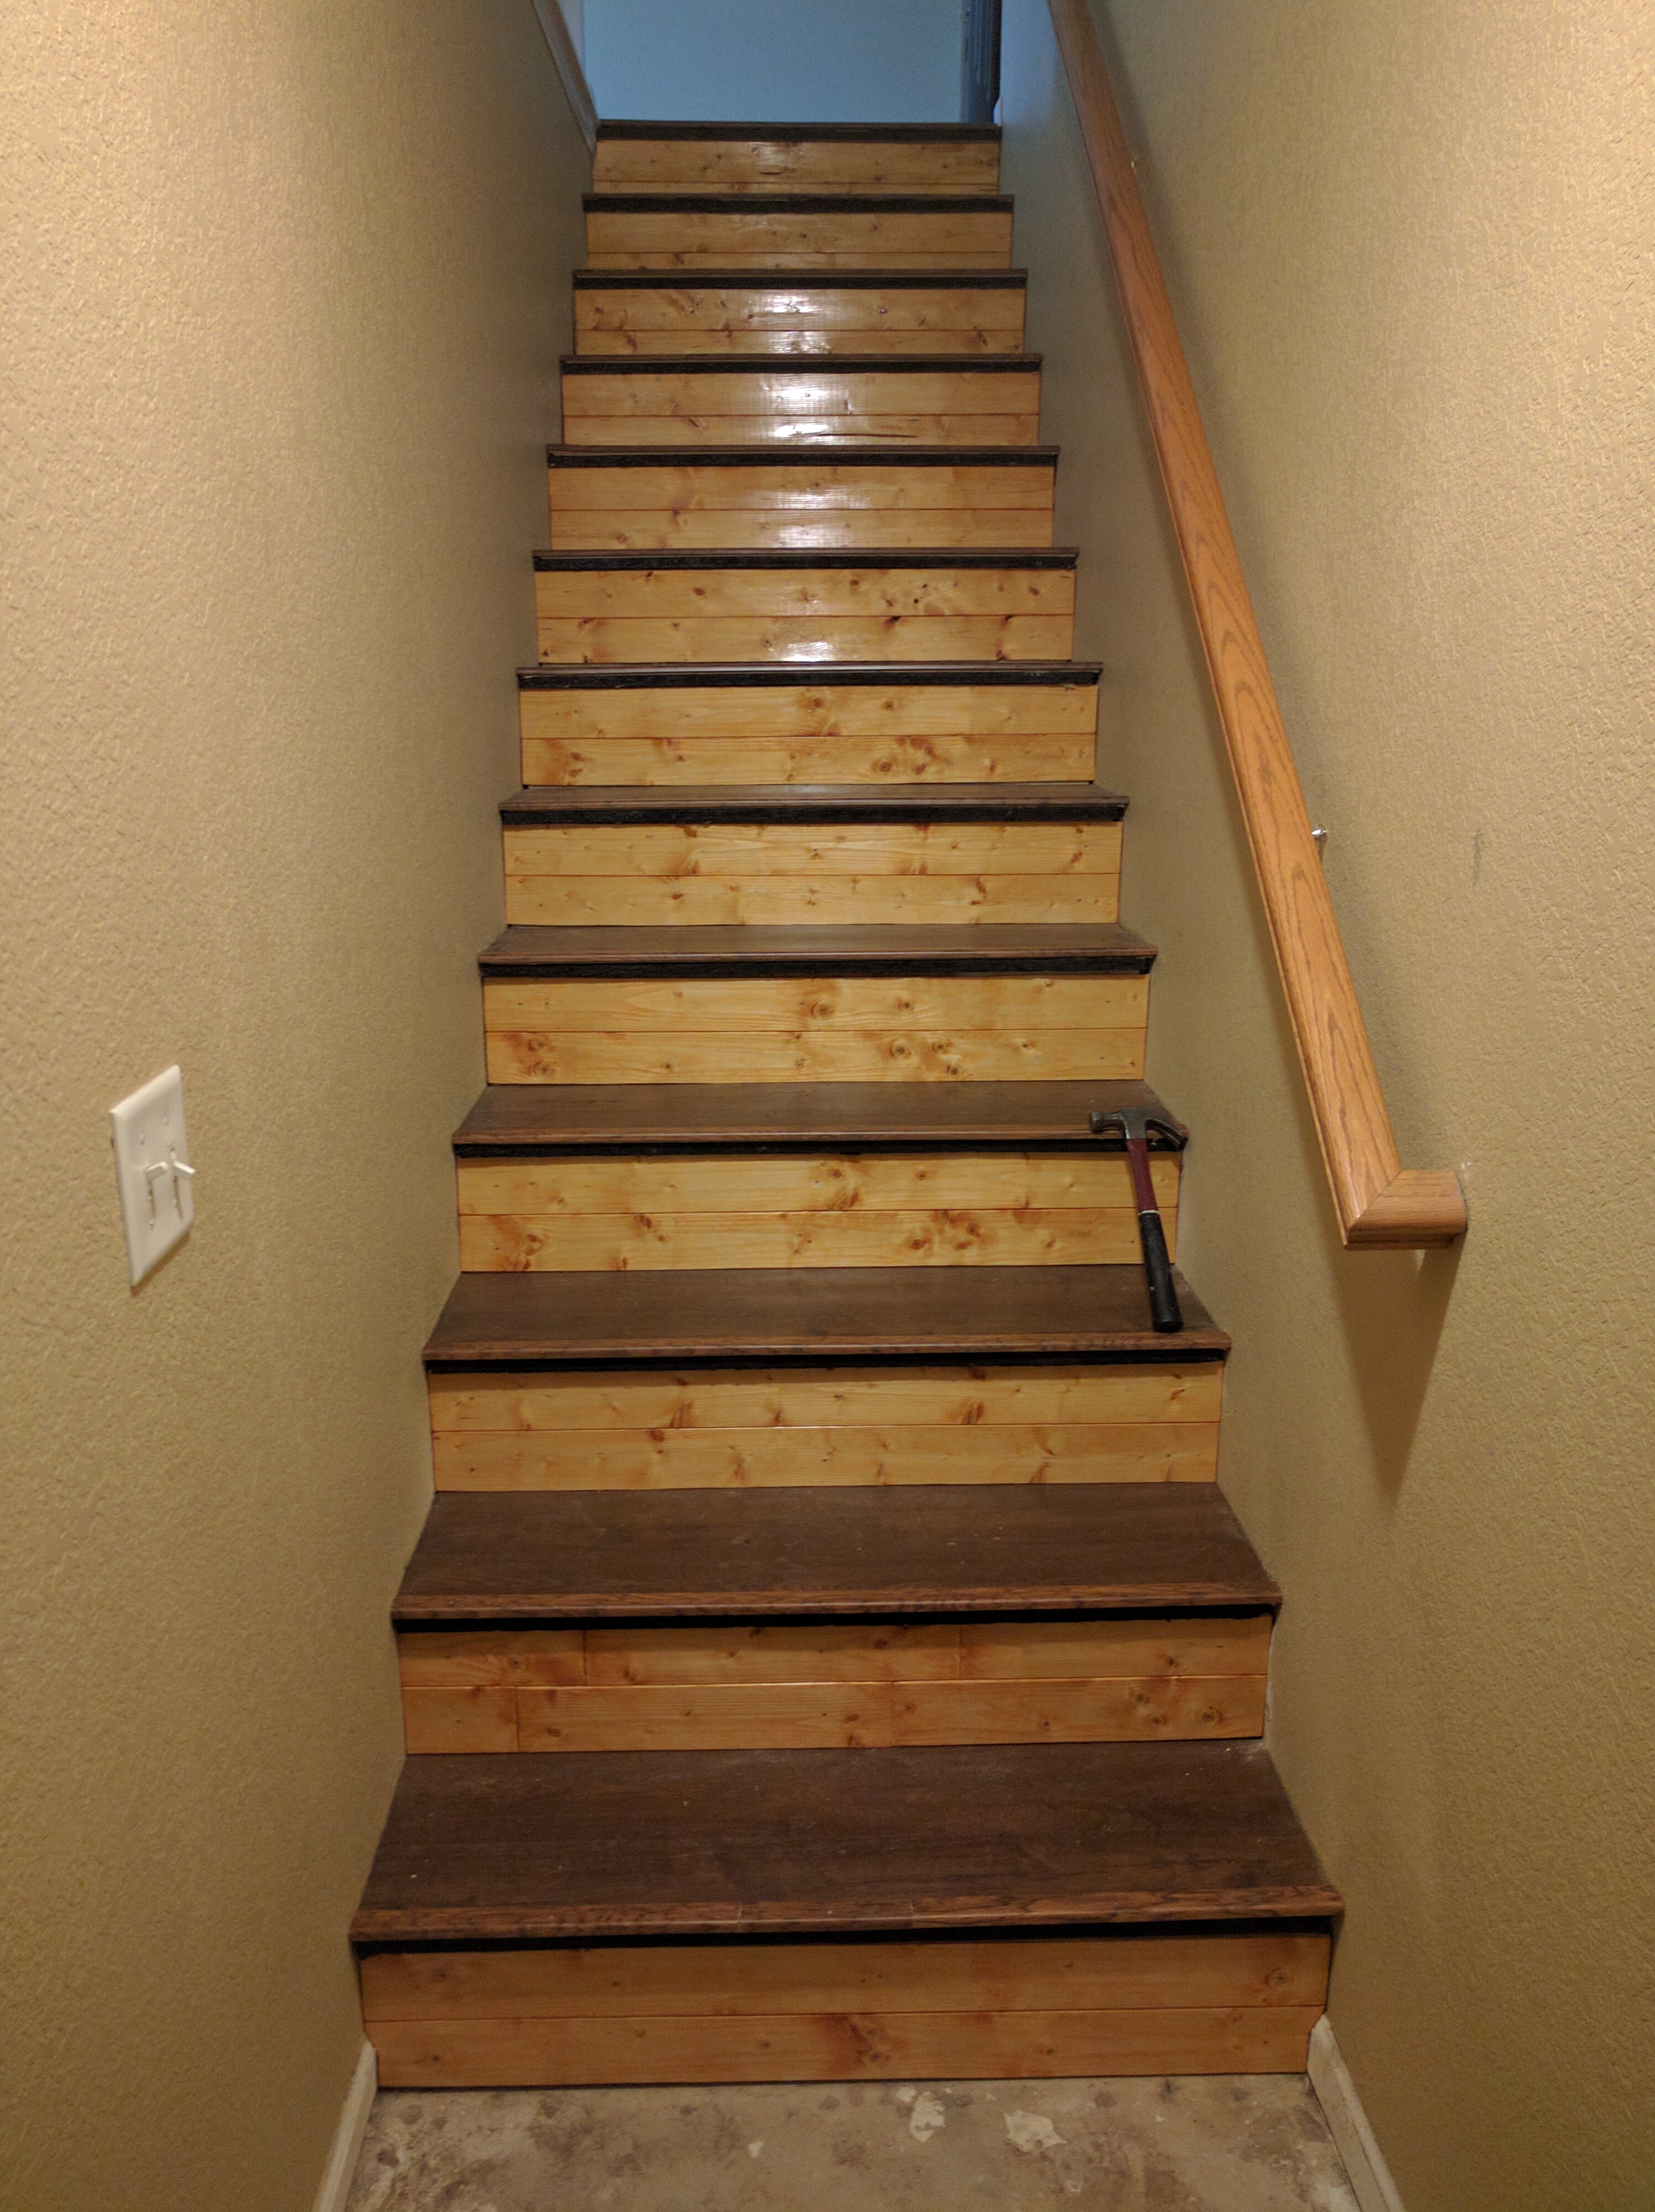
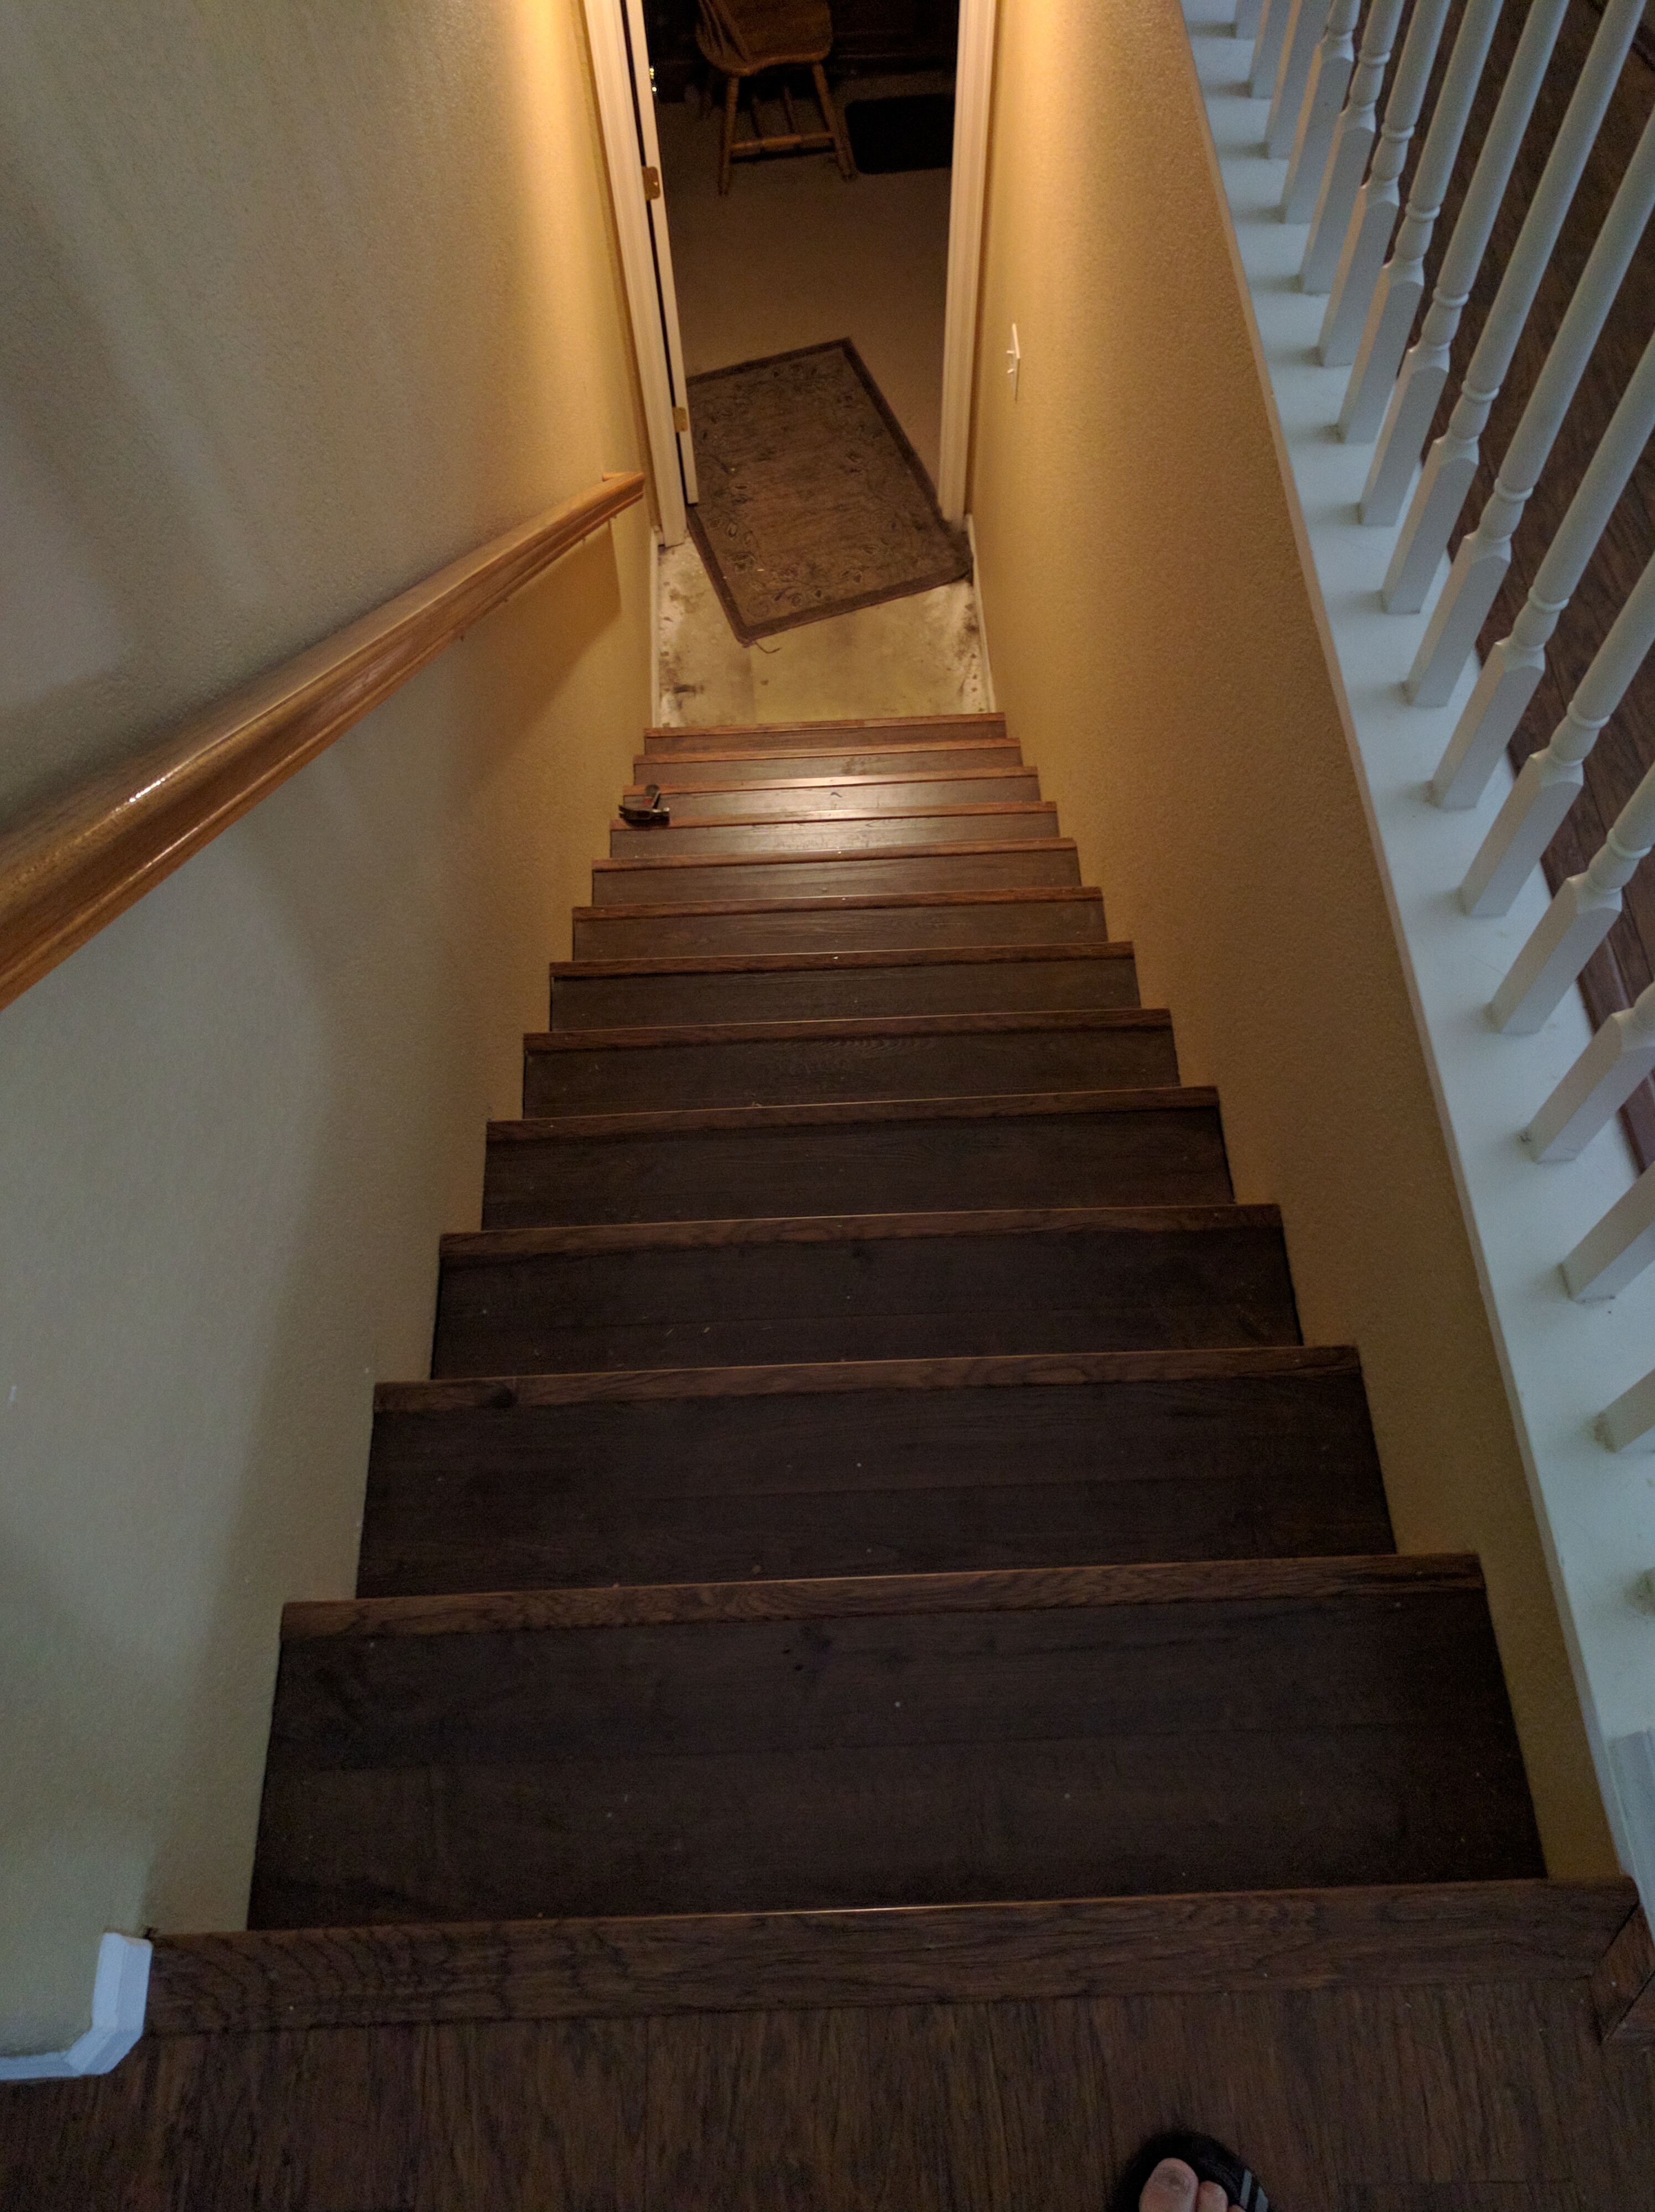
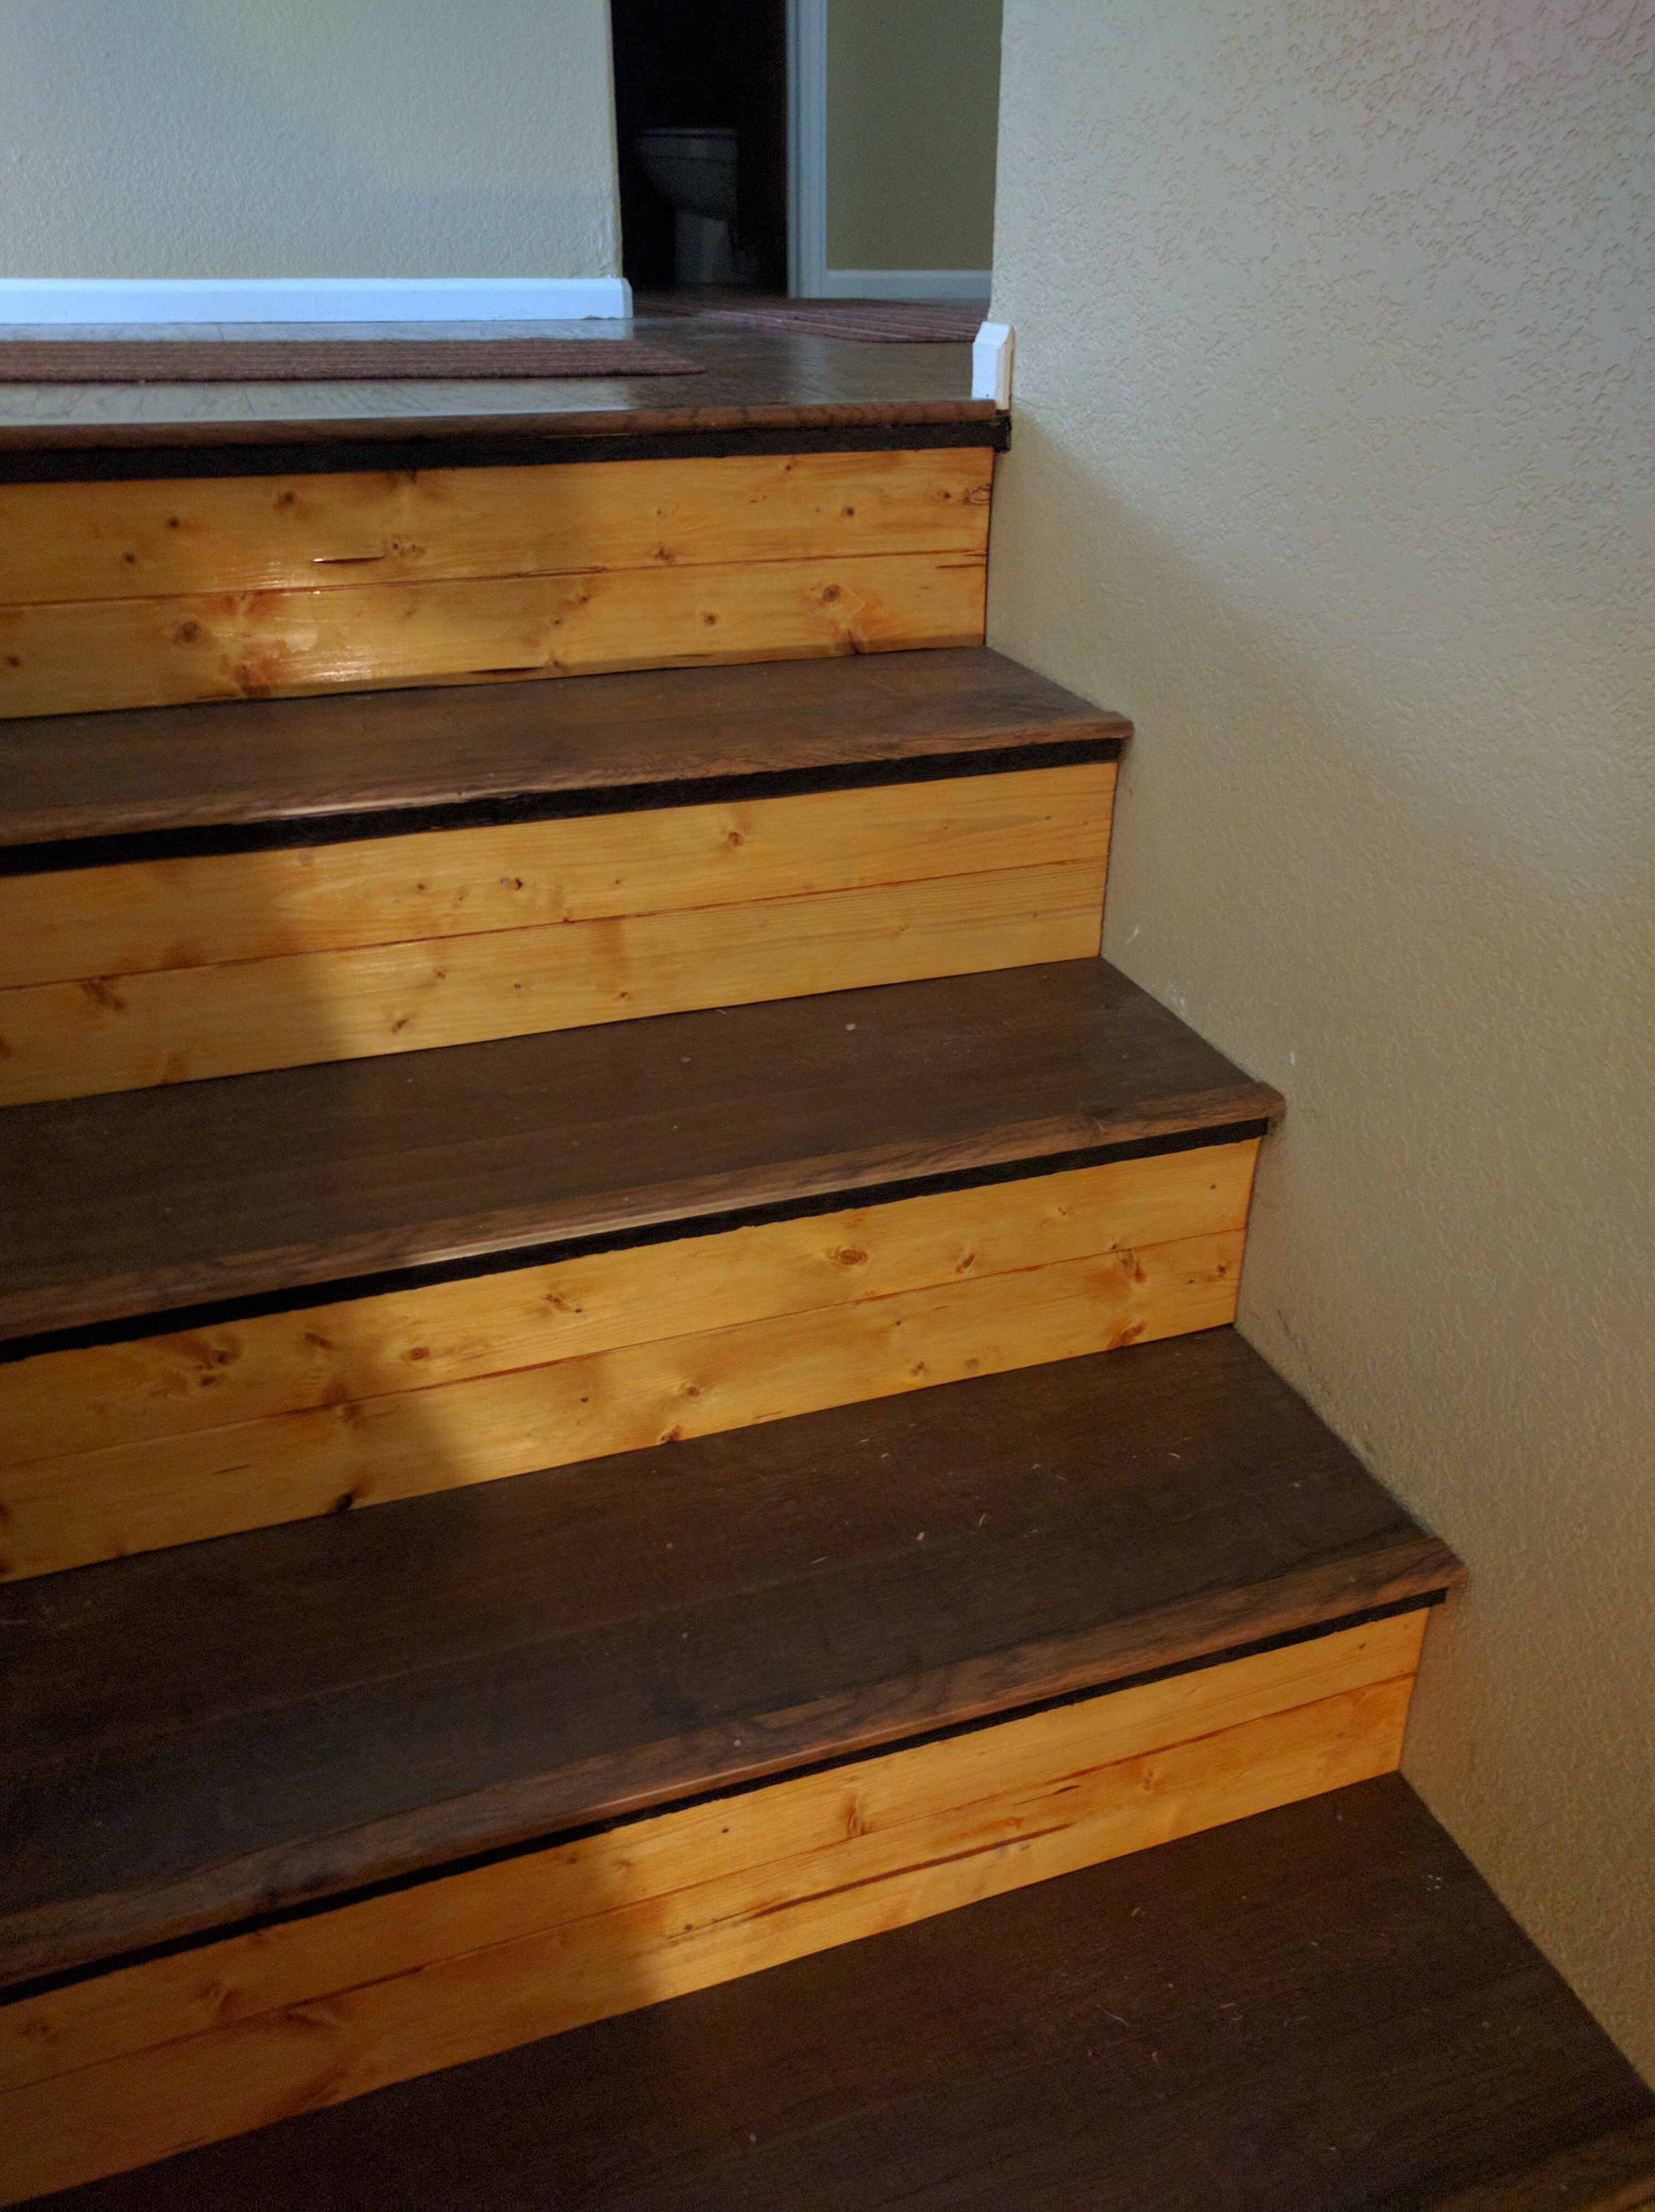
It only took a year for me to get around to finishing the stairs portion of our flooring remodel. I suppose I just needed the motivation from Sis coming to visit tomorrow. I’m a function over form guy, so I had no problem climbing in and out of the basement on the un-finished steps. The flooring contractor wanted +$500 for just the stairs, so I did it myself for about $200 in materials. I wanted something better than the contractor would ever do, for any price.
Another One Almost Done
They’ve been working on the new Wetland Loop Bridge literally almost all year. I think that is what made me care less about getting the pond done any time soon. I learned my construction attitude from the contractors building this bridge for the town:


This bridge used to be a 4-ft. concrete pipe covered with dirt and road. It was washed out beyond repair in the big flood a couple years ago. The true story about why it takes 5 months to build a little bridge like this will likely not be made publicly available. Ostensibly the reason given was the crews were mired in a huge mud hole all though spring and early summer. I’m not even sure why we need a bridge there, but we have a good one now!
It's Finally Done! Well, Almost ;-/
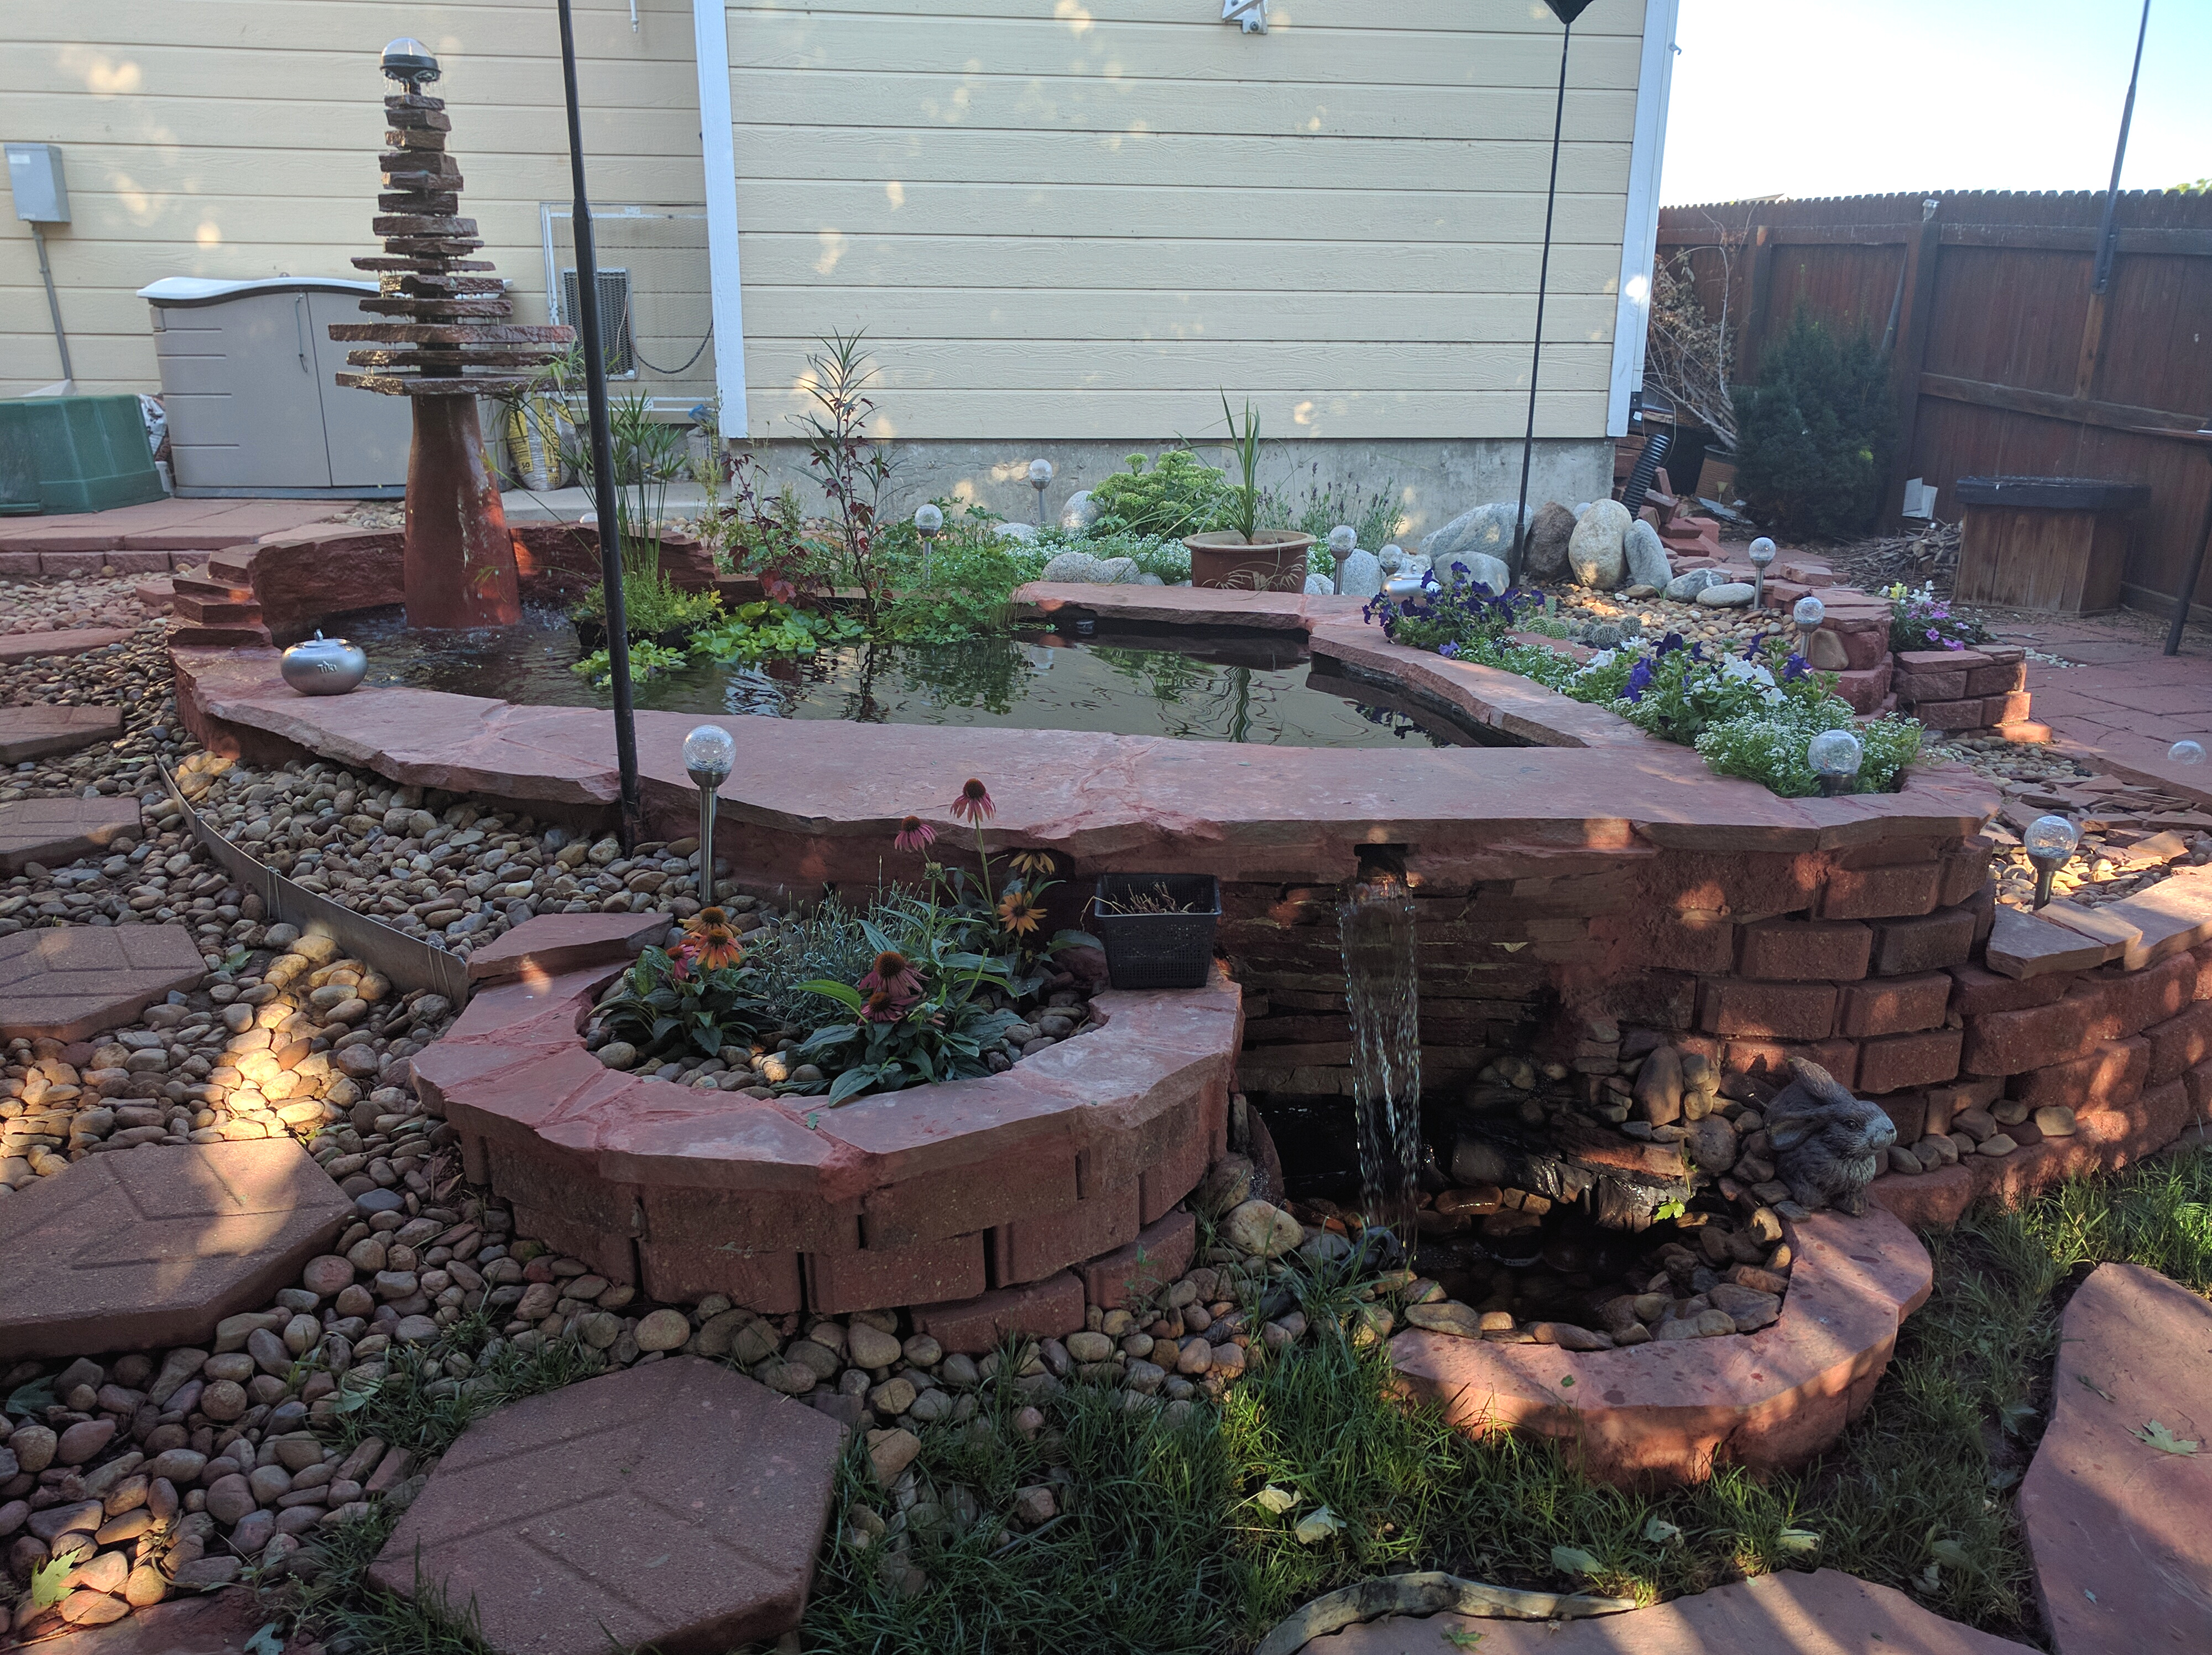
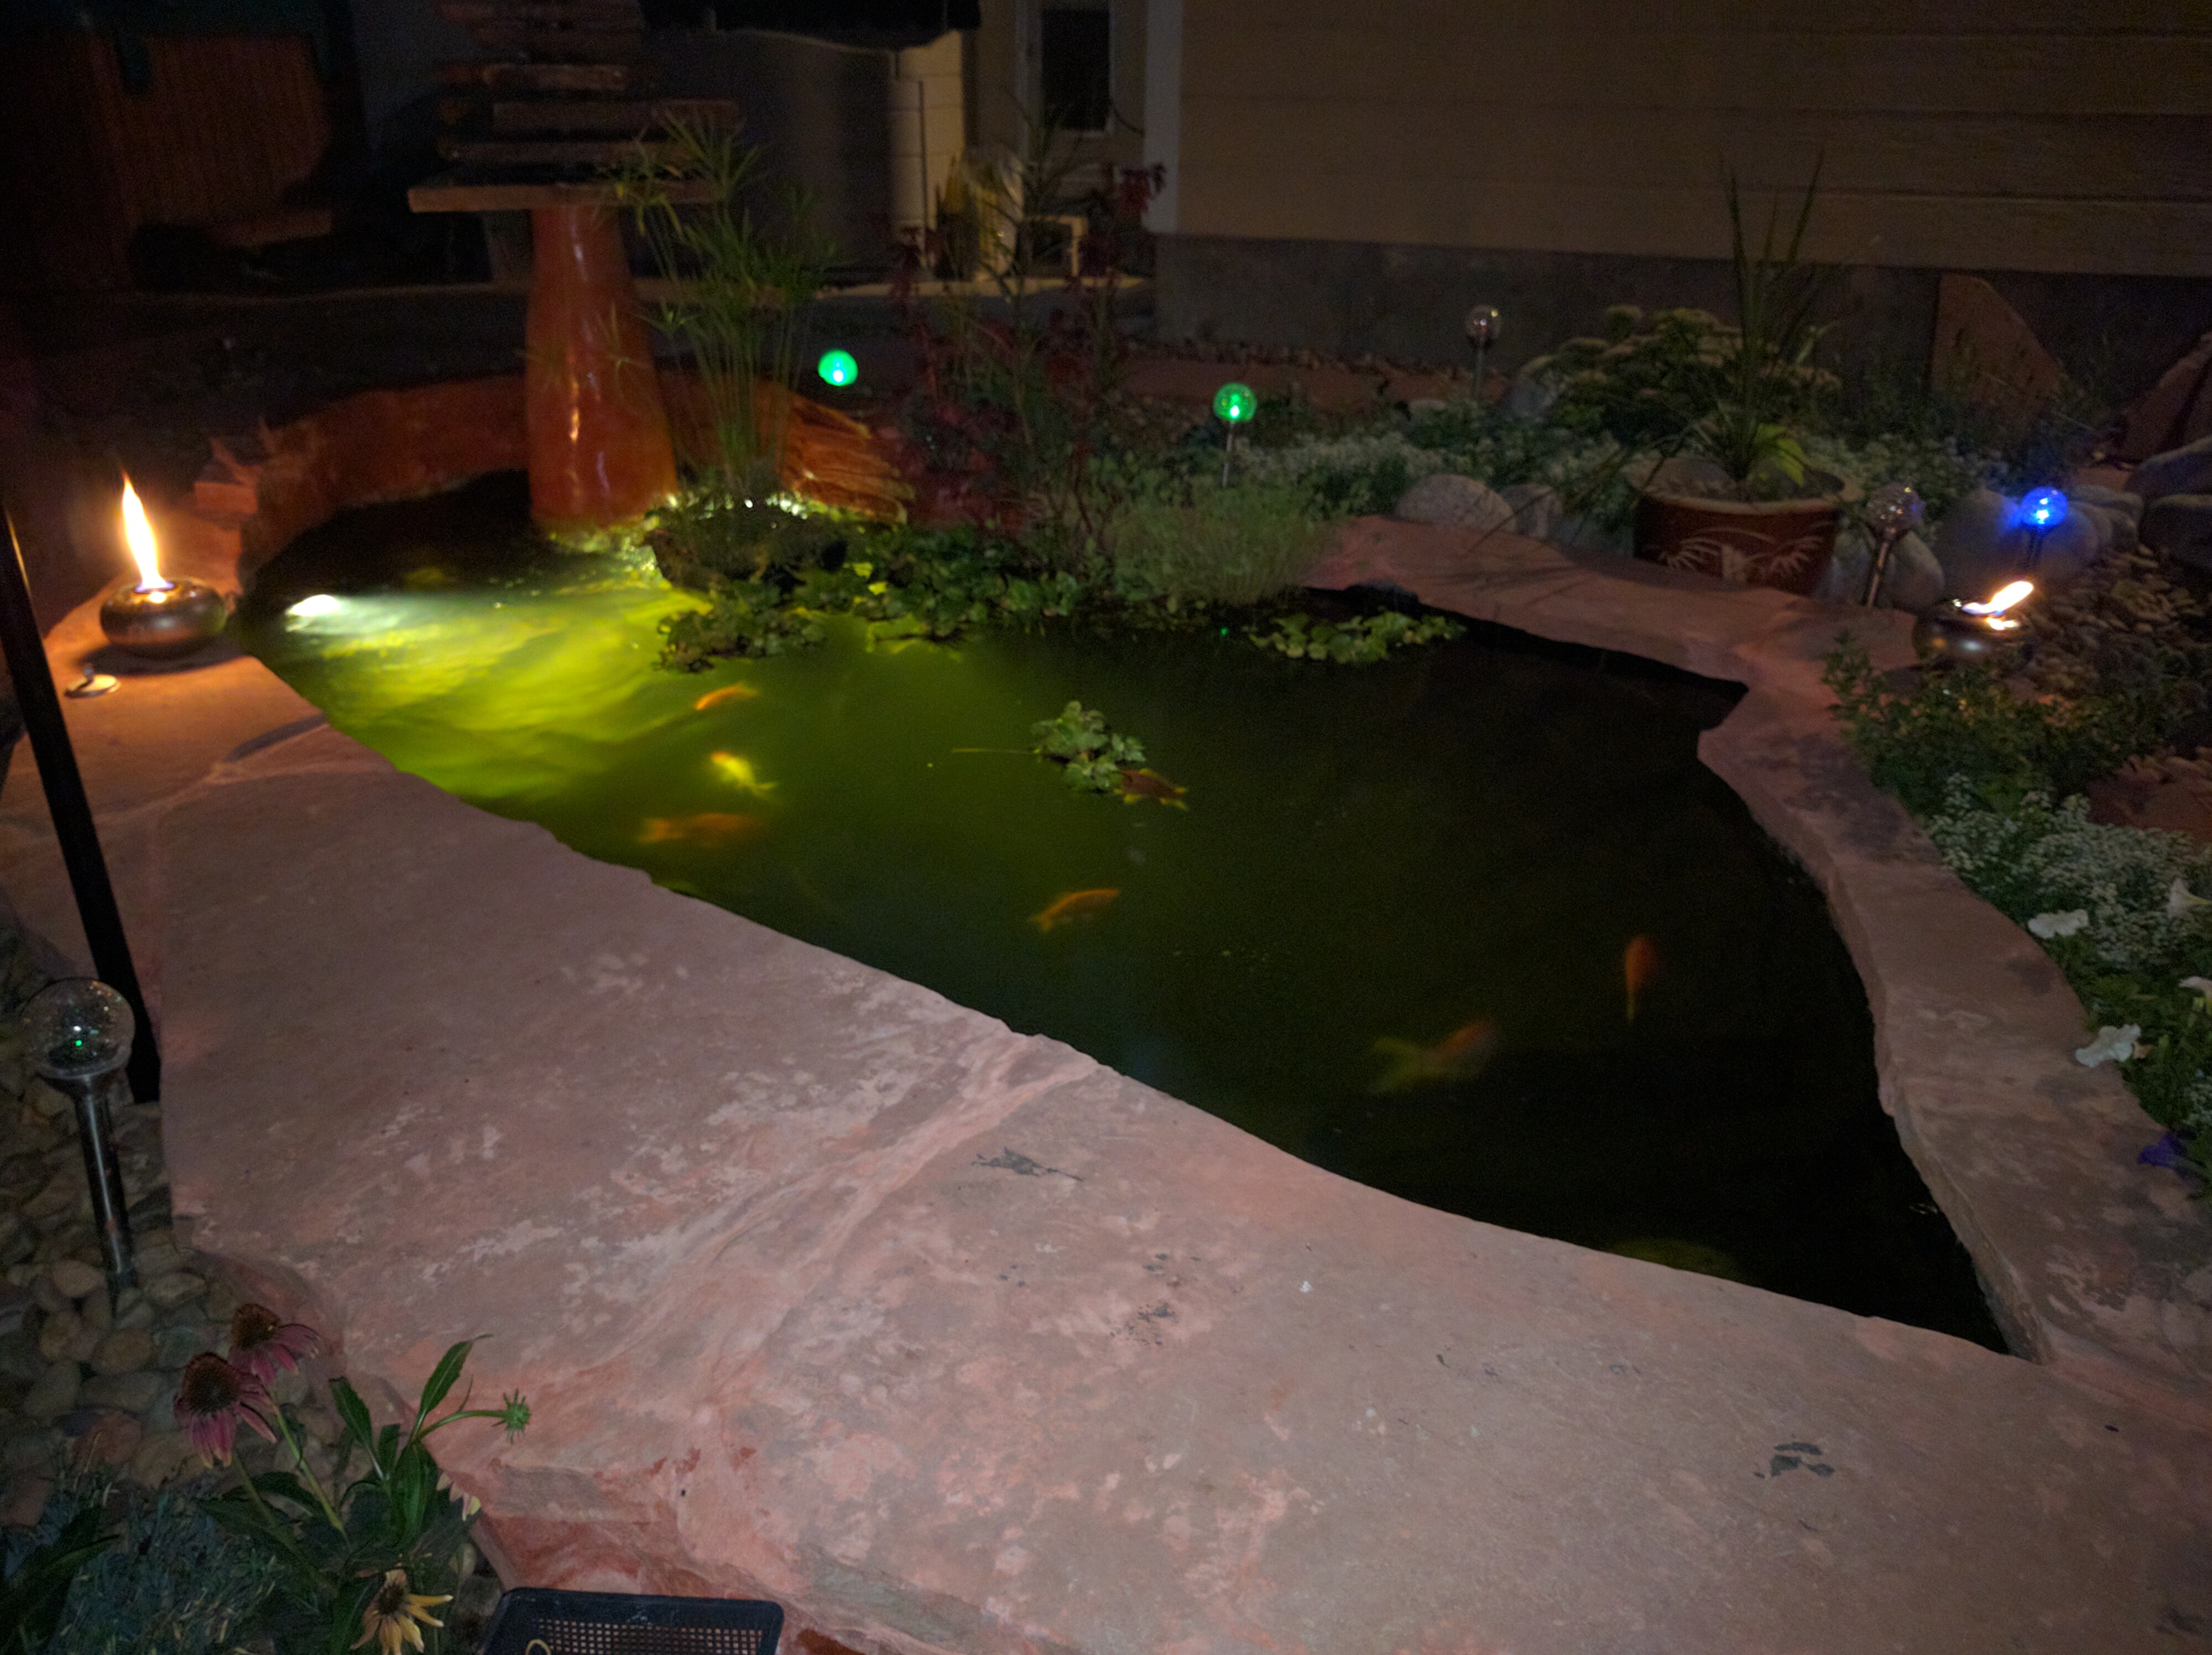
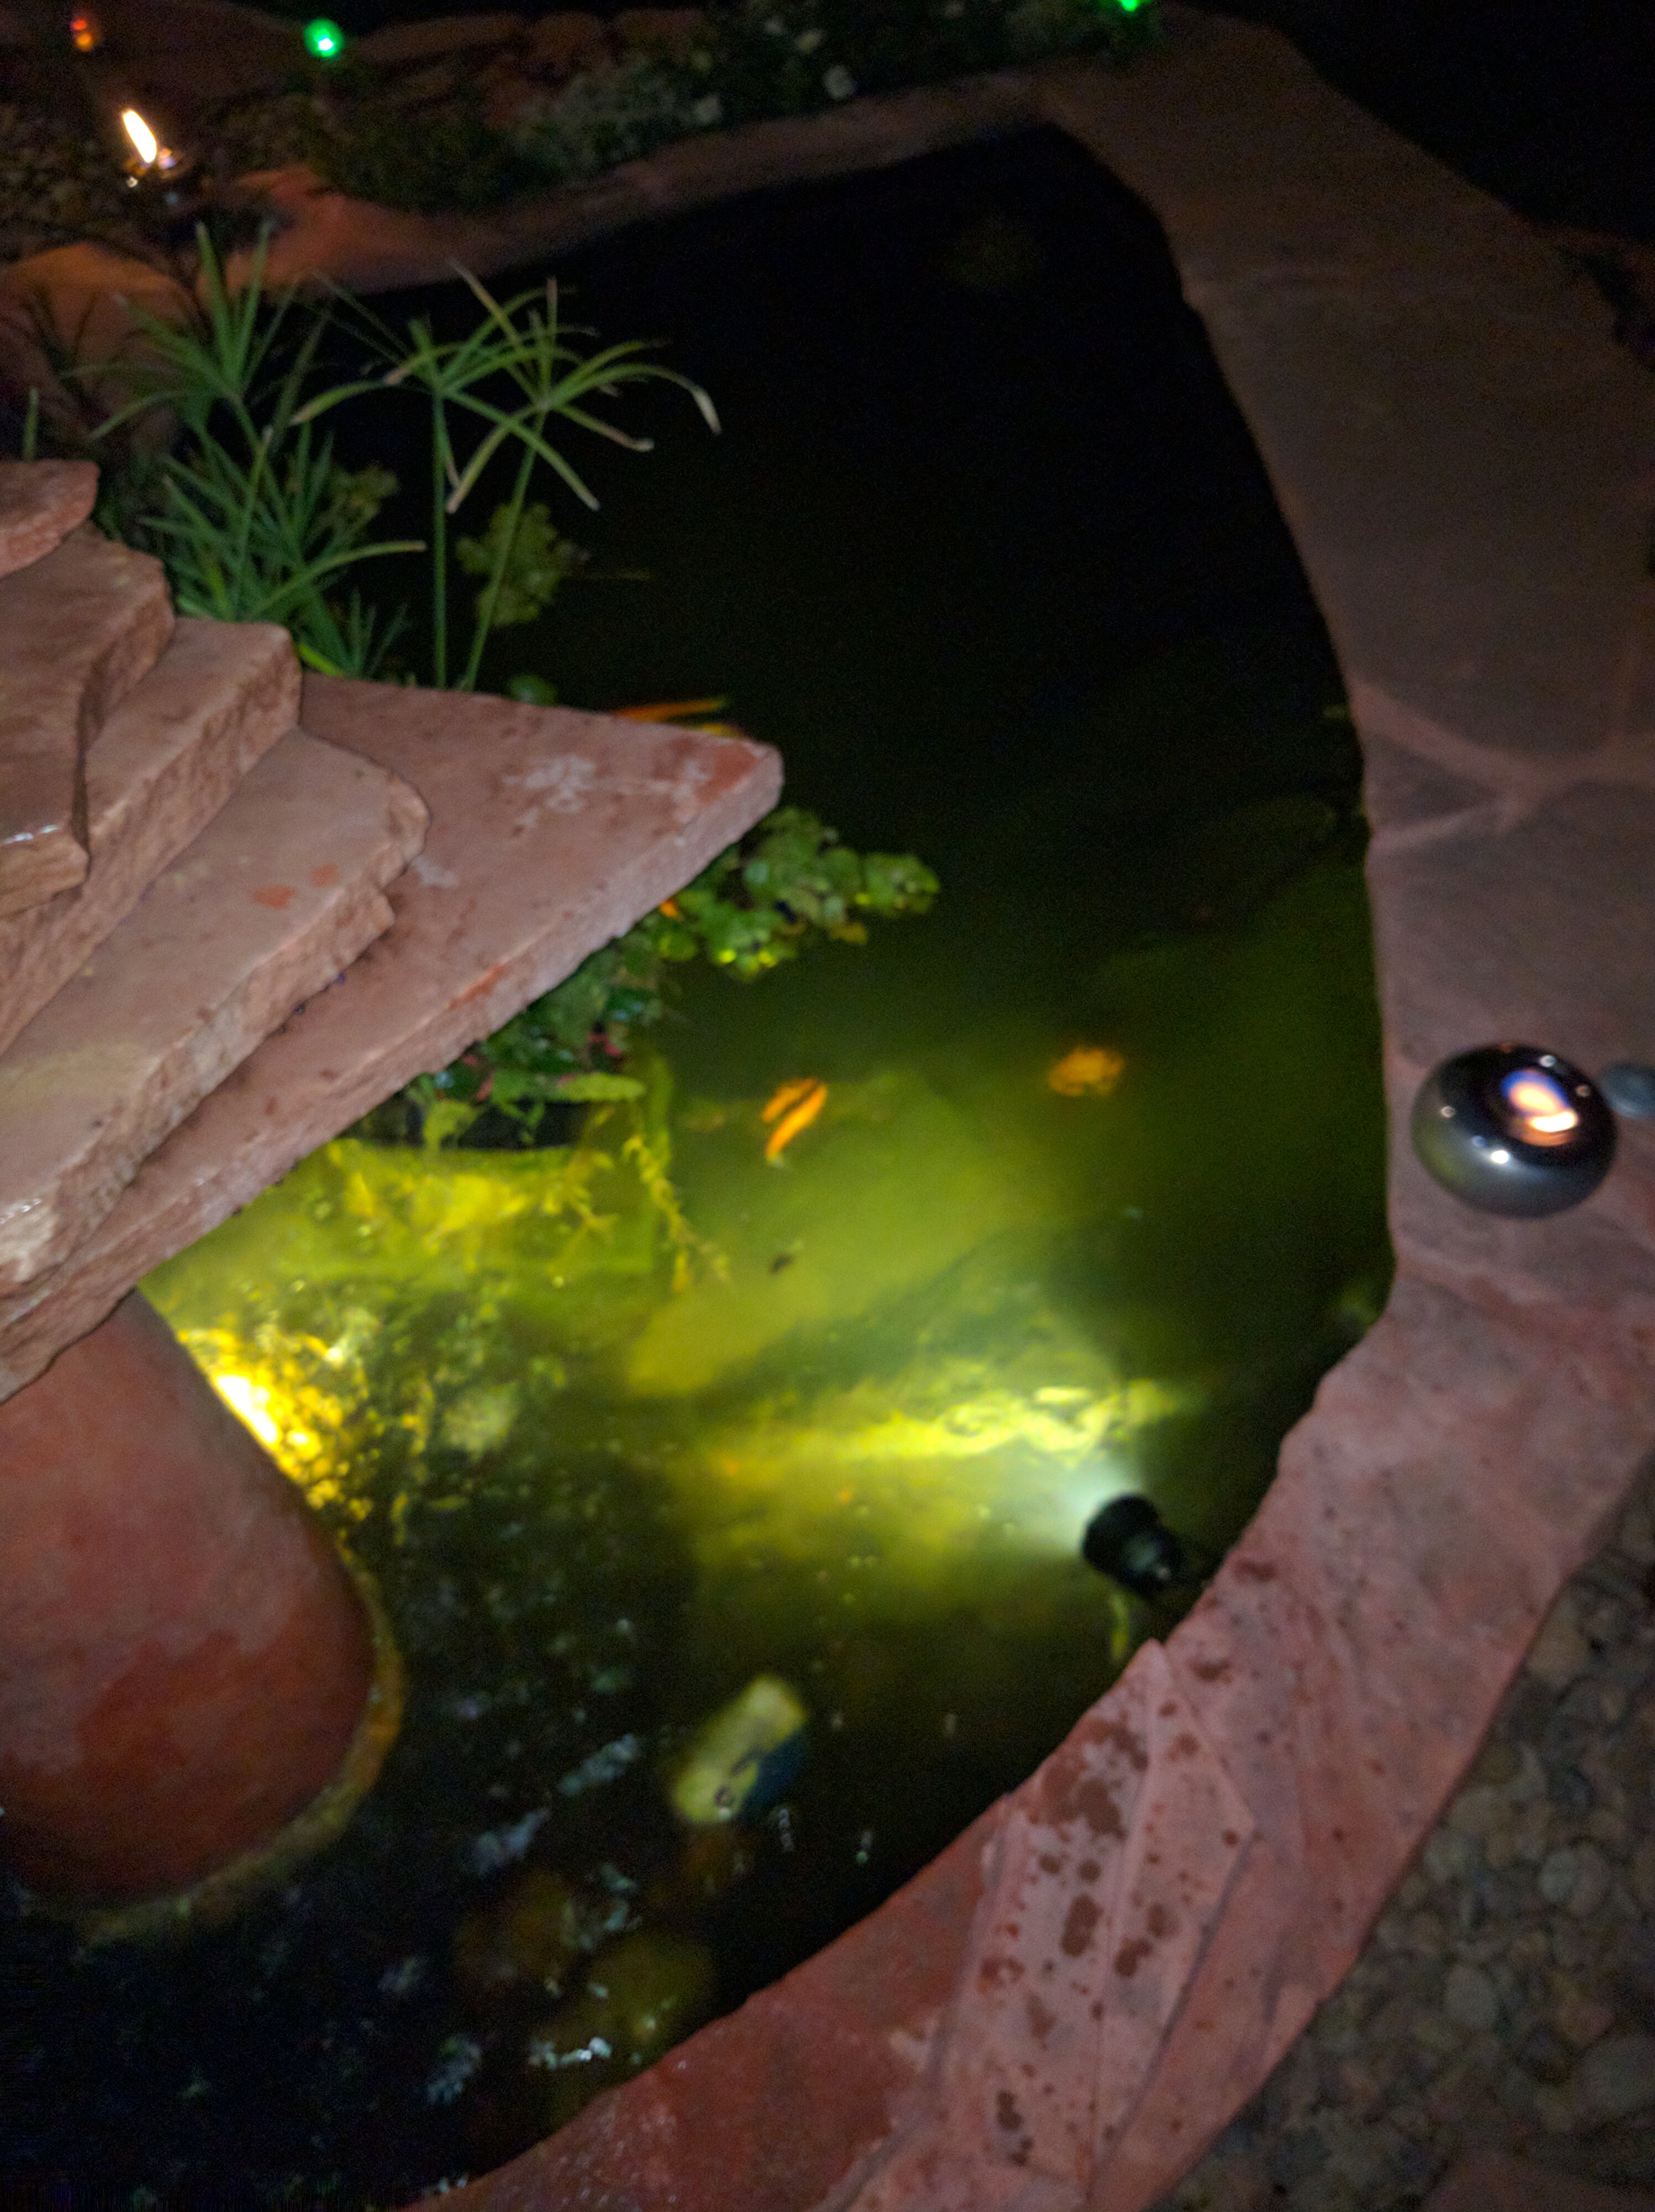
Took three whole months from March through early July, but it’s done. Admittedly, the pace of work was slow compared to what I used to do only a few years ago. It came out really well considering my inexperience with stone masonry. All told, the total price tag came to around ~$1k worth of materials, parts and tools. The big ticket item was a new hammer drill for the holes in those fountain rocks. Still need to hit the rough spots with the grinder and then apply a couple coats of sealer to the whole thing. I’ll get to that this fall after bringing the Goldfish inside and getting it emptied and cleaned out for winter. It’s gonna need a new cover then, too. The fun just never seems to stop.

More Pics: 18 20 21 22 24 25 26 27 28 29 30
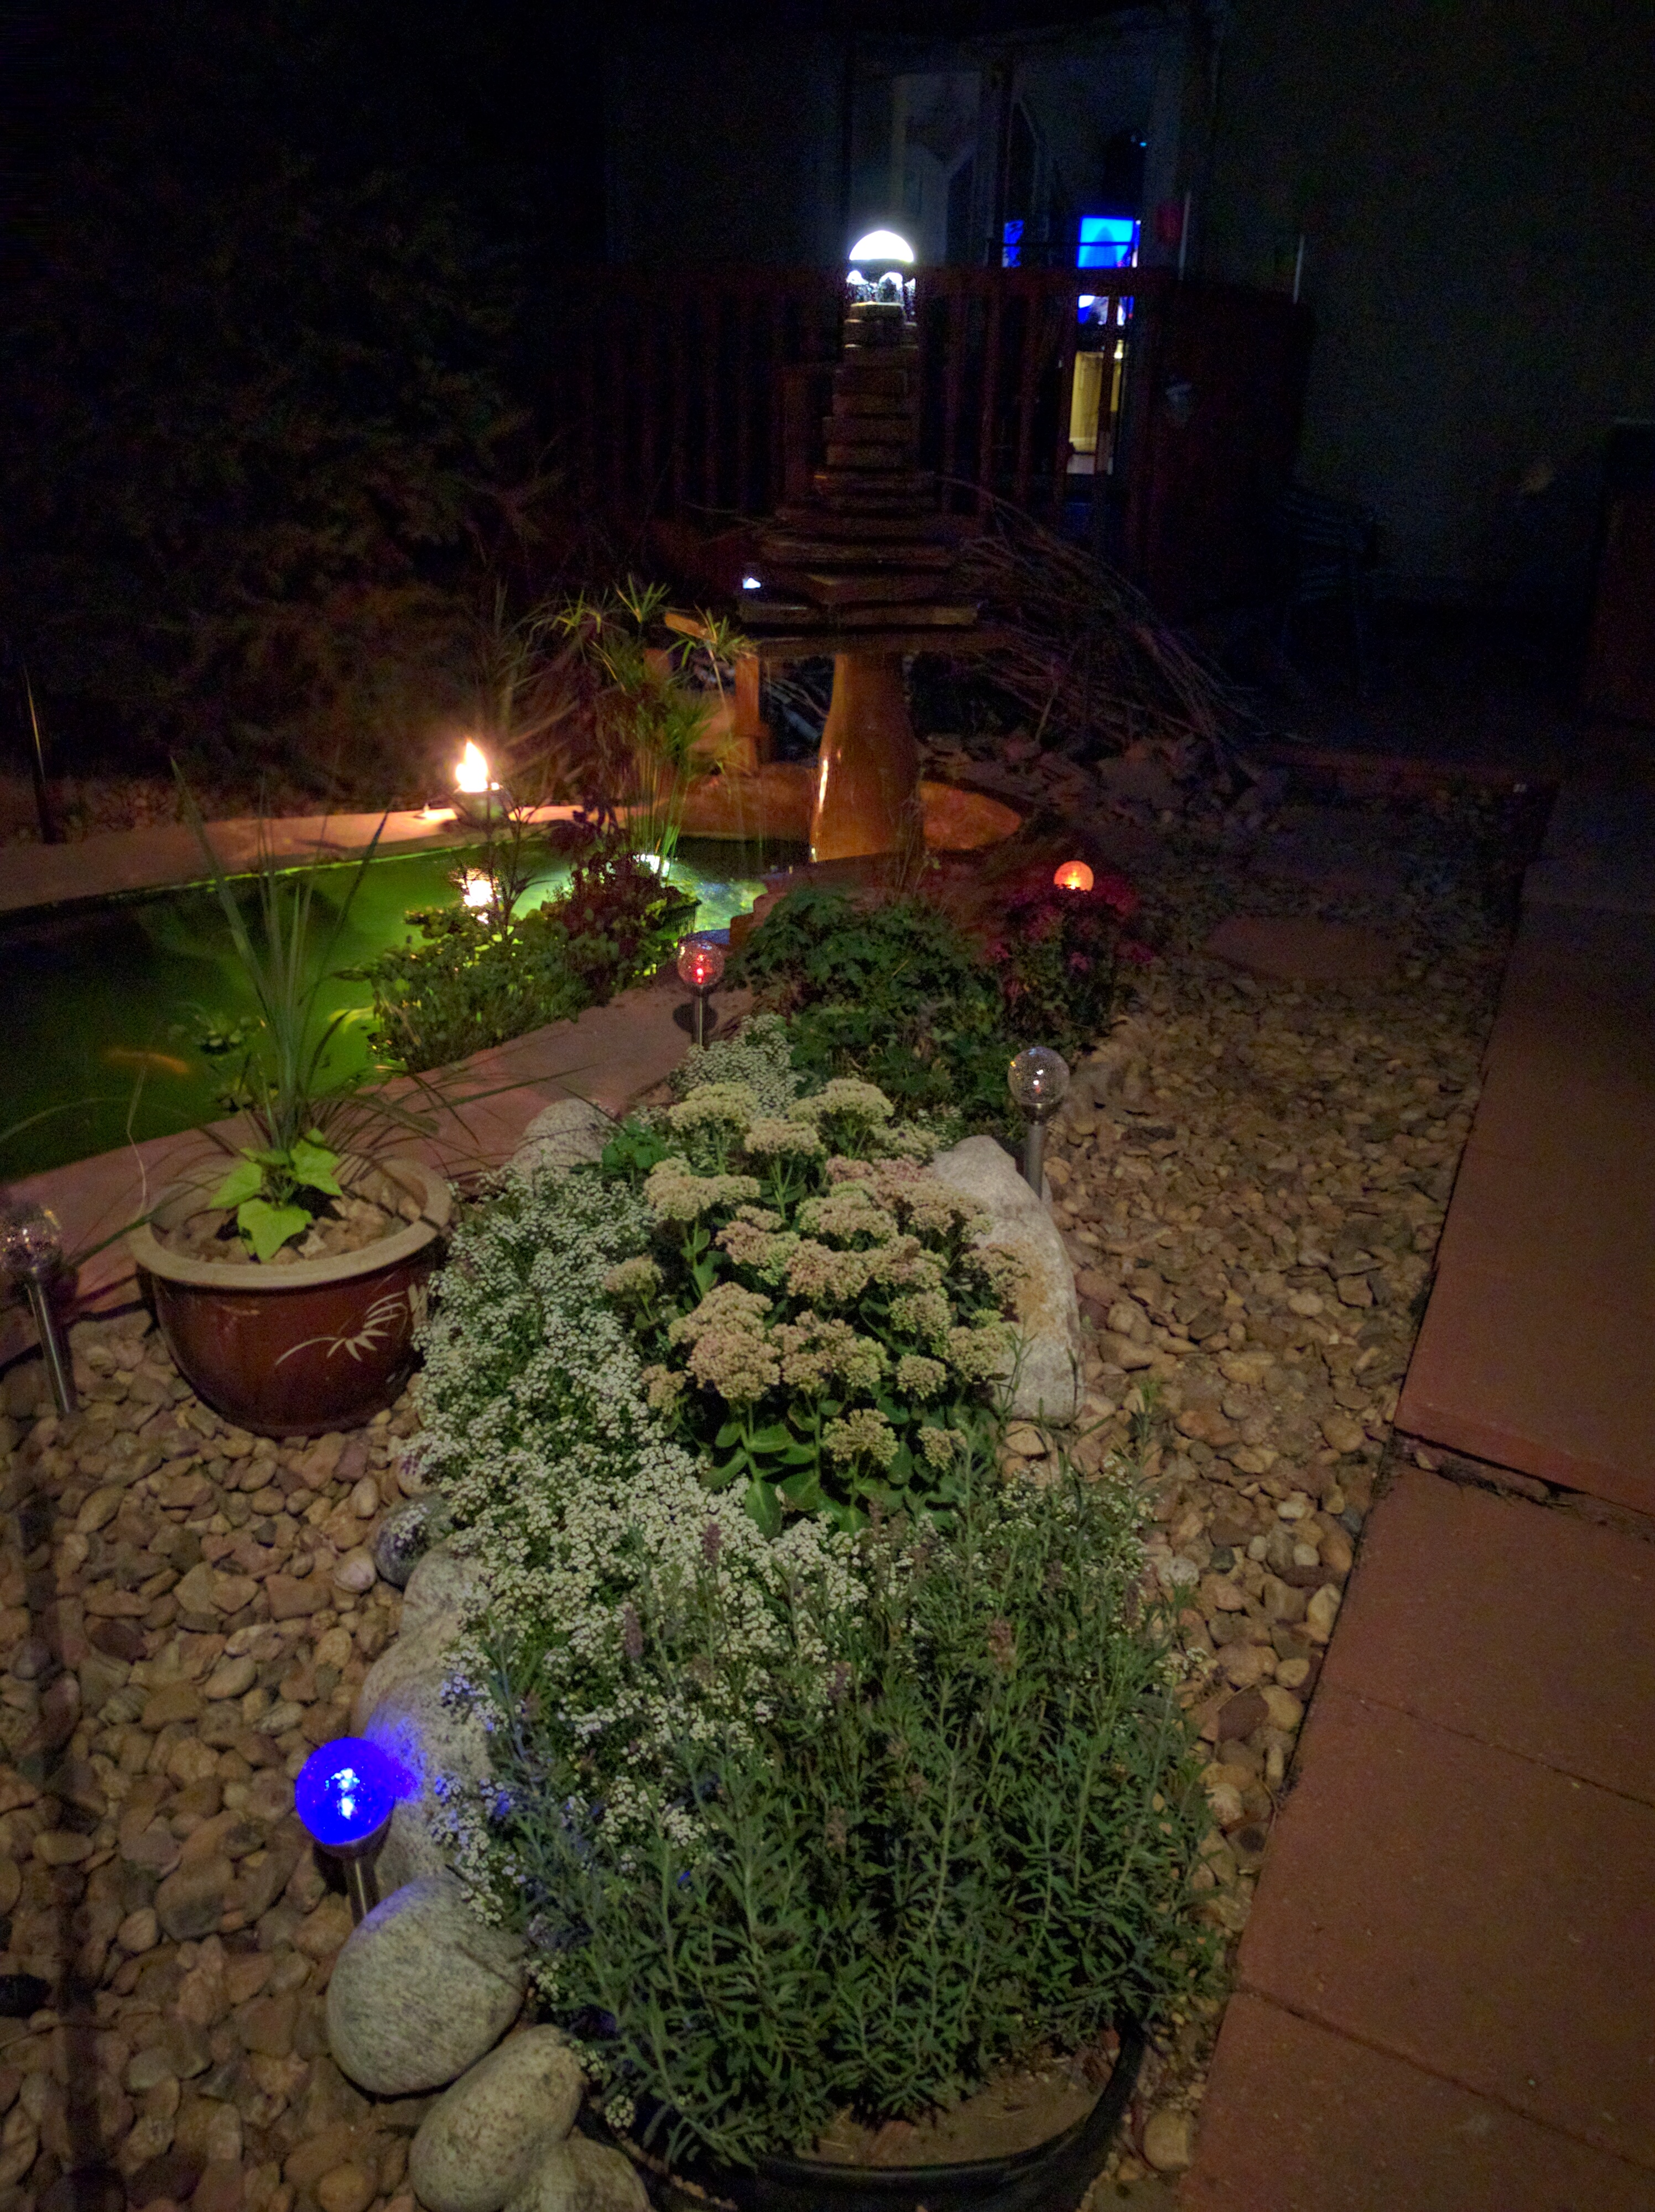
The LED lighting, particularly the fountain top, looks really cool. The top light fixture is a piece I custom made with a polycarbonate camera dome and some other miscellaneous bits and bobs. It creates a shimmering cloud of light around the whole patio area, but is masked from direct view so you’re not blinded standing there looking right at it.
Pond v3: Almost There!
Just a couple pics to show the current state of work. You can get a pretty good idea of how the finished product will soon look. Things still left to do are finishing the fountain, stone details/joints, installing lights and fountain pump, running/burying electric lines into the garage and cleaning up and restoring the landscaping. The little round flowerbed by the filter basin was the only casualty from the work, so it needs re-planted. But it’s well in hand at this point. I think it’s kinda funny how you start into a project like this and after a couple-few days of digging a big hole don’t realize you are only about 5% finished with all the work needing to be done at that point. I’ll make another post later in the season when everything is in full bloom and looking nice.

I’ll get the sump liner sealed up and do a flagstone top around that flowerbed, as well:

Pond v3: Update2
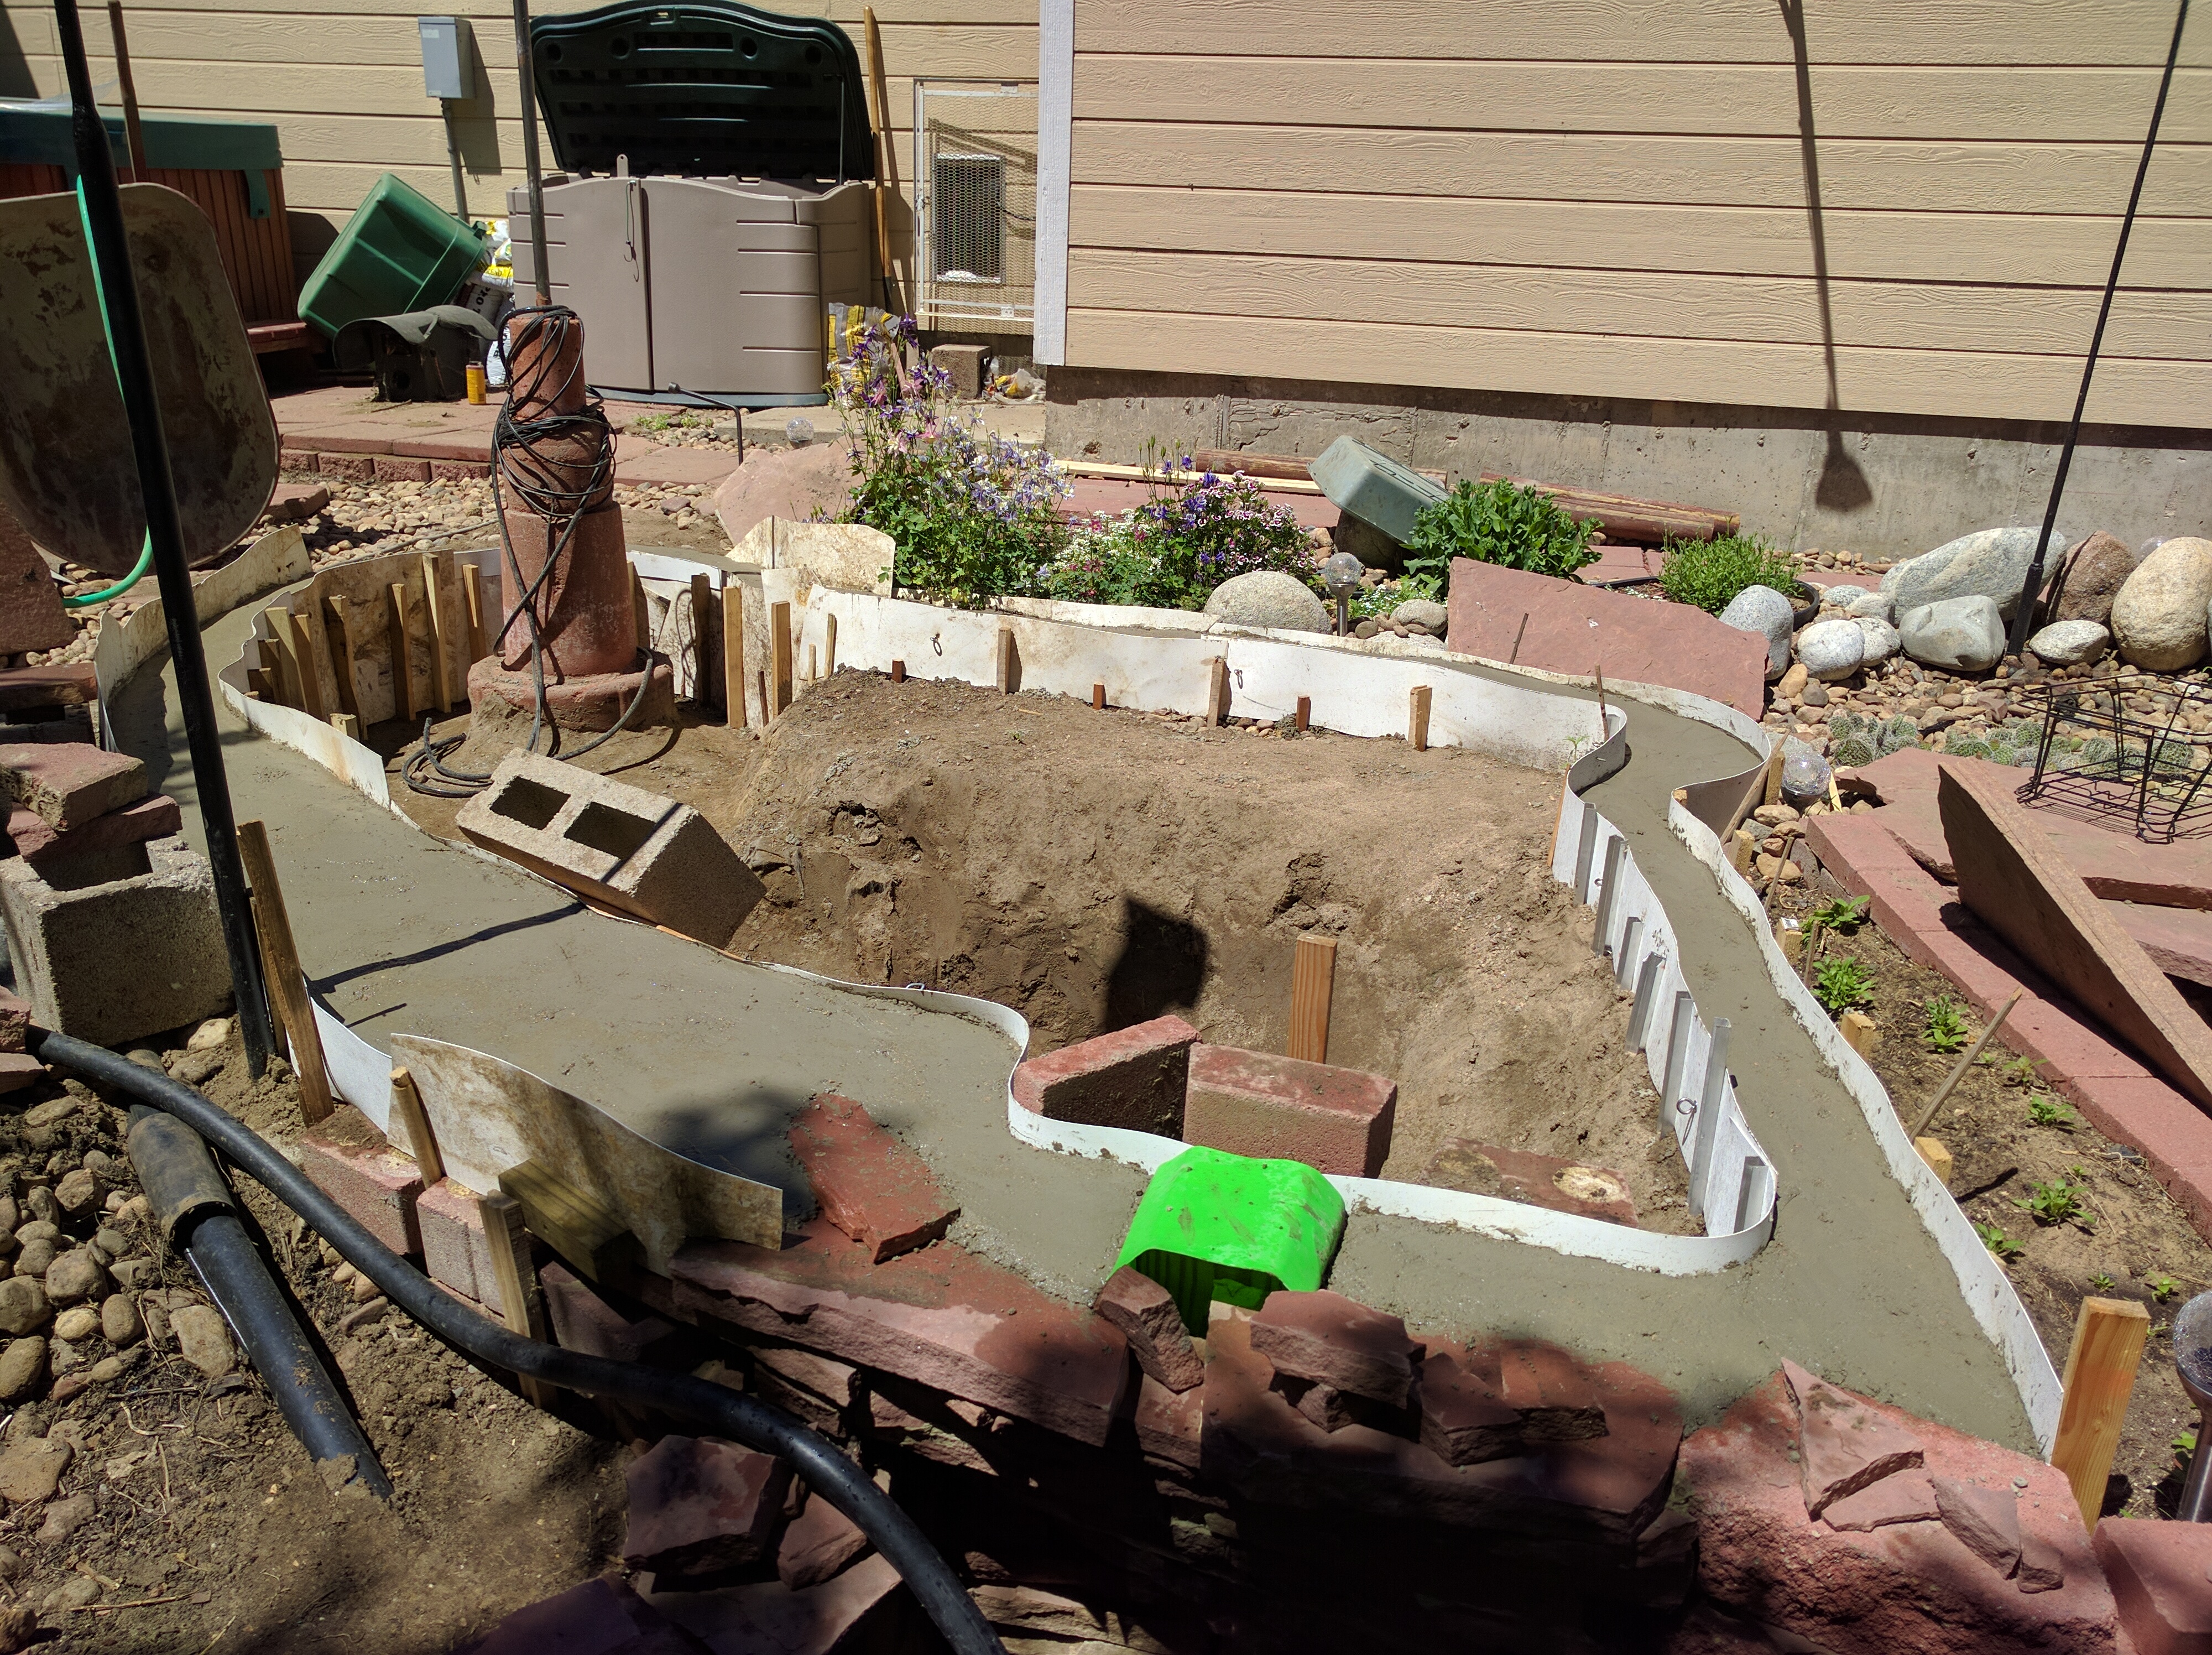
Over the past week I’ve ramped up the work pace to really get this project moving. Concrete was done last Sunday. The top edge is pretty close to level all the way around now. That solves one of the biggest problems I always had with it. I could never get it filled clear up to the top due to leakage around the edge somewhere. It’s built into a gradual downslope, so that always became an issue at 2 or 3 problem spots and caused the water level to be lower than I wanted.
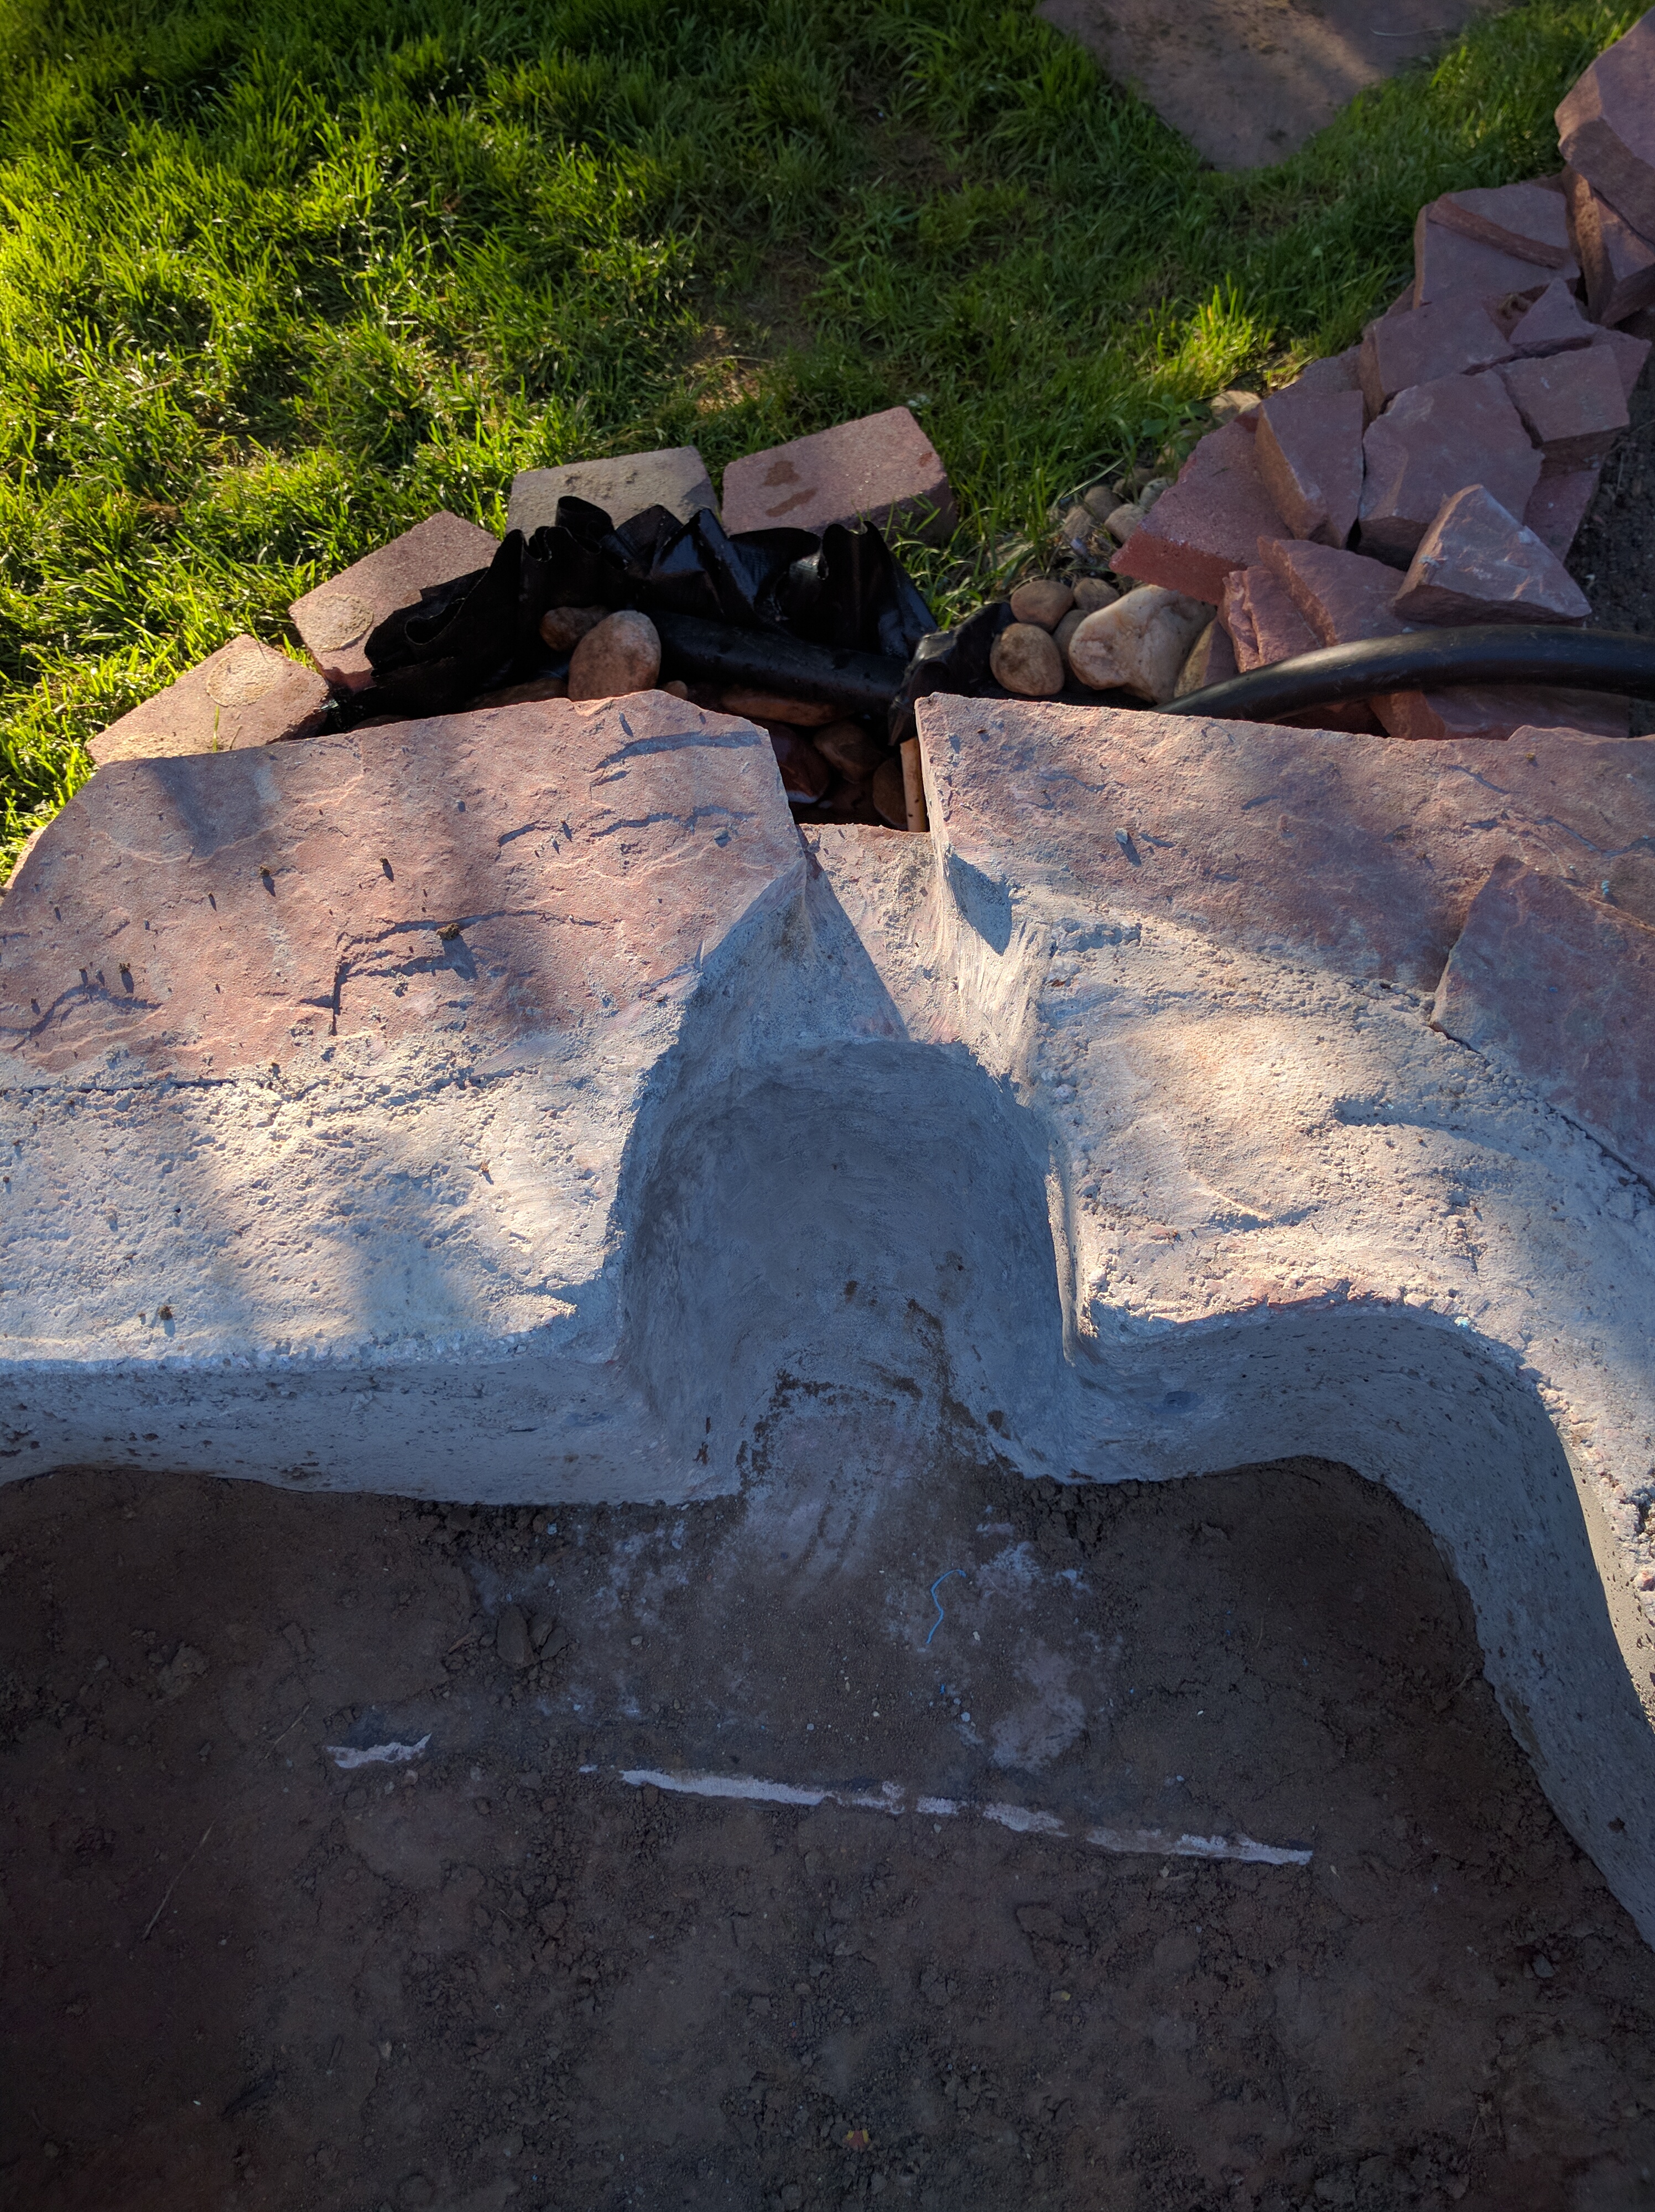
The fountain pedestal was problematic. I’m no professional mason, but finally managed to get it shaped, polished and sealed in an acceptable fashion. You can also see how I did the ingress points for water return and electric in the next 2 pics:

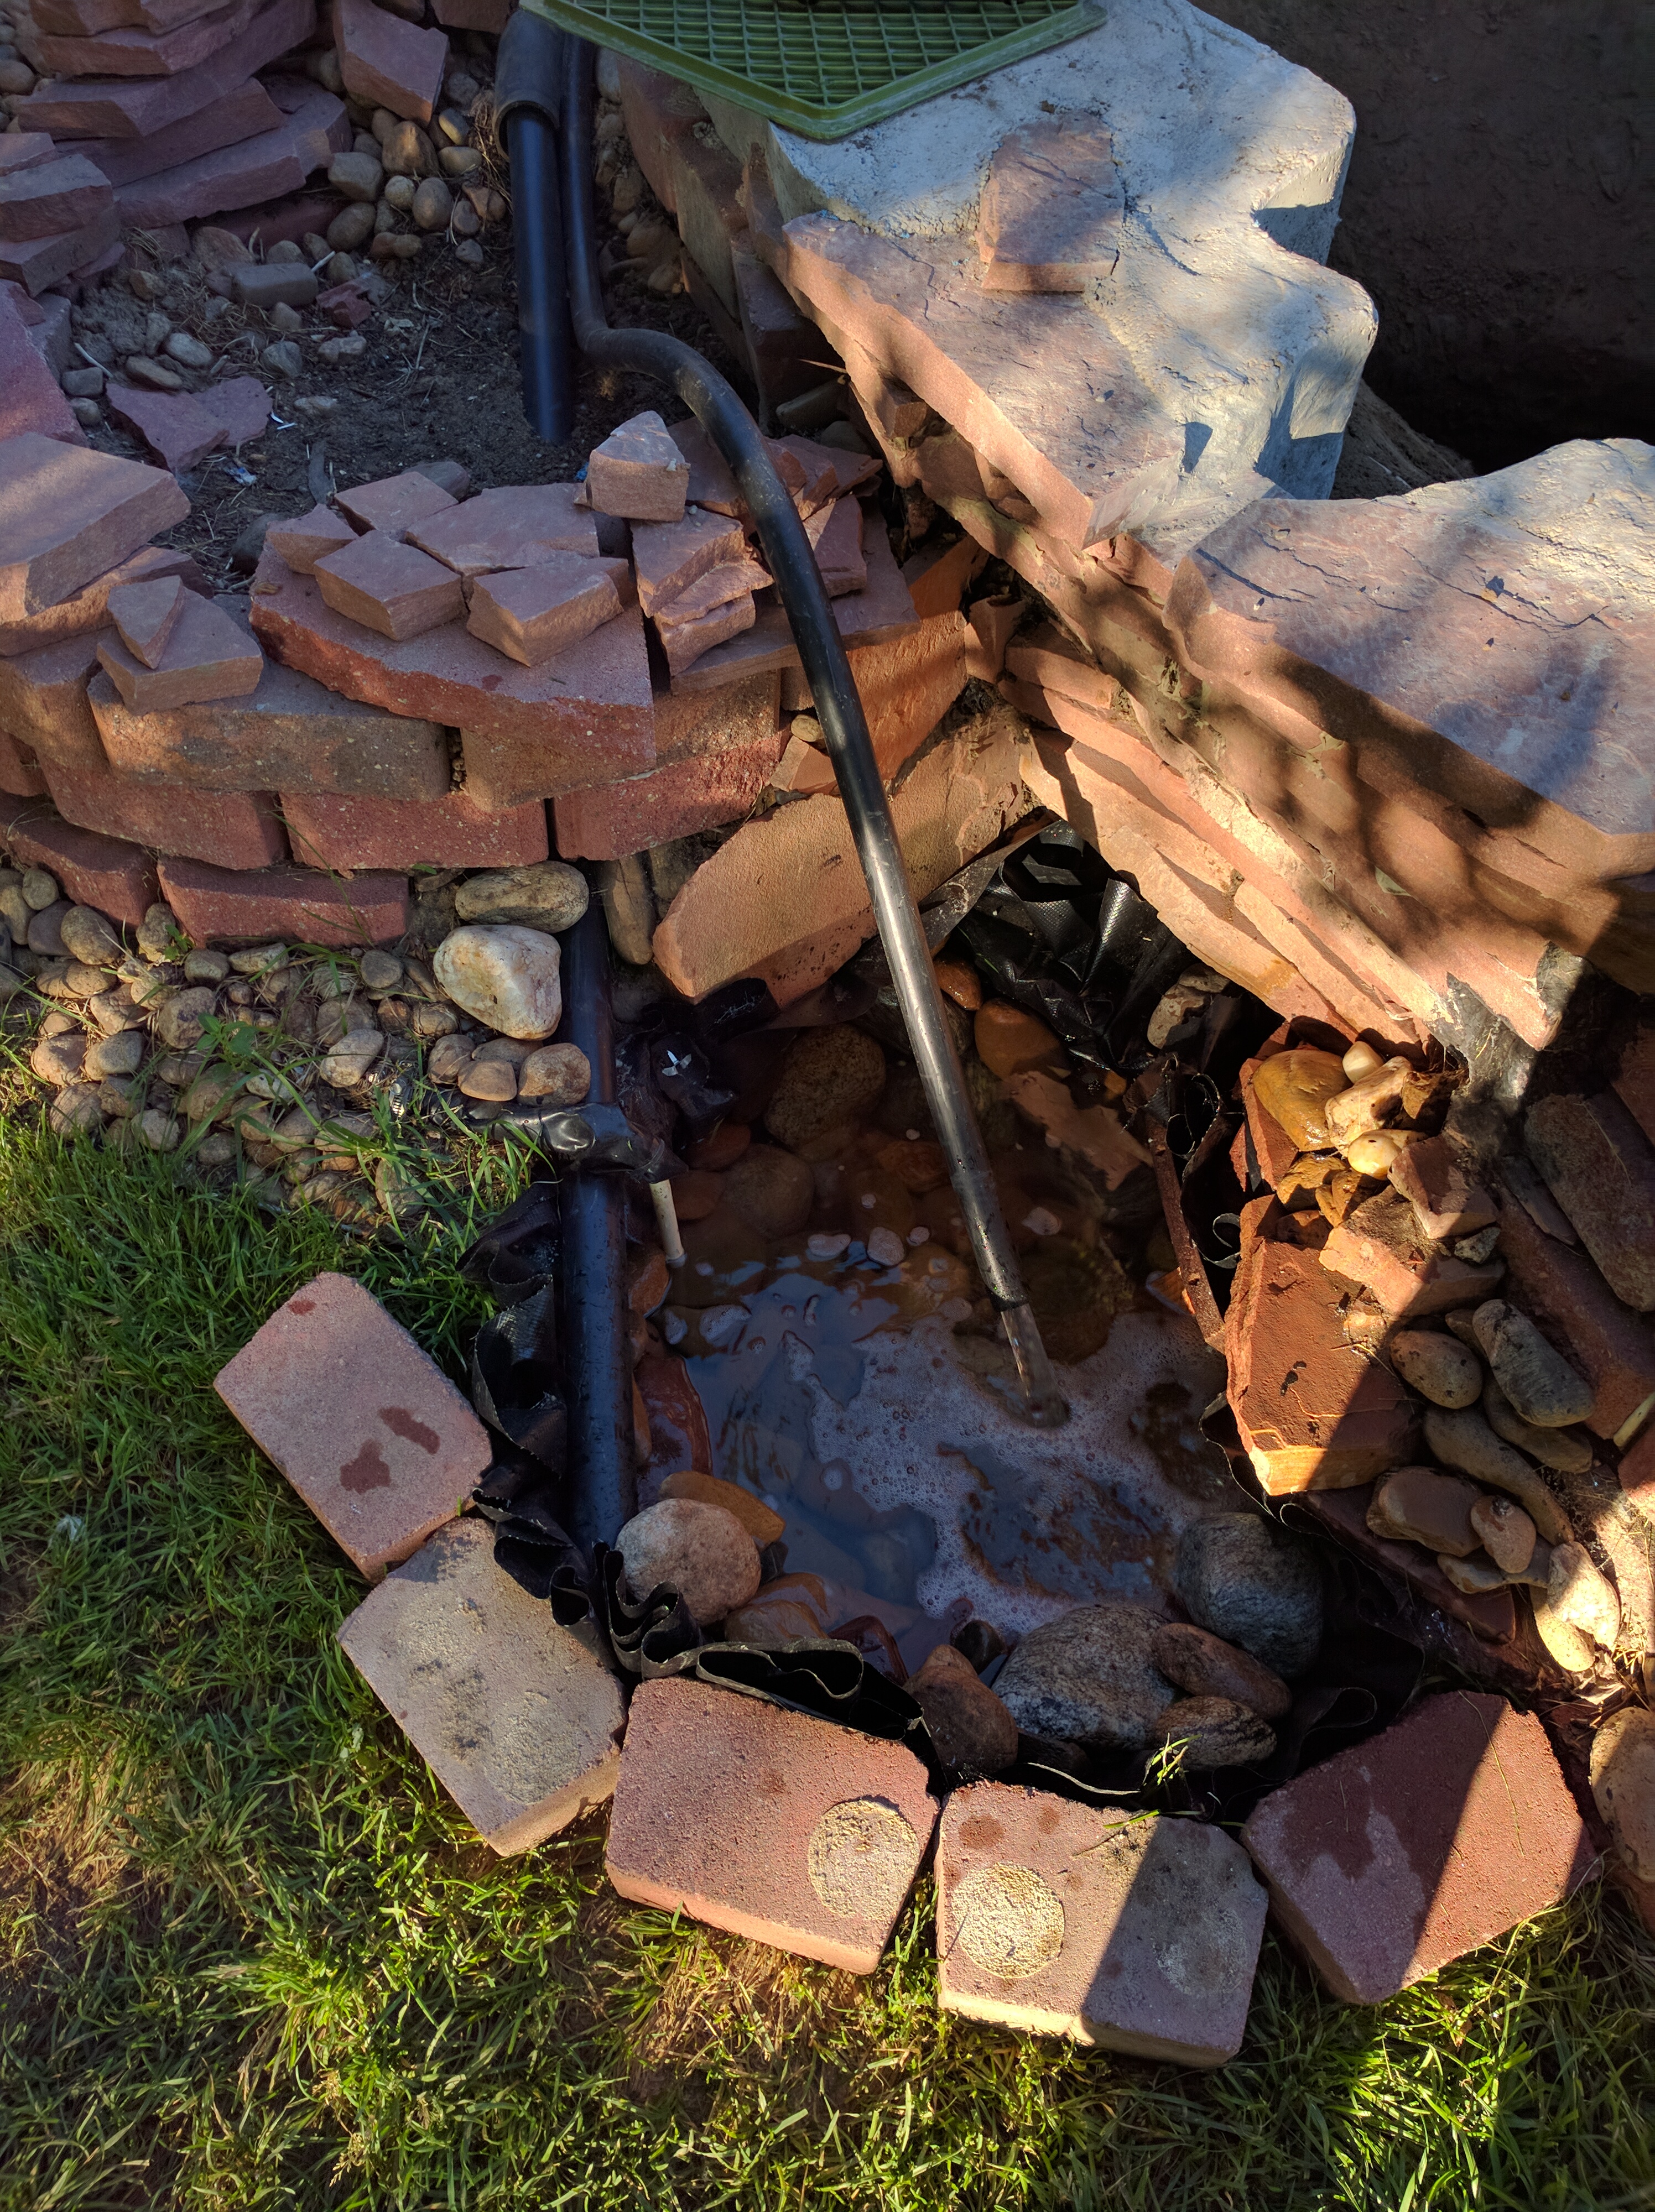
There are a total of 12 ingress points through the liner. I still need to fabricate a backing grommet for the fountain bottom. The little ones (shown below) are made from PVC dowels to accept stainless screws and screw-eyes. They will be used to fasten floating plants, lights and to control lettuce and duckweed or whatever else ends up in there:
Here’s another pic showing a better view of the water return line:

I’ve had the sump/filter running in test mode for the past couple of weeks, and it seems to be operating as expected. The filter is made up of 63 wiffle balls covered with 2 bags of polyfill. This is actually a low-budget project, believe it or not. The biggest expense so far was about $100 worth of Quickrete. I got the poly drum for $10 from my methanol supplier. I think I’ll use 3 bags of poylfill next time, but it seems adequate with 2 for now. Bird netting separates the polyfill from the top layer of rocks. The landscape blocks around the sump edge are just holding up the liner for now, and I’ll get that properly finished at some point.
Where the water falls out to the sump here will be covered after the top is finished with flagstone all around:
Depth in the middle ends up being about 4 feet. Liner goes in today.
Pond v3: Construction Update
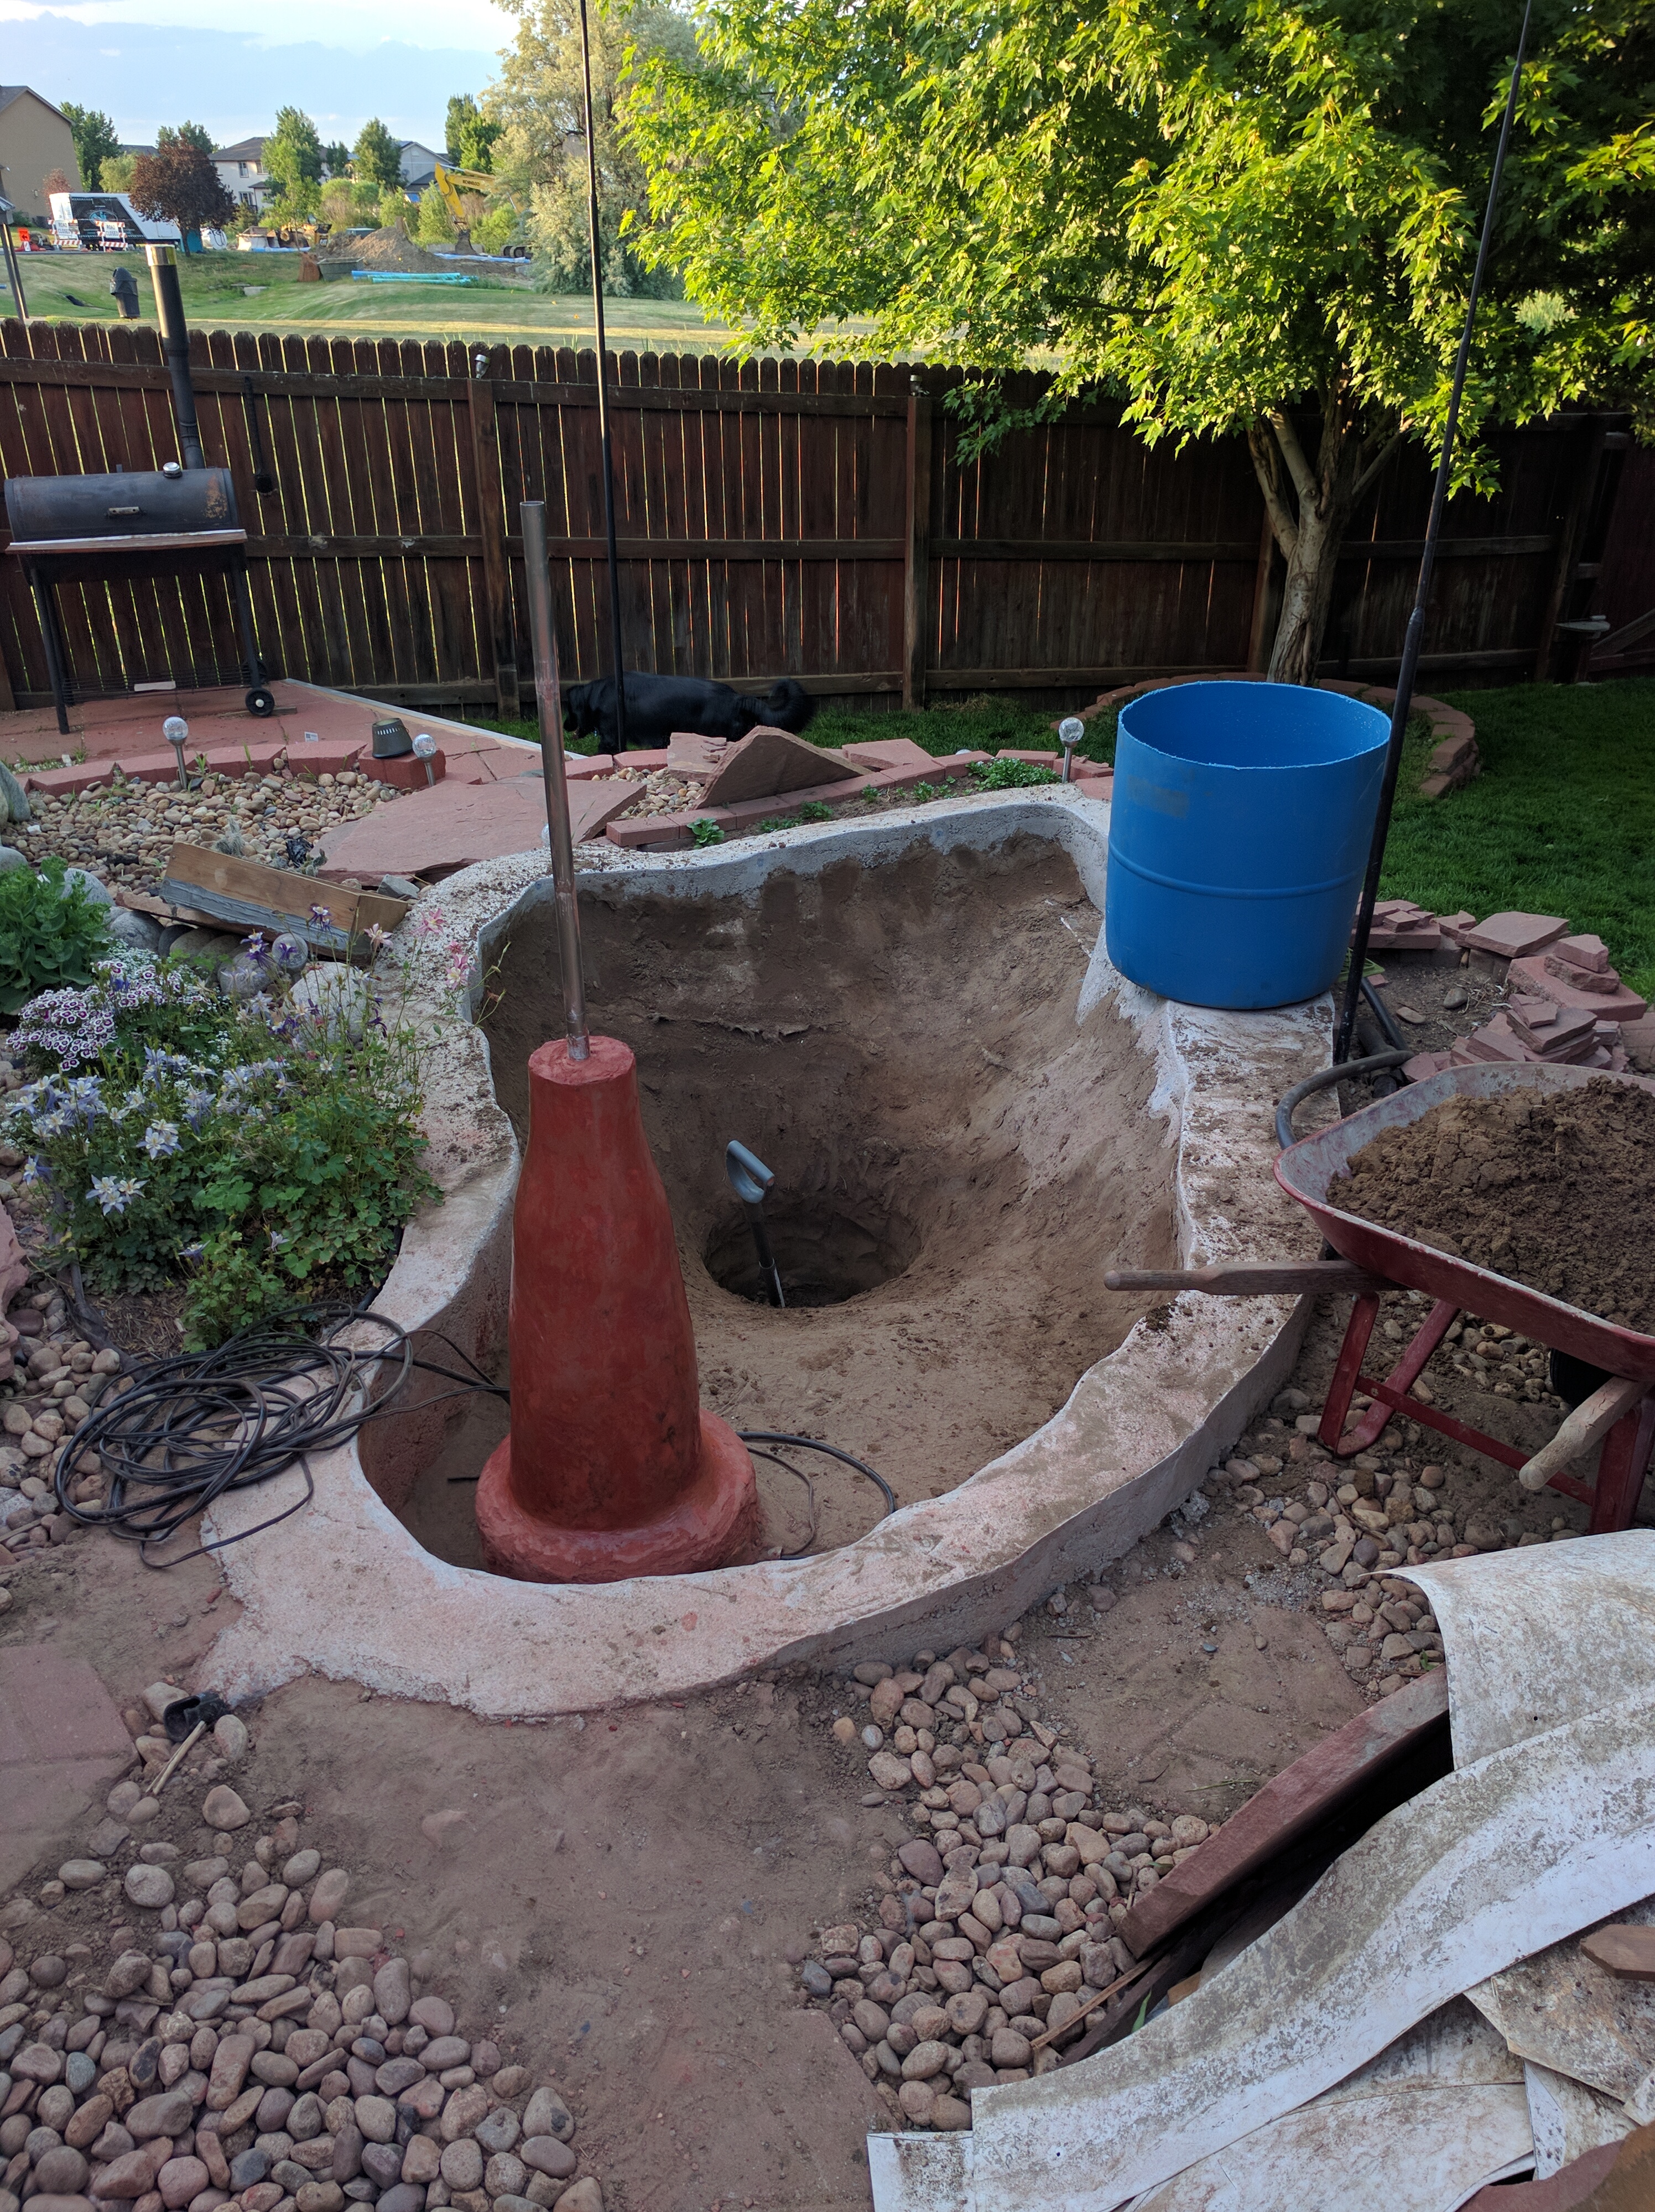
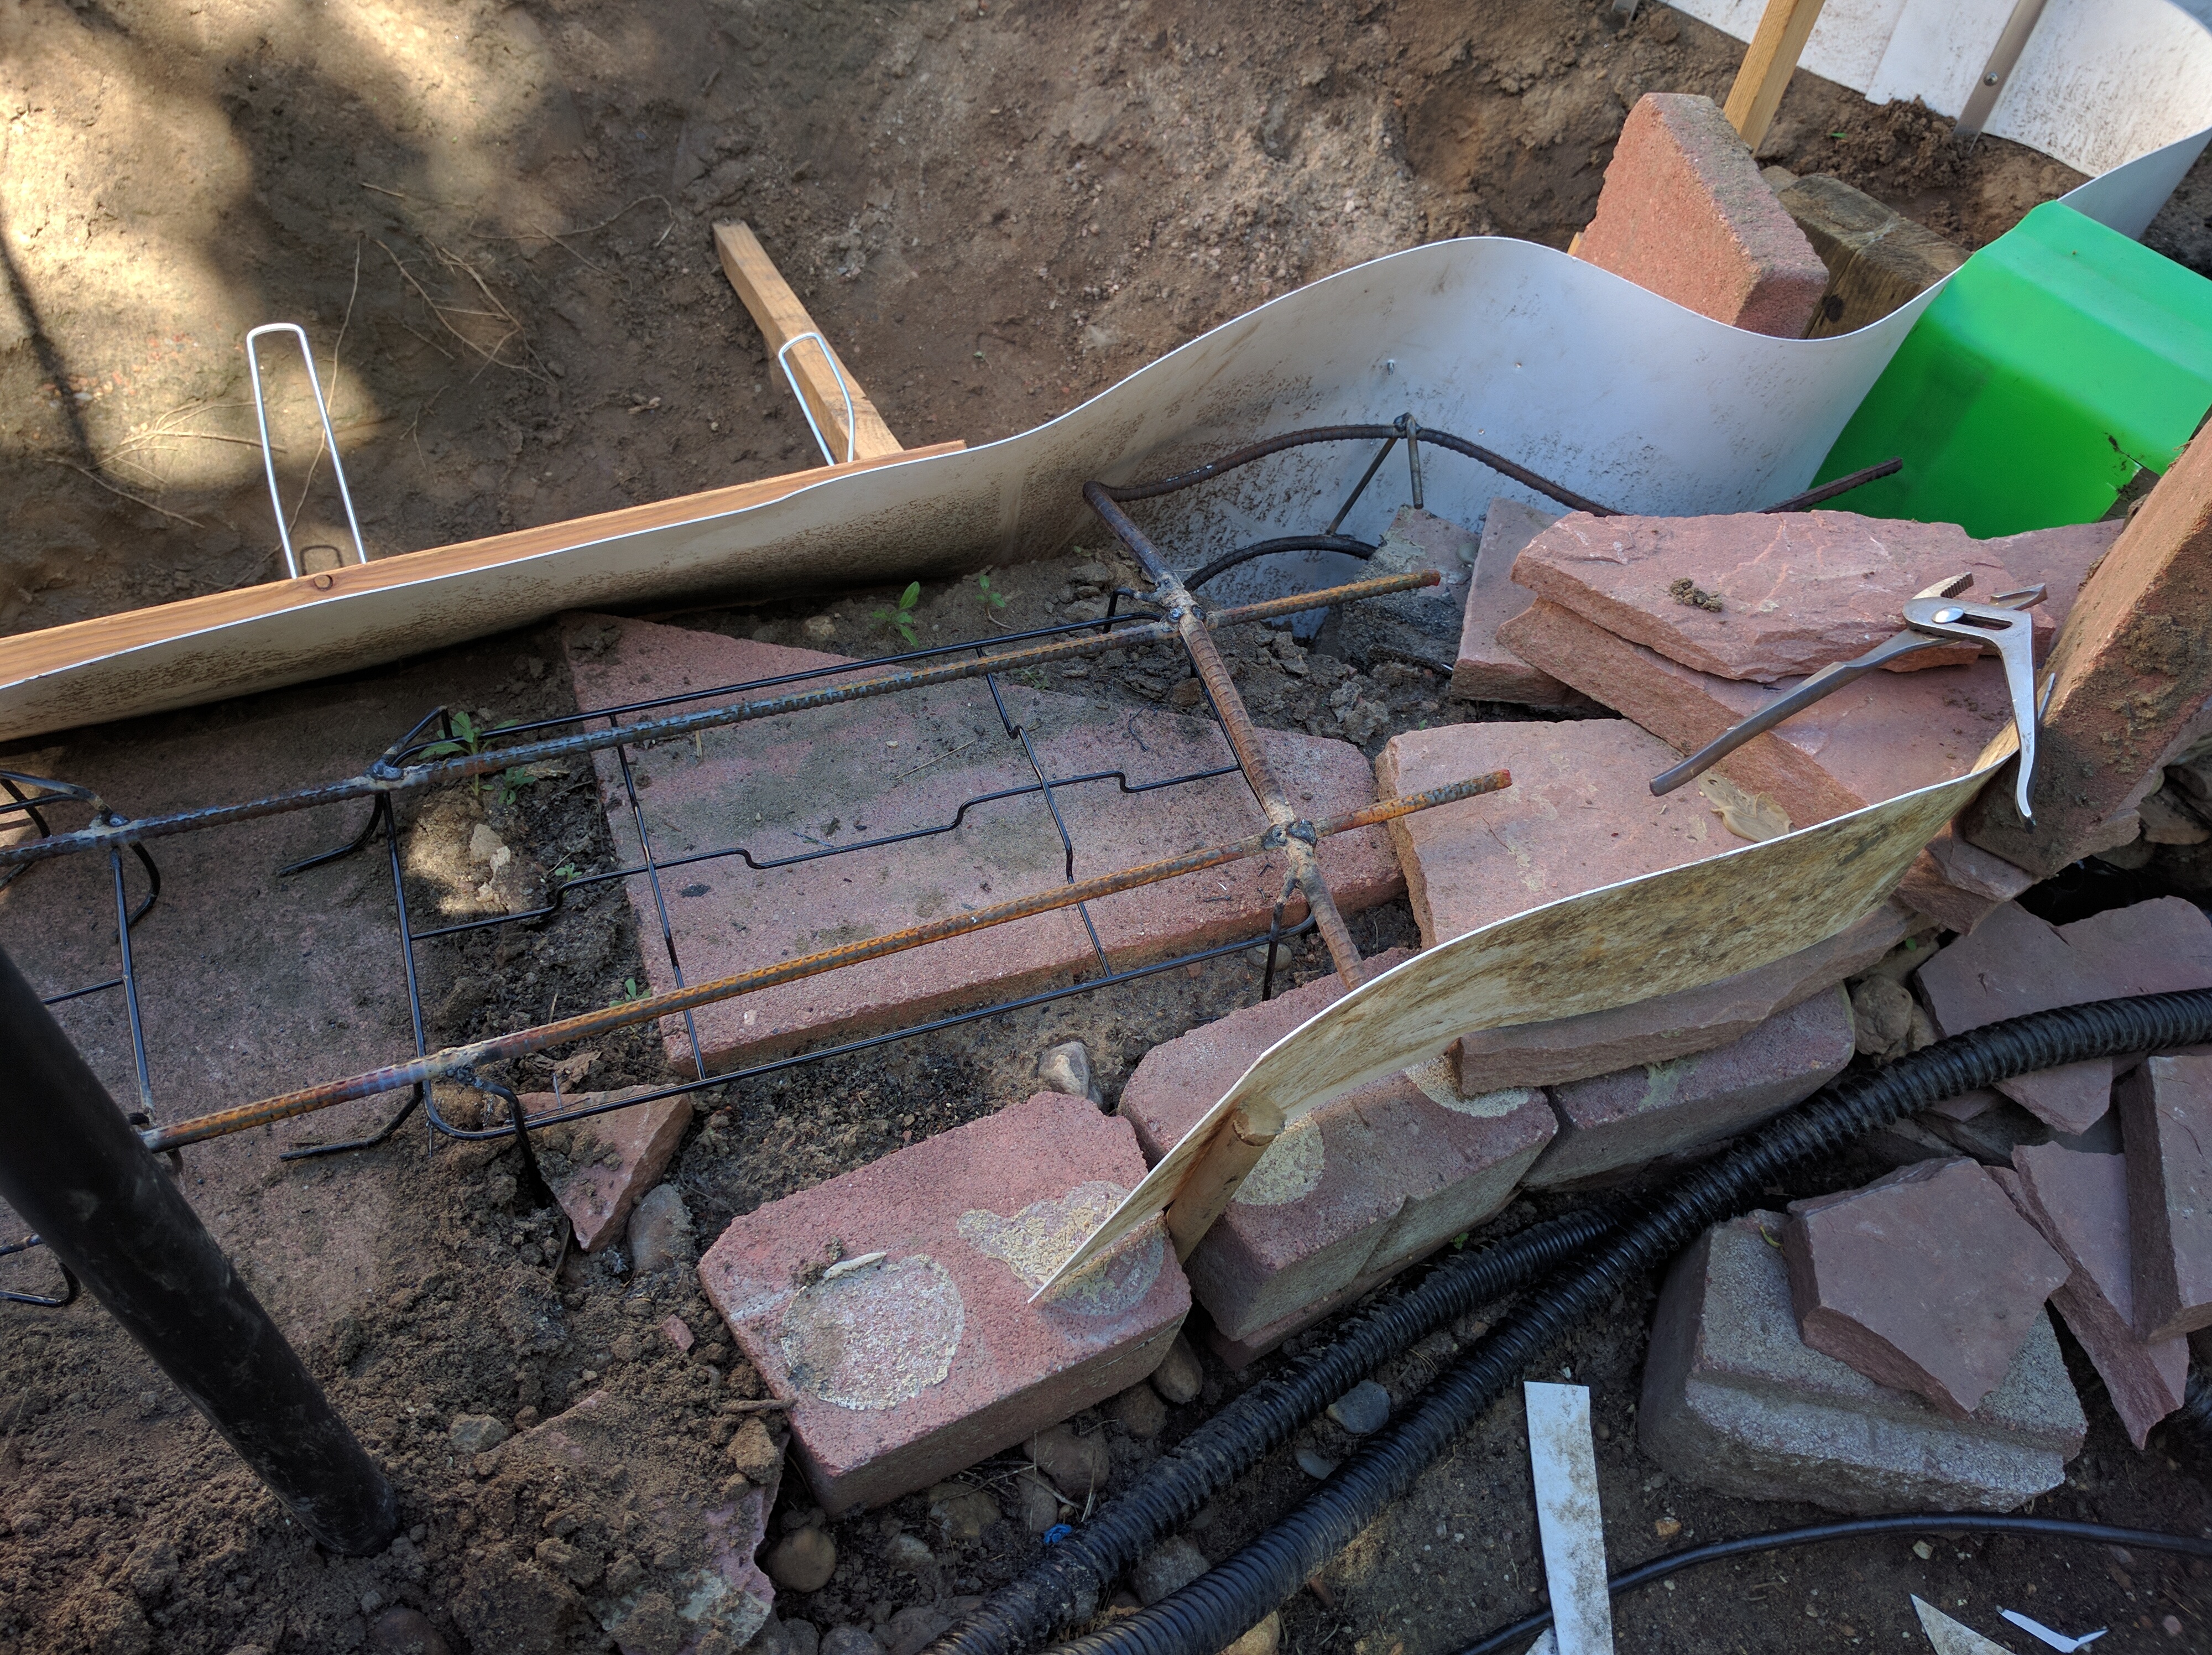
As mentioned in the previous post, the backyard pond turned into a major construction project this year. I expect to pour concrete this weekend, so that biggest and most difficult portion is now almost done. Welding rebar on my hands & knees for 4 hours yesterday afternoon really wore me out! I believe a tentative finishing date should be somewhere within the next couple of weeks. As opposed to the old 5-gallon pail, the new sump is a significant upgrade, now holding probably around 40 gallons. The big blue thing in there is the top 3rd of a 50-gallon poly-drum. It’s 16 inches below the water line, forming the lower pump compartment, with an access panel. Proper filter media goes on top of the pump compartment, covered with landscape rock forming a small pool under the outlet:
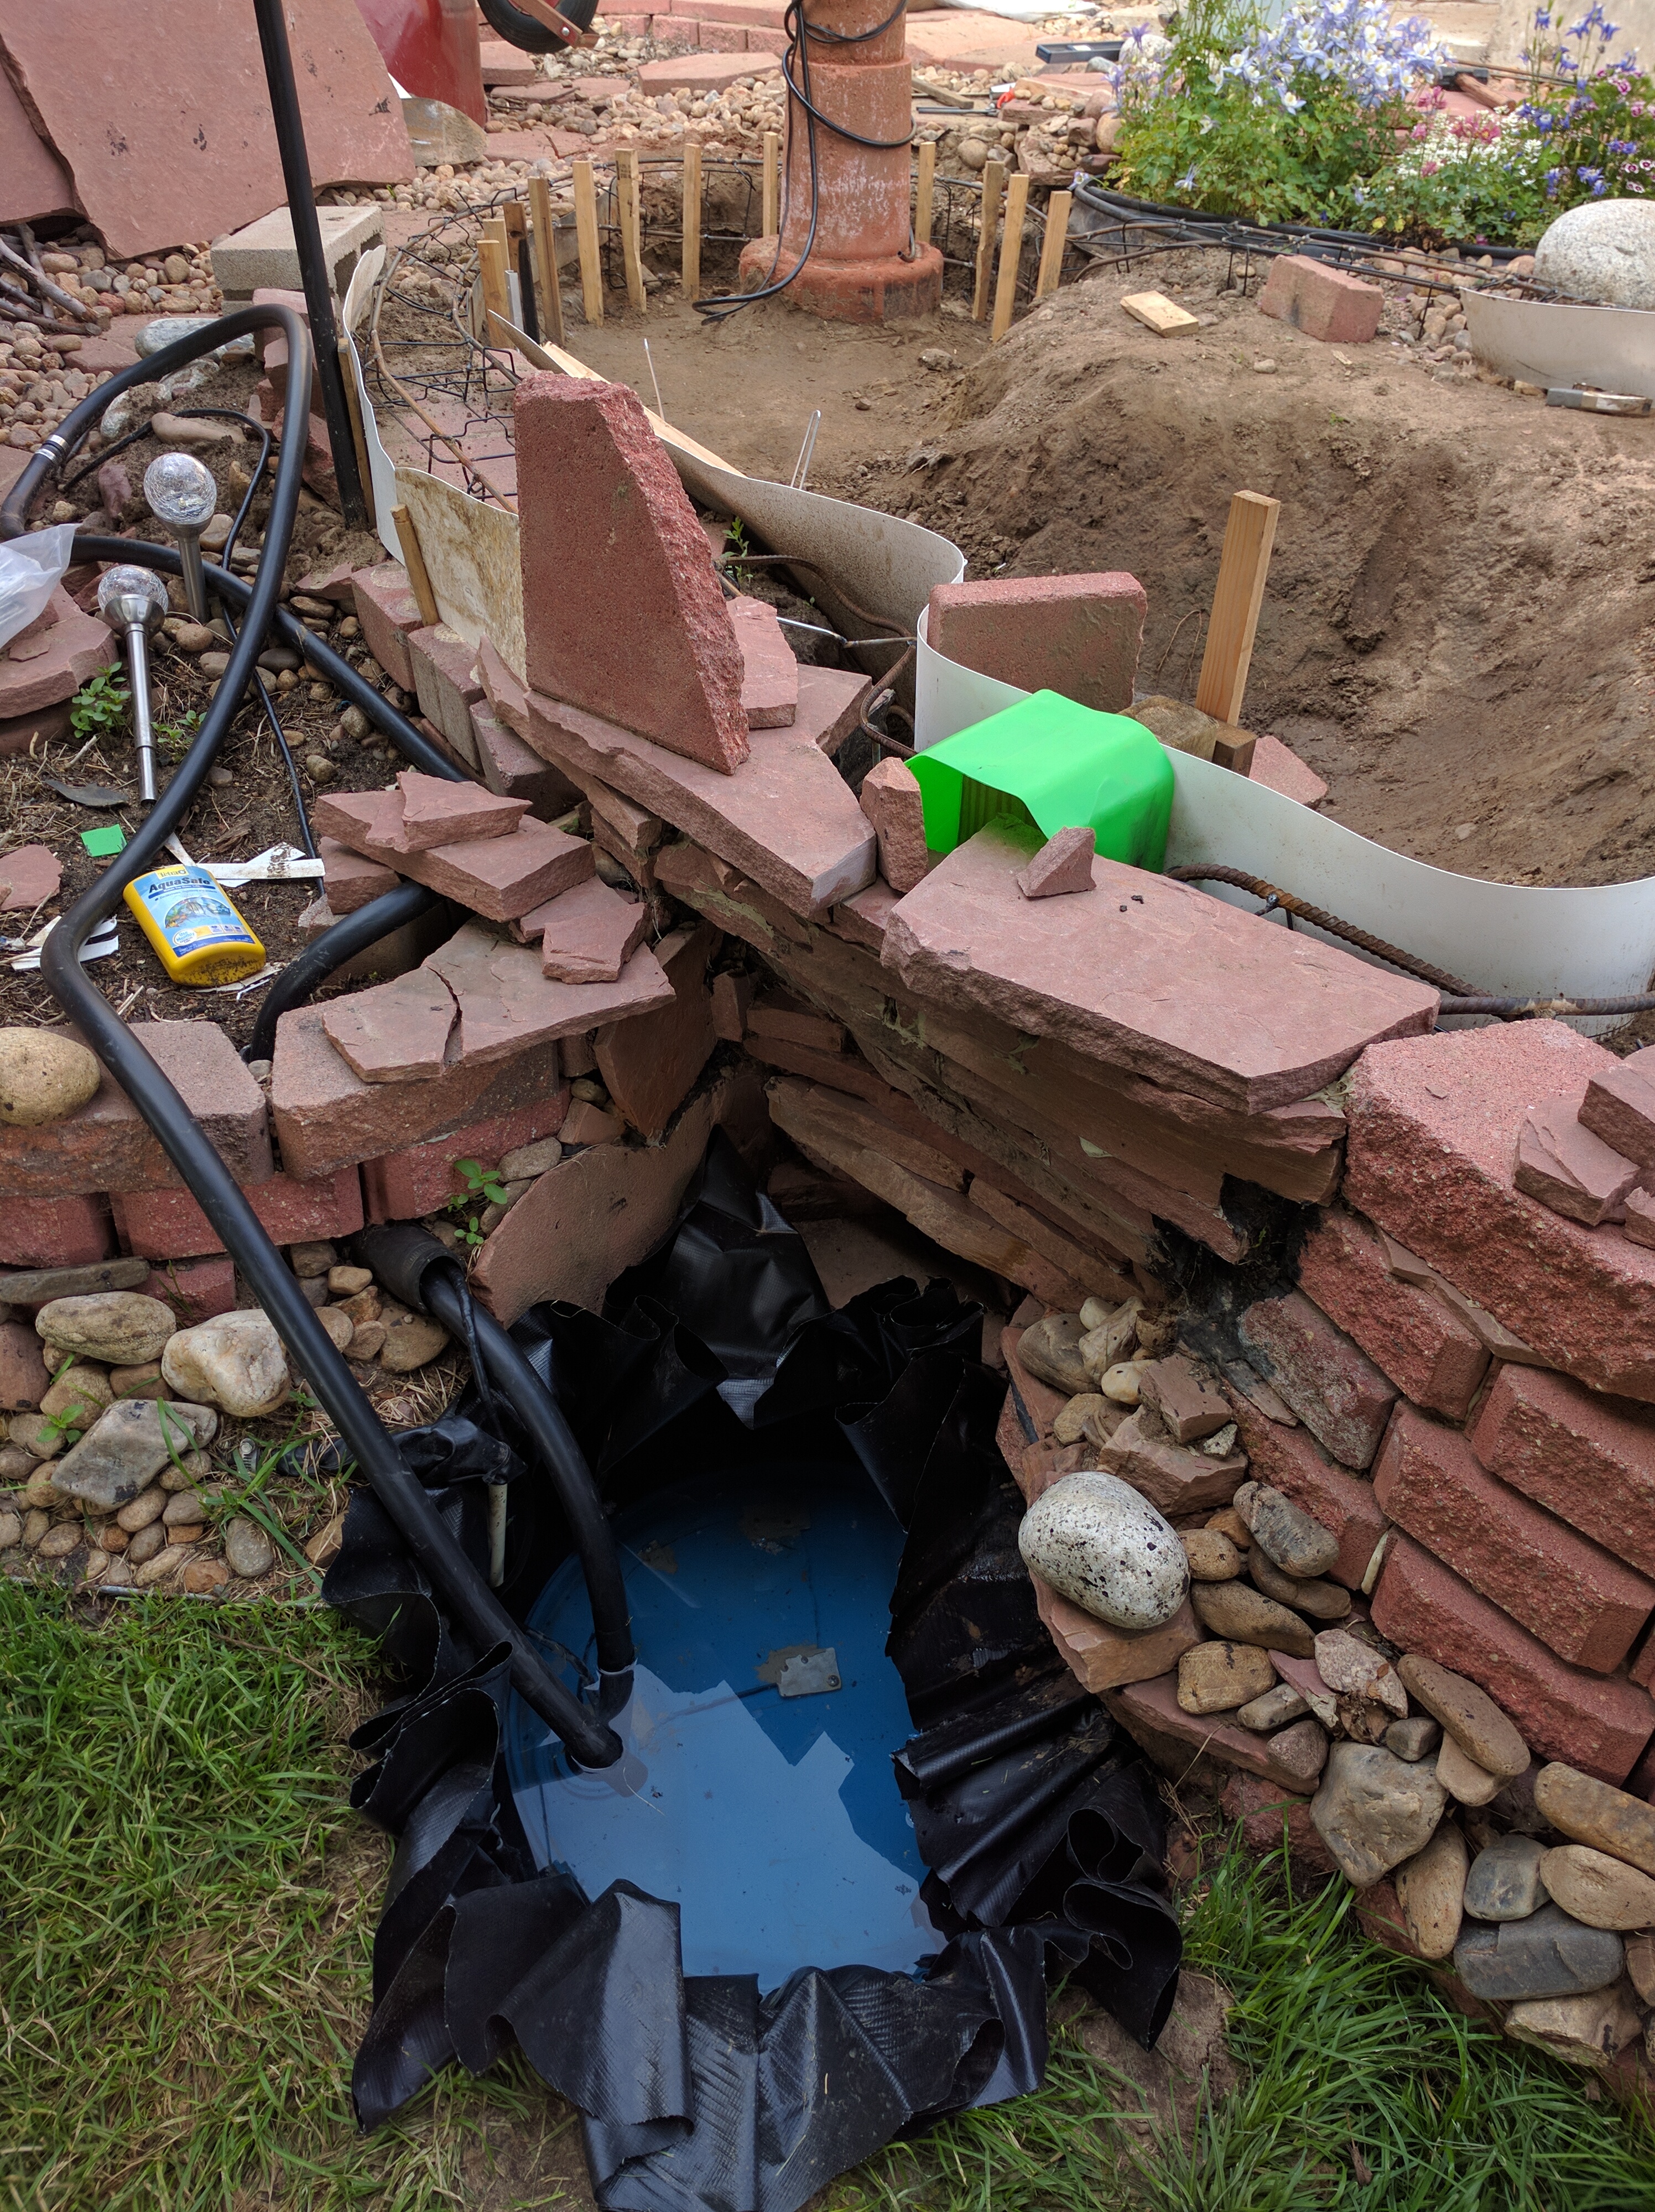
Water level will come up at least a full 6 inches, with alot of digging still left to do. The other 2/3 of the blue poly barrel will form the bottom of the pond itself, making it around 4 feet deep in the middle. I’d estimate total capacity to end up being in the 500 gallon range.
A concrete slab all the way around the edge will make it easy to seal. I got the largest liner Home Depot had – hope it’s big enough. We’ll be using red flagstone around the edges for finishing once again, and also to form a tall pyramid on top of the fountain pedestal. The pedestal will be finished with a polished surface color matching the flagstone. It should end up standing about eye-level at the top with LED lights under a small clear poly-carbonate dome where the water comes out. Two underwater LED’s will illuminate around the bottom.
The fountain is an interesting bit to me, from a design standpoint. It was the part that started the whole project after I decided the old store-bought item was not exactly what I wanted. This one is fairly solid, with 3-inch steel pipe support roots welded into a re-bar base going out 3 feet at a 45-degree angle. Standing back looking at it after that little concrete experiment inspired me to just tear it all apart a re-do the whole thing.

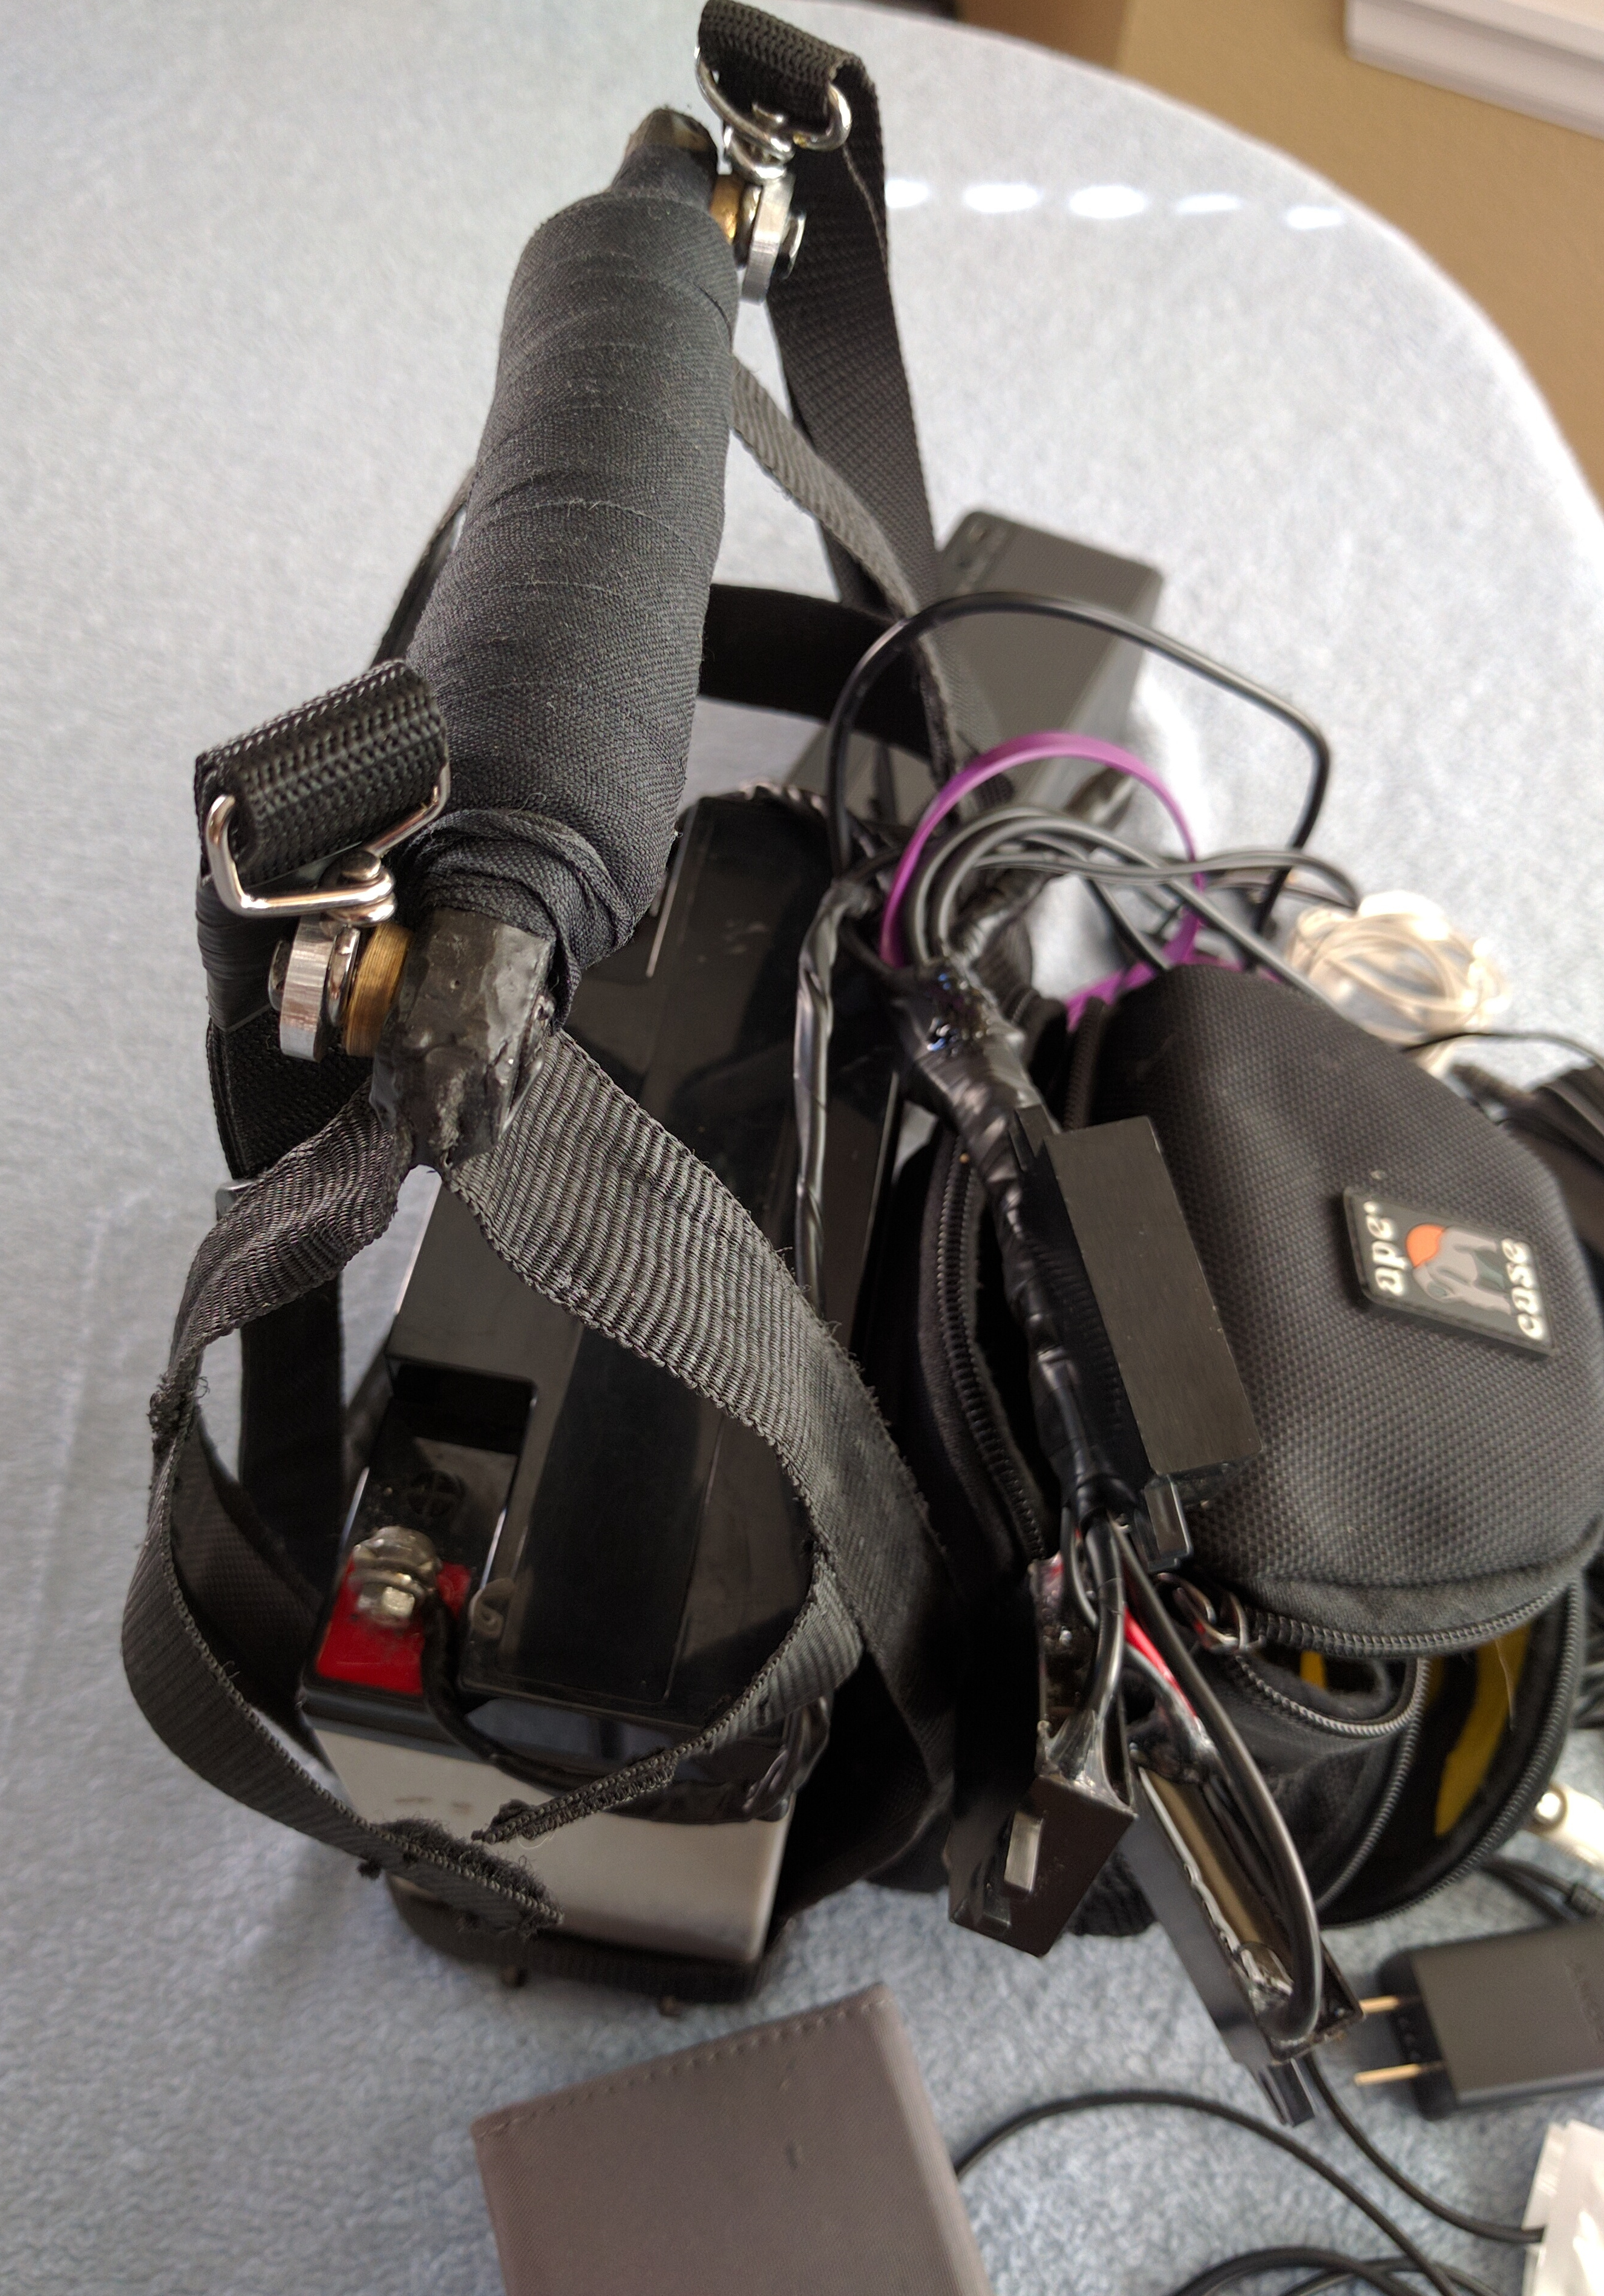
WEMMS Enters OTE
Yesterday, the WEMMS (W)ay (E)xtreme (M)obile (M)usic system achieved initial operational capability. It came in fully loaded at 18.2 pounds:
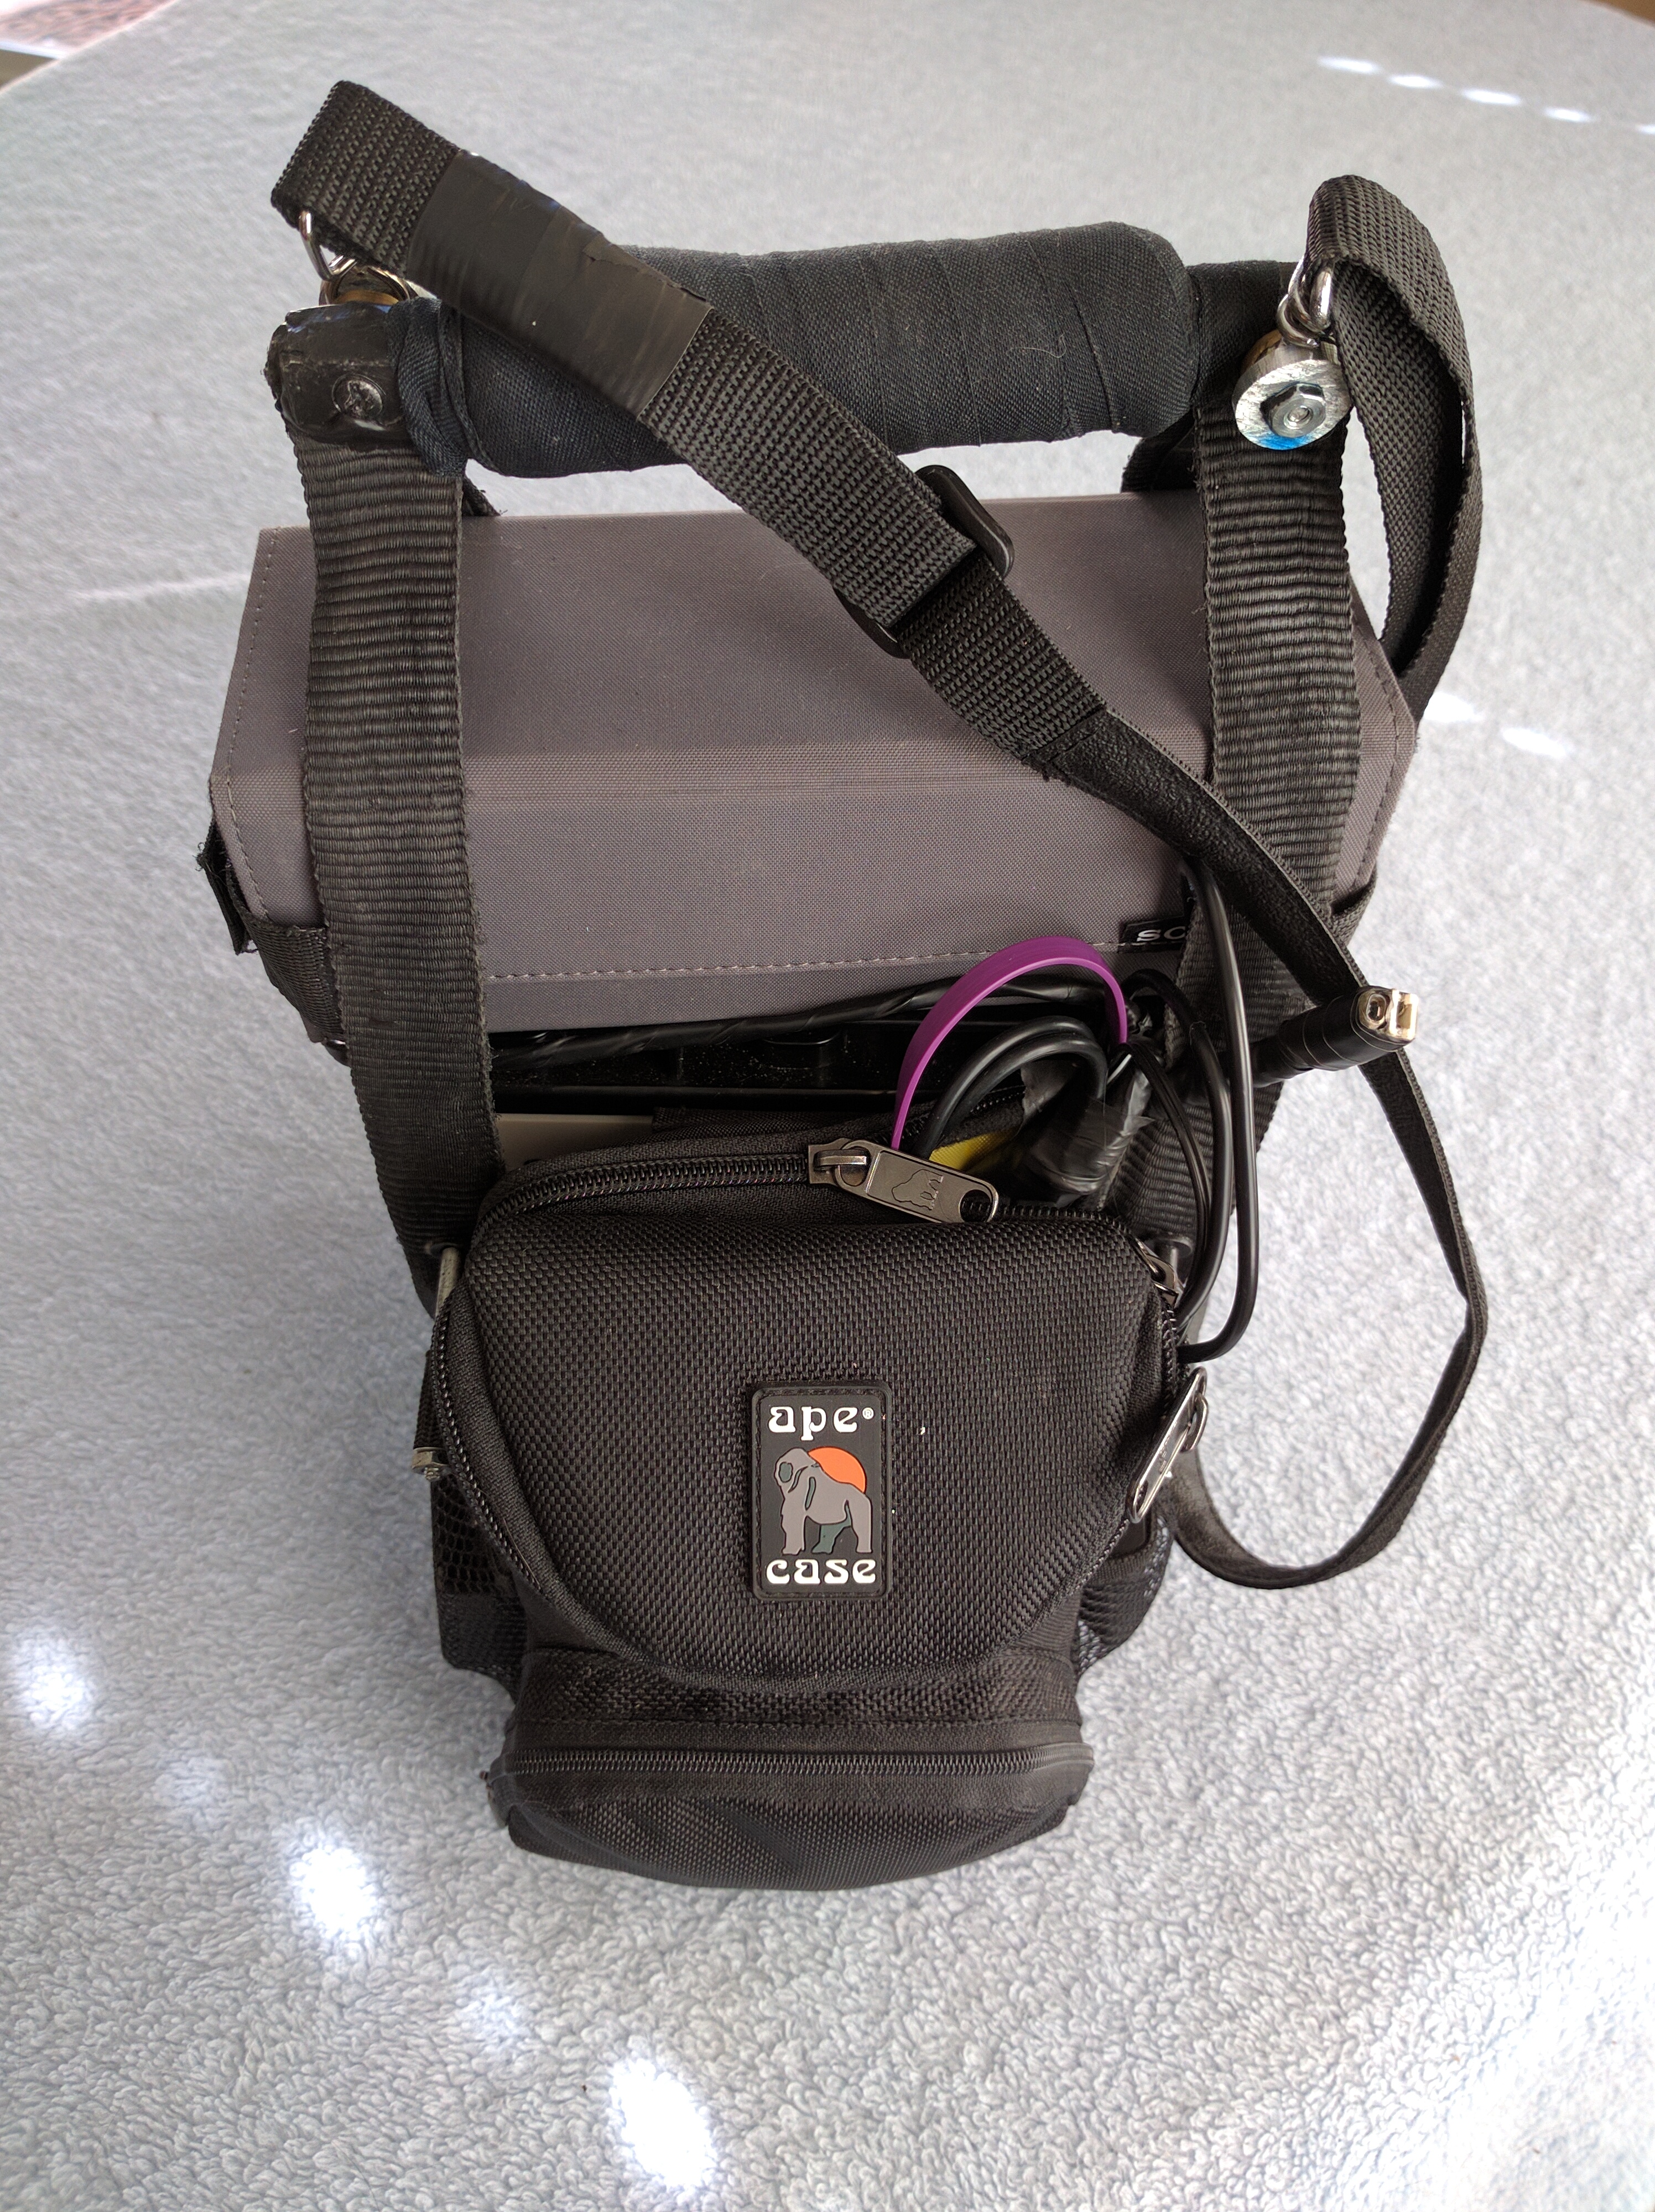
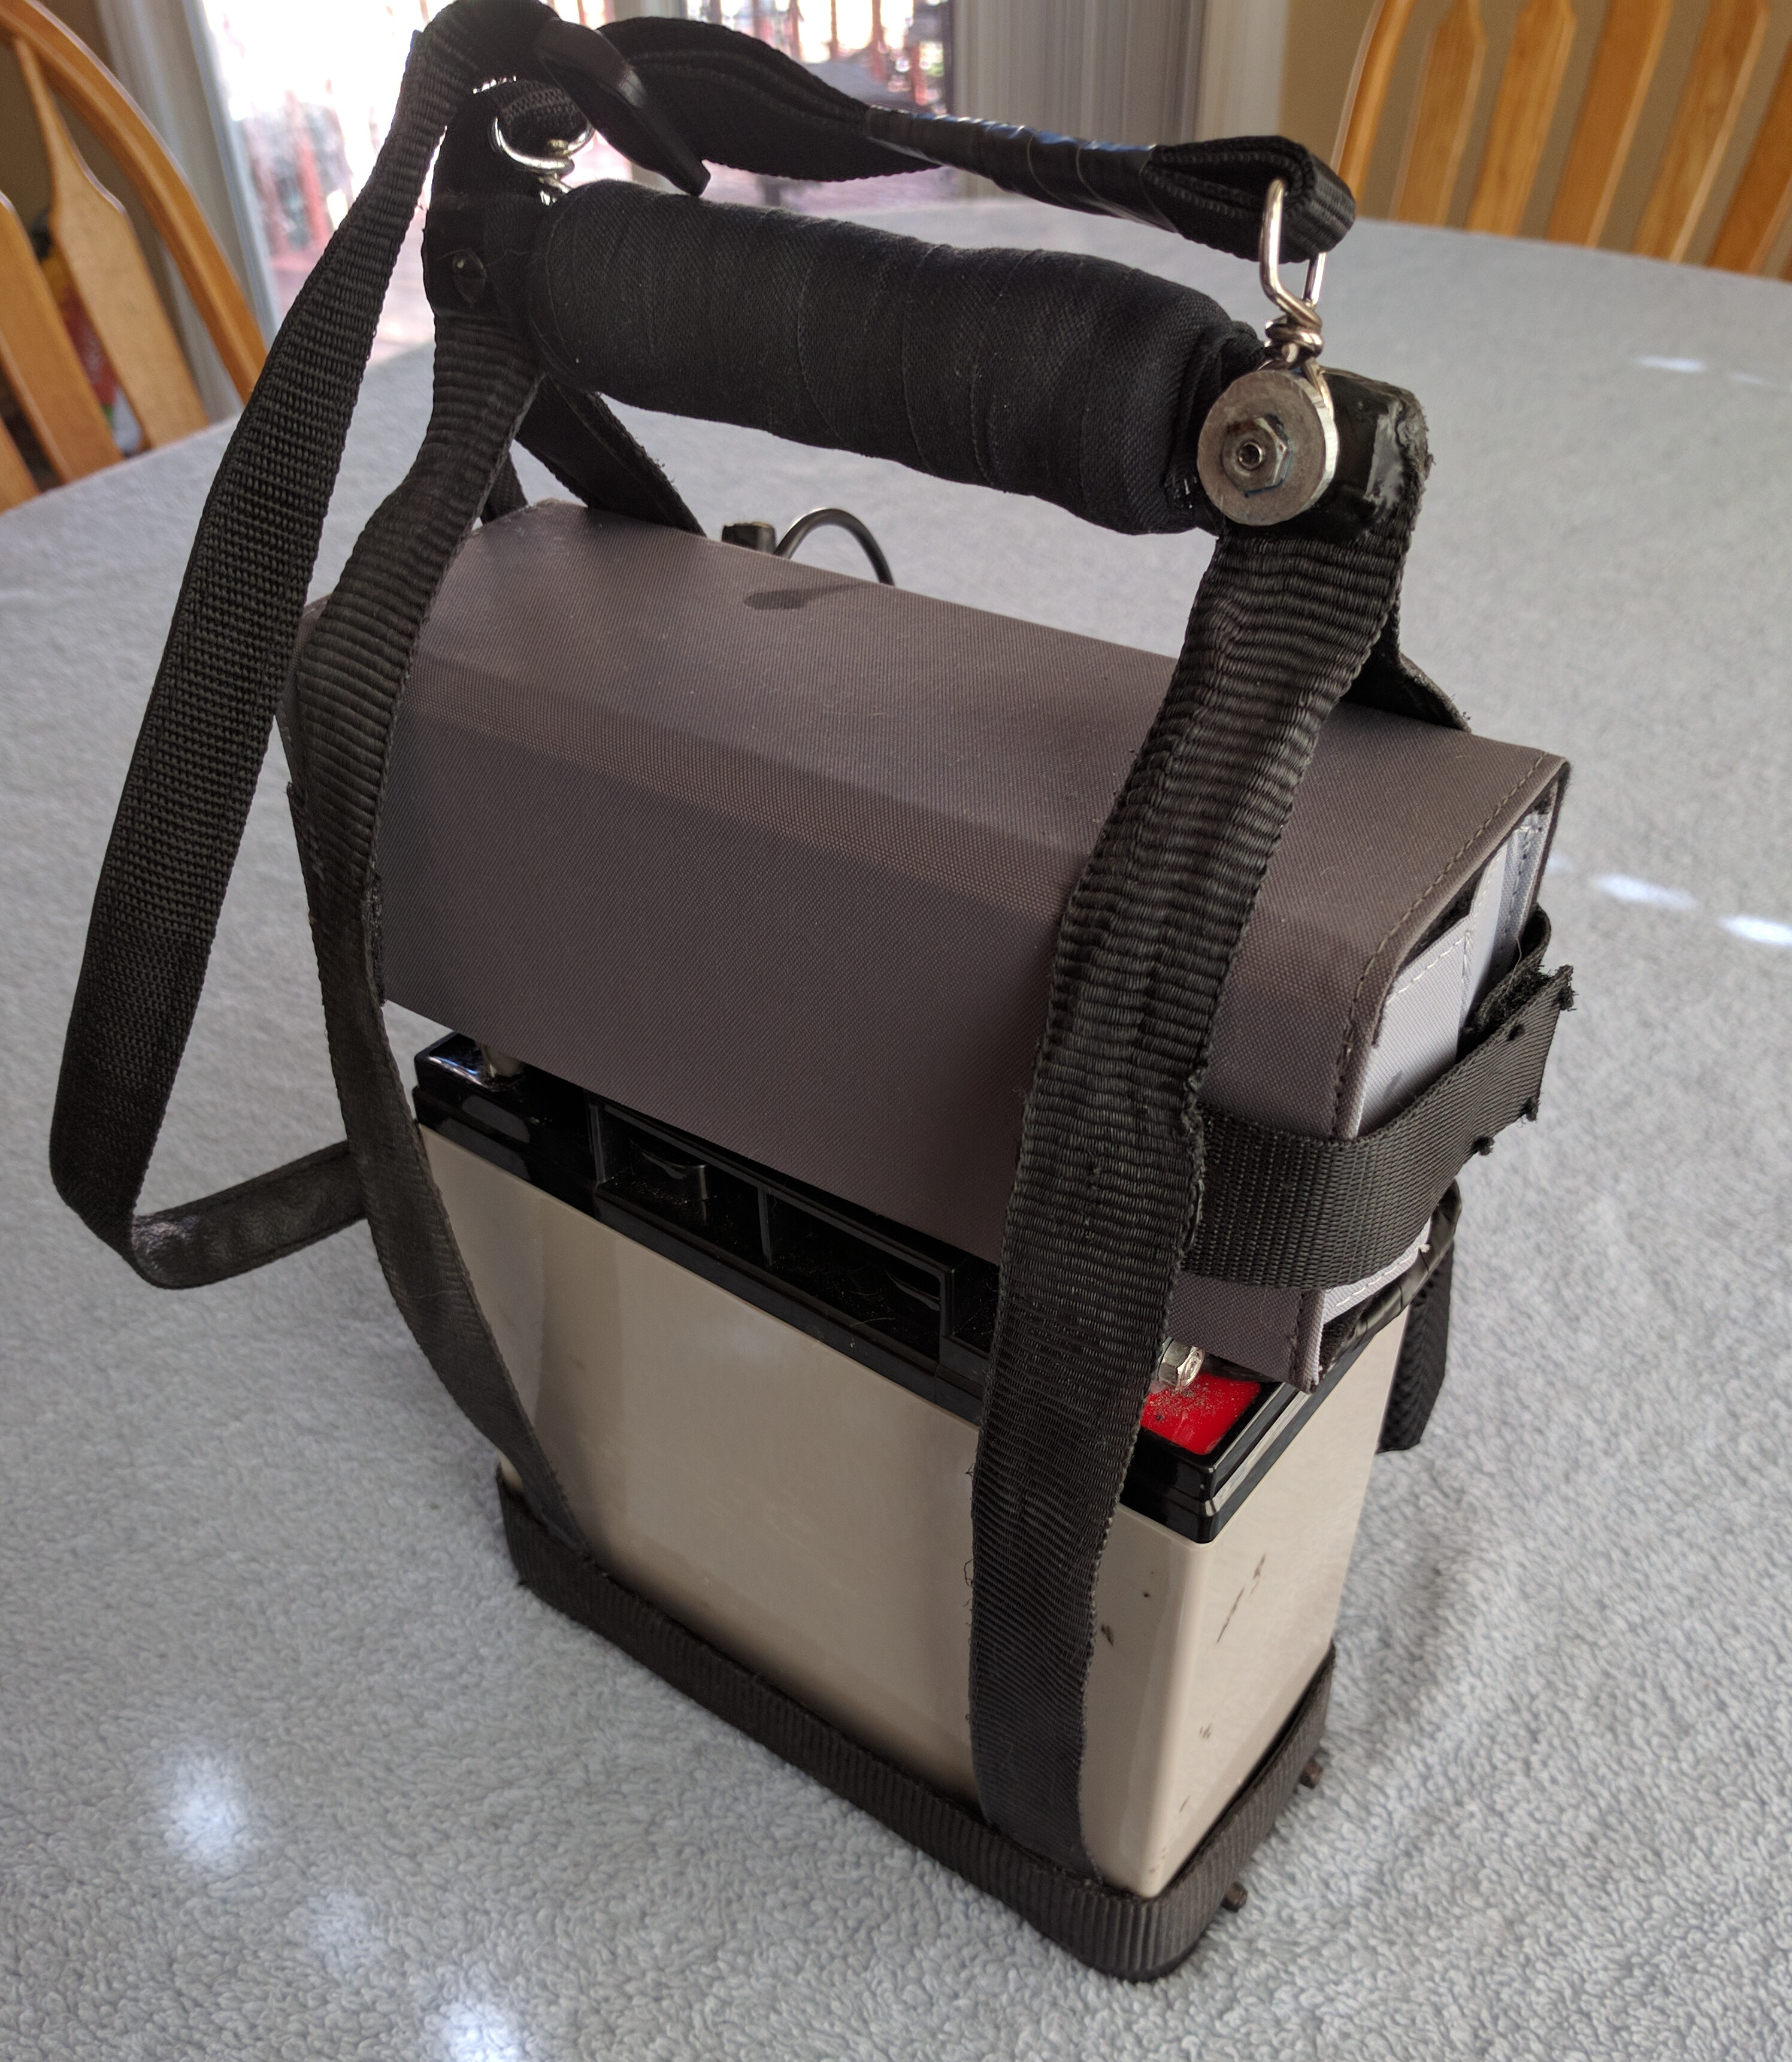
We had a little scope creep during the build, but what project doesn’t these days? (aside: I started the pond refurb 2 months ago with the intention of just replacing the fountain. It turned into a top-to-bottom rebuild. Ended up tearing everything out, clear down to the dirt.) Anyway, this guy is now also a universal charging station with 3 transformers supporting 2 USB female plugs, with cables and adapters to fit just about anything currently out there in the mobile electronics realm.

It played continuously in testing for over a week before I cancelled the test after the battery was down to under 6v. Recharge time with the big wall wart was about 2 days. The little wart is hardwired for standby charging near a wall socket to keep it topped up in that mode of operation. I still need to make a cigarette lighter and standard car charger adapter plugs, but other than that, I believe it’s pretty well finished and good to go. Camping trip in August will complete the OTE phase.
Sneak Preview: DIY Mobile Sound
I’ve never been able to realize a truly satisfying mobile music experience. Been through literally dozens of car, walkman, boombox, etc. systems over the years – some retail, mostly DIY, others kludged combinations. Despite the arguably diverse application scope here, one drawback always ruined it: Battery Capacity. To me, mobile means mobile. I’m not interested if it needs plugged in to keep playing loudly for more than a few hours.
I have this little Sony portable speaker and an Apple Nano I use for camping. It sounds good, but is as expected, limited by battery capacity. I was in a hurry ordering replacement batteries for one of the UPS units a few weeks ago and of course ordered the wrong ones. With the help of an inexpensive 5-12V transformer, I decided to press these 8-aHr units into service on a solution to my mobile sound quandary, rather than pay the 15% re-stocking fee. You can barely see the battery in it’s custom carry case in the protoype setup pictured below. It’s been playing continuously for 4 days now. The Nano thinks it’s plugged in:

This morning it’s down to 12.3 volts, from a 12.7v start. That’s about .1 volt loss/day, playing softly. I’m springing for one of those new high-end DAC digital players that’s been showing up on the market lately for what I’ll refer to as the WEMMS – Way Extreme Mobile Music System. Finished pics coming after testing and touching up complete…
St. Vrain School District Issue
I felt compelled to send this note to the district this afternoon”
It is absolutely reprehensible how today we must come to grips with another suicide at our school. I blame the leadership of this school district. We didn’t have this problem when I was in school. I believe it comes down to a simple lack of discipline and leadership. Bullies followed that boy to his home trying to start a fight not long ago. I want to know what is being done about the bullying problem. I also want to see those associated with the aforementioned incident held accountable. They must learn their actions have consequences. You will find this note posted on my personal blog at http://stuff.is-a-geek.net/wordpress, along with my and your (if any) and other’s responses. I will be keen to publicly evaluate attitude(s), actions and/or inactions on your part. Enough is enough.
We’ll see what they have to say…
Pond V3: Chapter 1
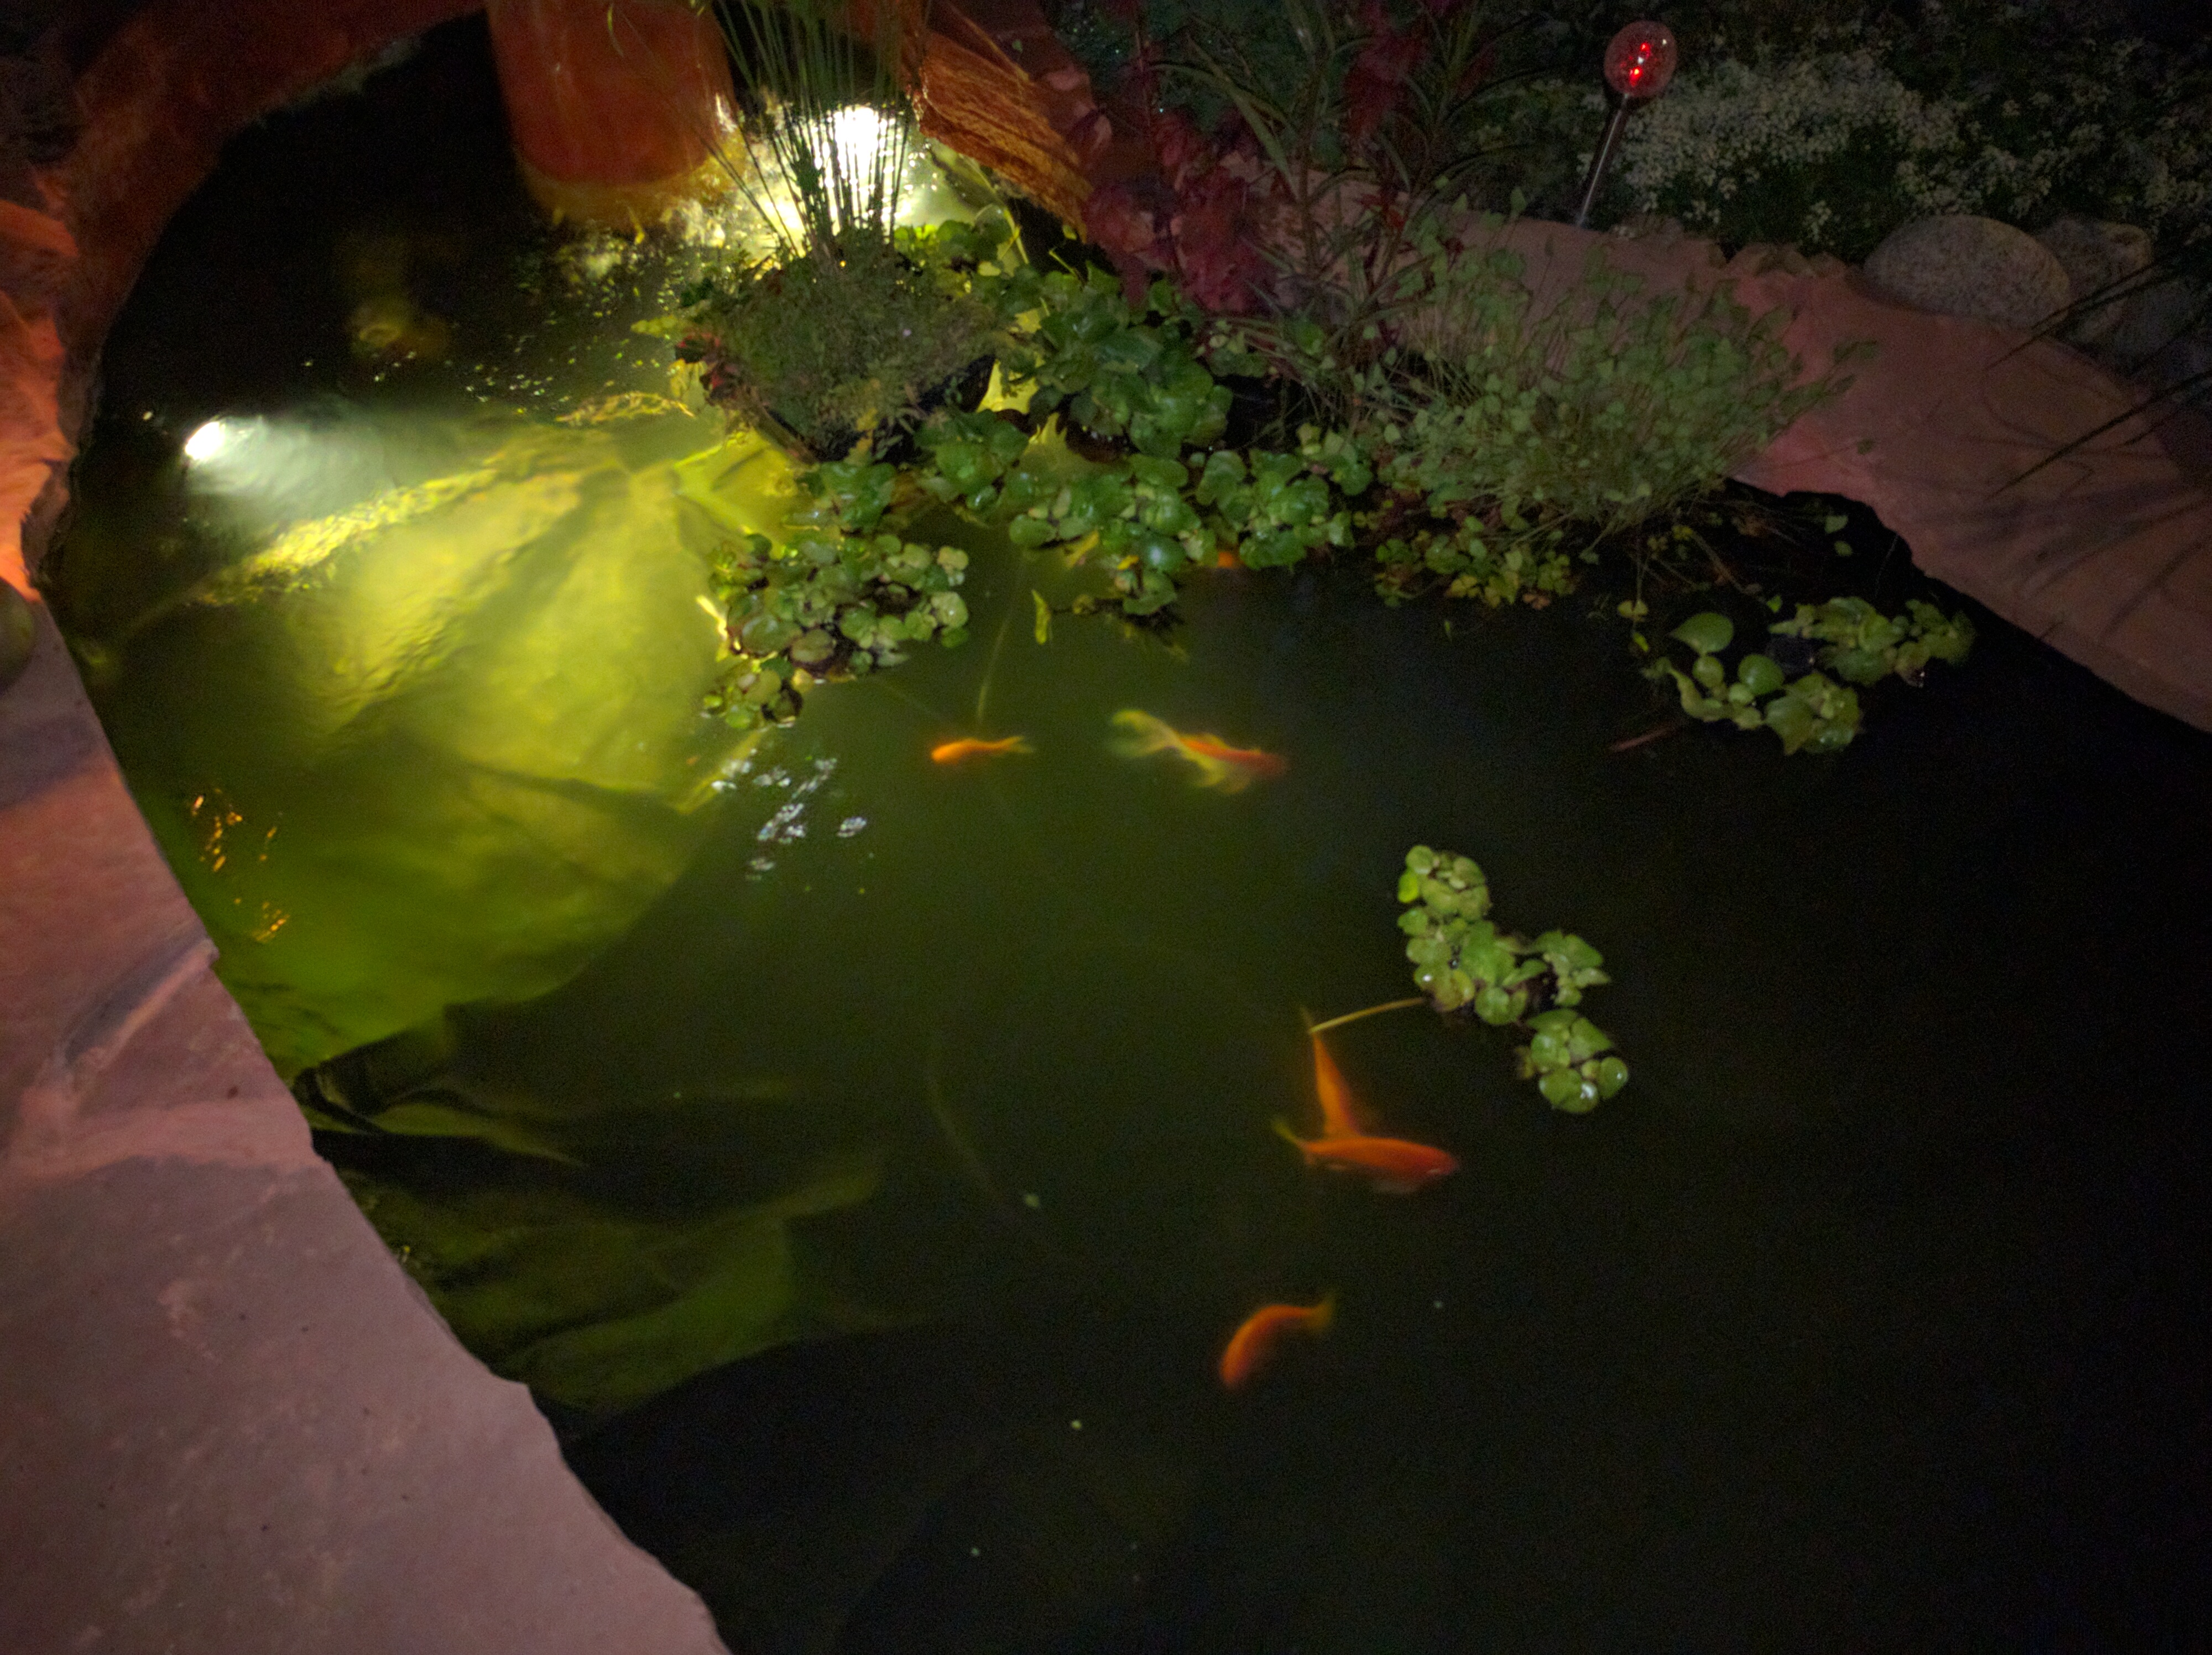
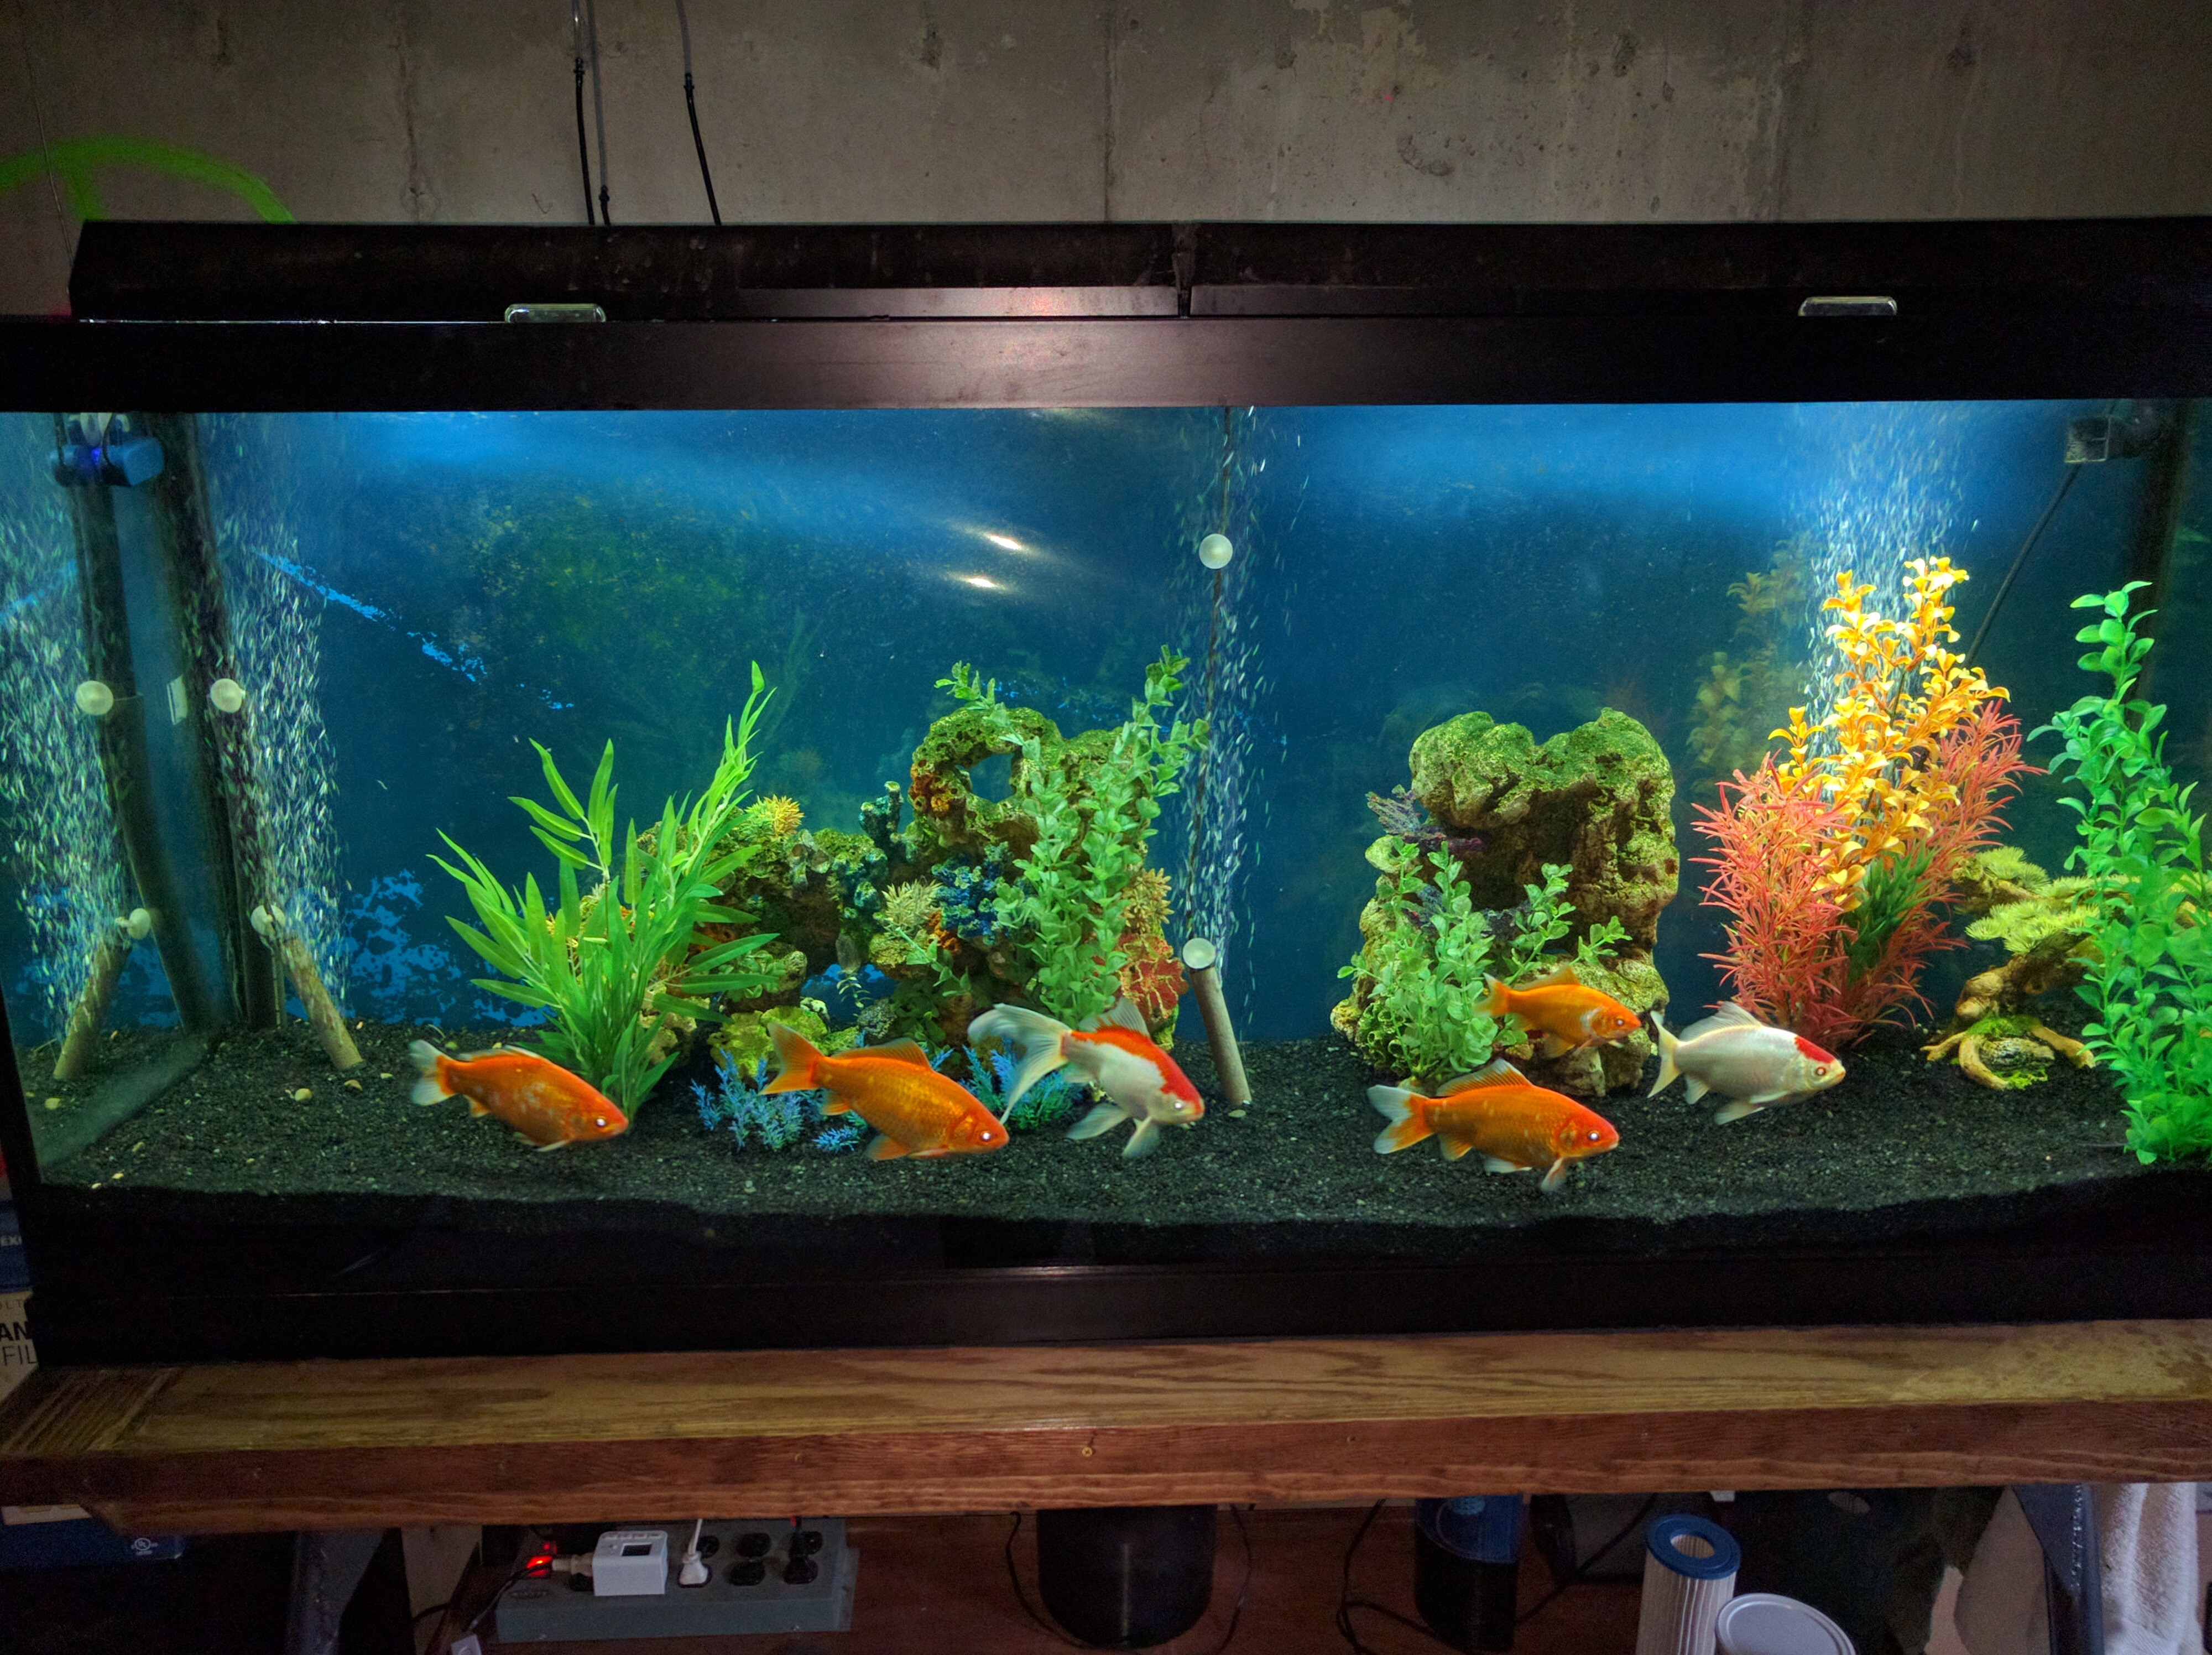
The backyard pond is getting a major, final (hopefully!) upgrade this spring. The past 2 years have been a learning experience. I believe I’m ready to put the finishing touches on it now. Those “touches” as t’were, entail a complete overhaul. One issue is the goldfish. They are getting BIG! Here’s a pic of them in their 125gal basement winter tank:
Another thing is/was that plastic fountain I put up last year. It looked OK and everybody seemed to like it, but it just started feeling a bit cheesy to me. After some thought I came up with an idea for a permanent, more natural and elegant-looking fountain. It will tie into a concrete surround slab raising the water level about 6 inches this time. The sump seal is being re-designed and I’m going to replace the liner and dig it deeper. Goals for the work will be zero seepage and a significant capacity increase Here’s what it’s looking like after a good start over the past couple of weeks:

Junipers Out, Roses In
The very first flora we planted right after moving in back in 2003 was 3 Junipers outside Phoebe’s bedroom window:
I viewed them as a security measure more than anything else, blocking access to the window and basement egress. We had an early hard freeze in 2013, that pretty much killed them. I say “pretty much” because they did survive just barely, but remained mostly brown for the next 3 years. I hoped they would eventually fully recover, but it wasn’t happening.
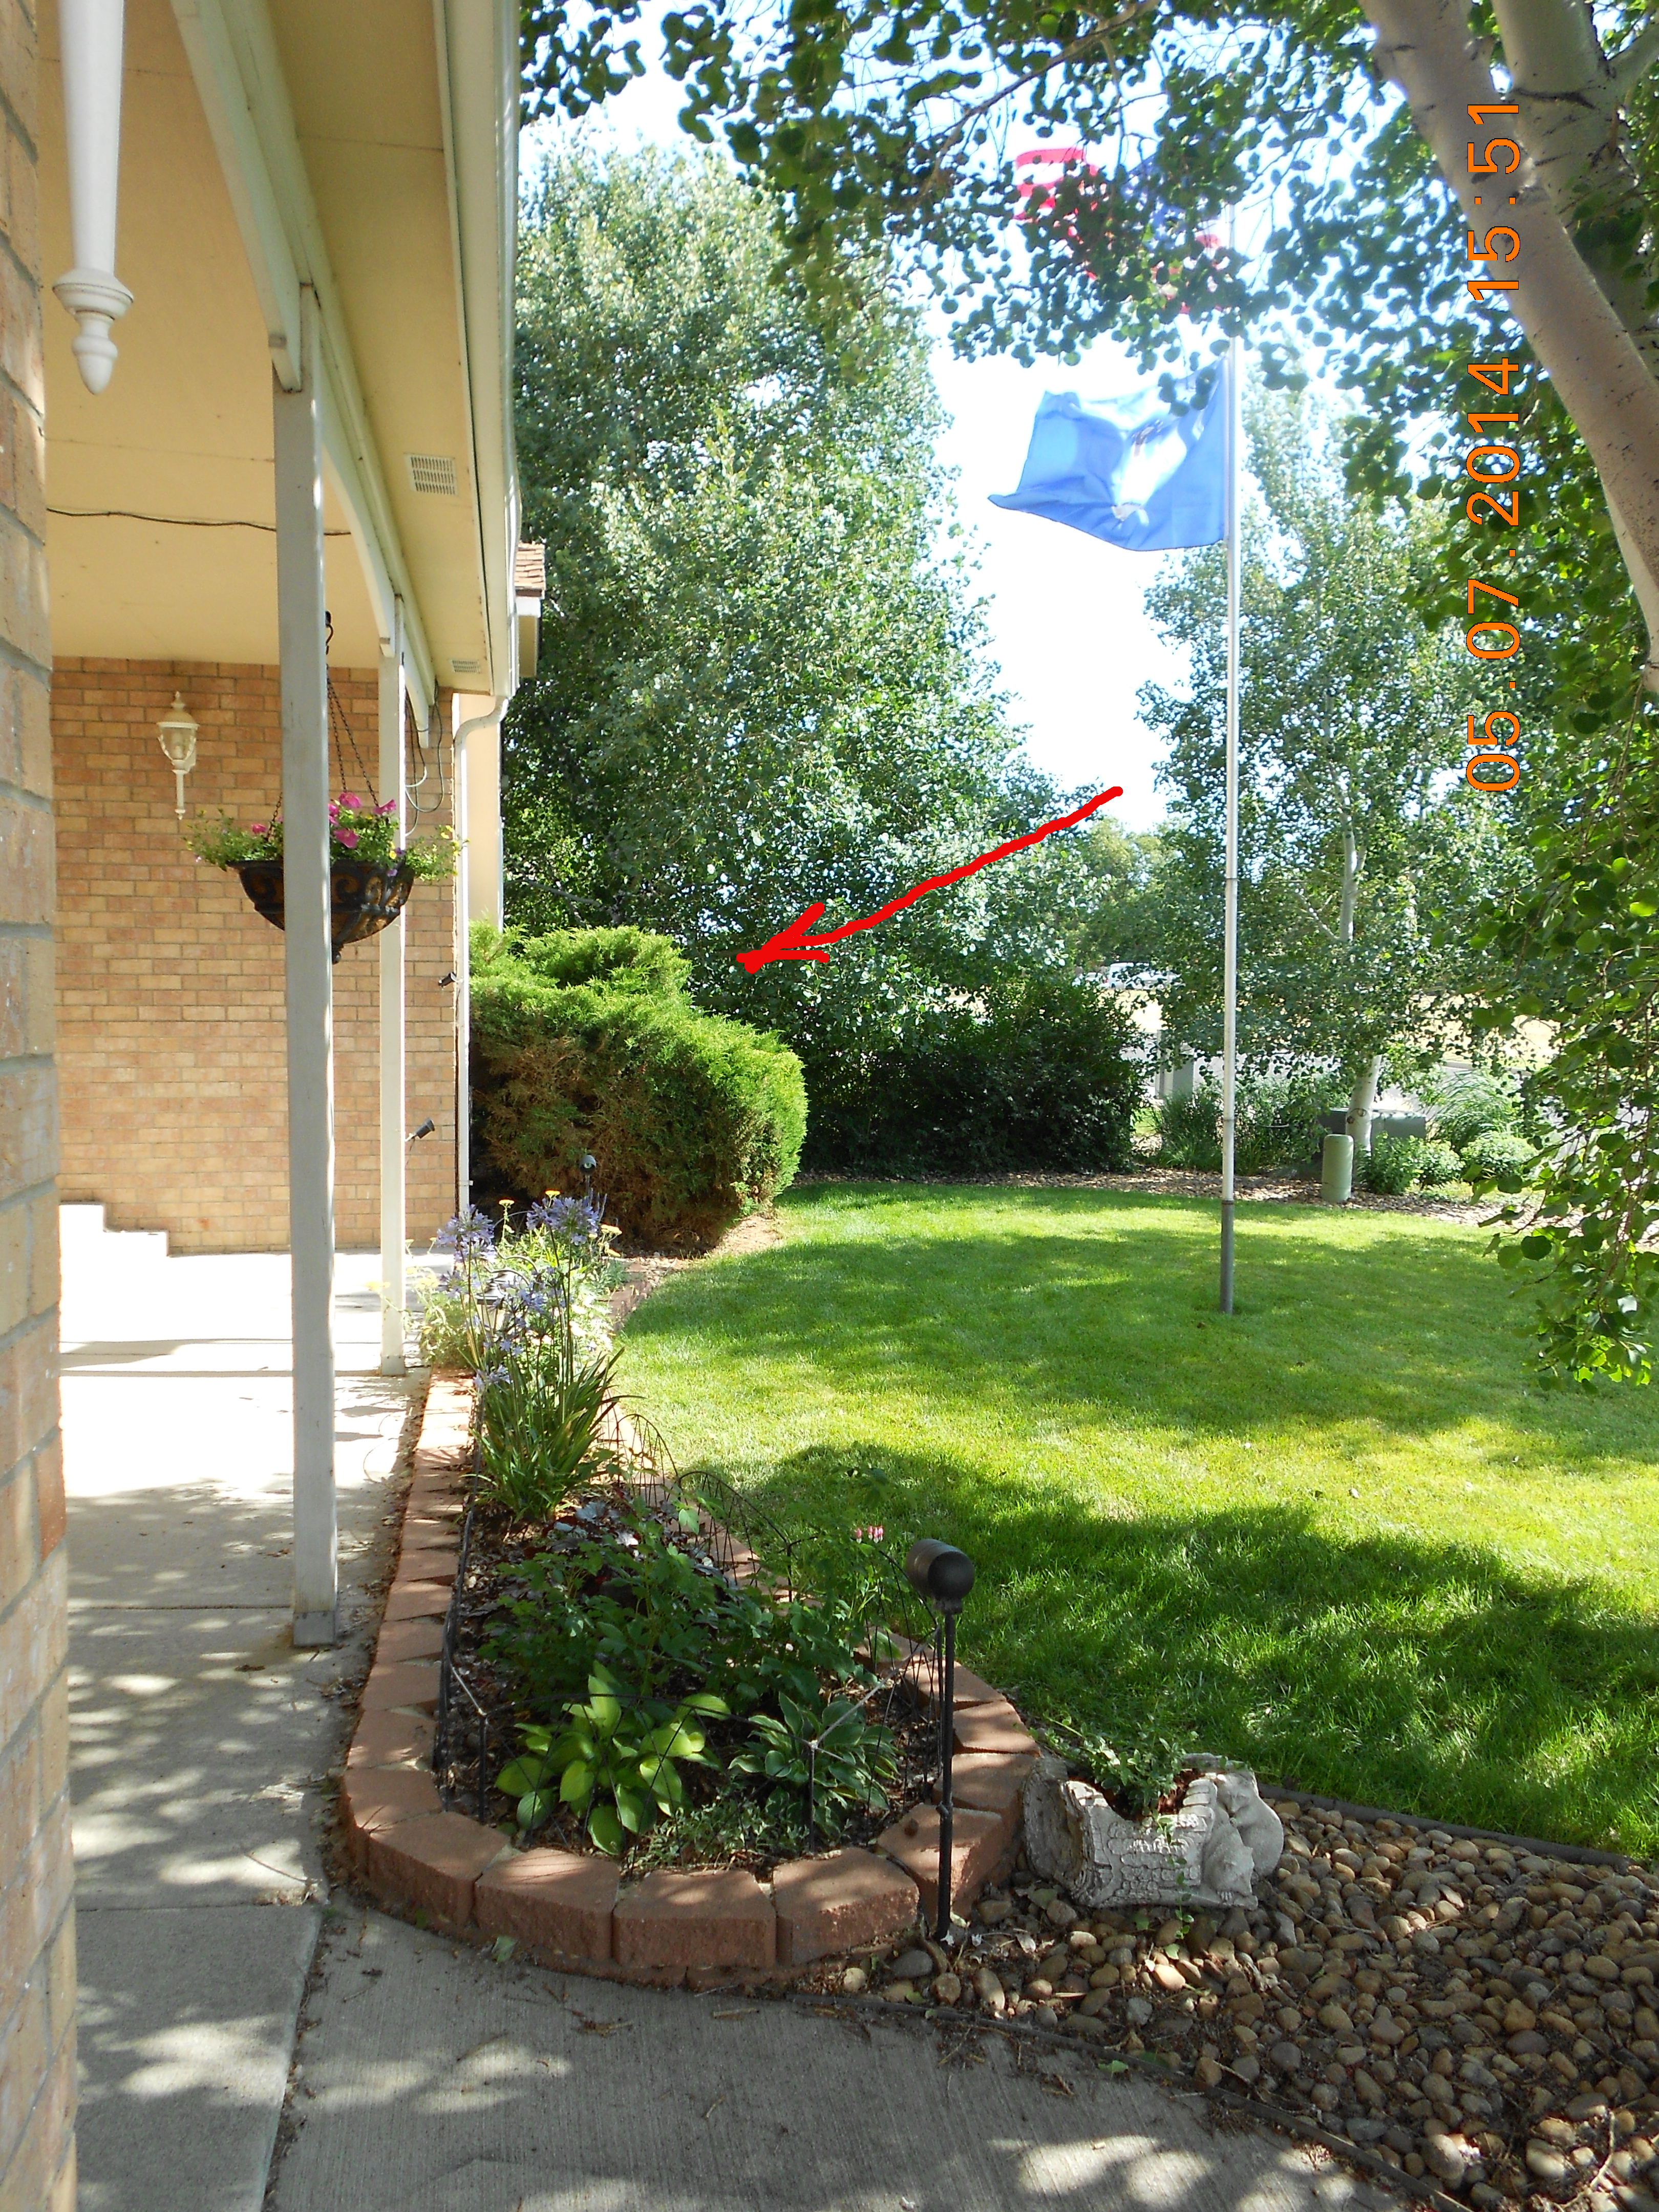
I started a somewhat related project in the spring of 2014 to install a sump in the egress window well. We’d always been getting water in there for some reason, I assumed just because the soil here is sandy and drains really well. So I did a little digging on-and-off over the next 2 years, not really in any hurry. Little did I know, the Juniper project would finally reveal exactly why water was going in there and rusting the window well shell.
The problem became quite clear after pulling the Juniper stumps. Some fool builder decided to back-fill around the window with landscape rock! Not completely, but enough to make a negative grade down almost 2 feet on 1 side. So I had to dig out about 500lbs. of rock and properly back-fill the thing with soil. Despite not really needing it anymore, the sump project finally got completed in conjunction with a new flower bed containing 2 rose bushes for starters.
 | 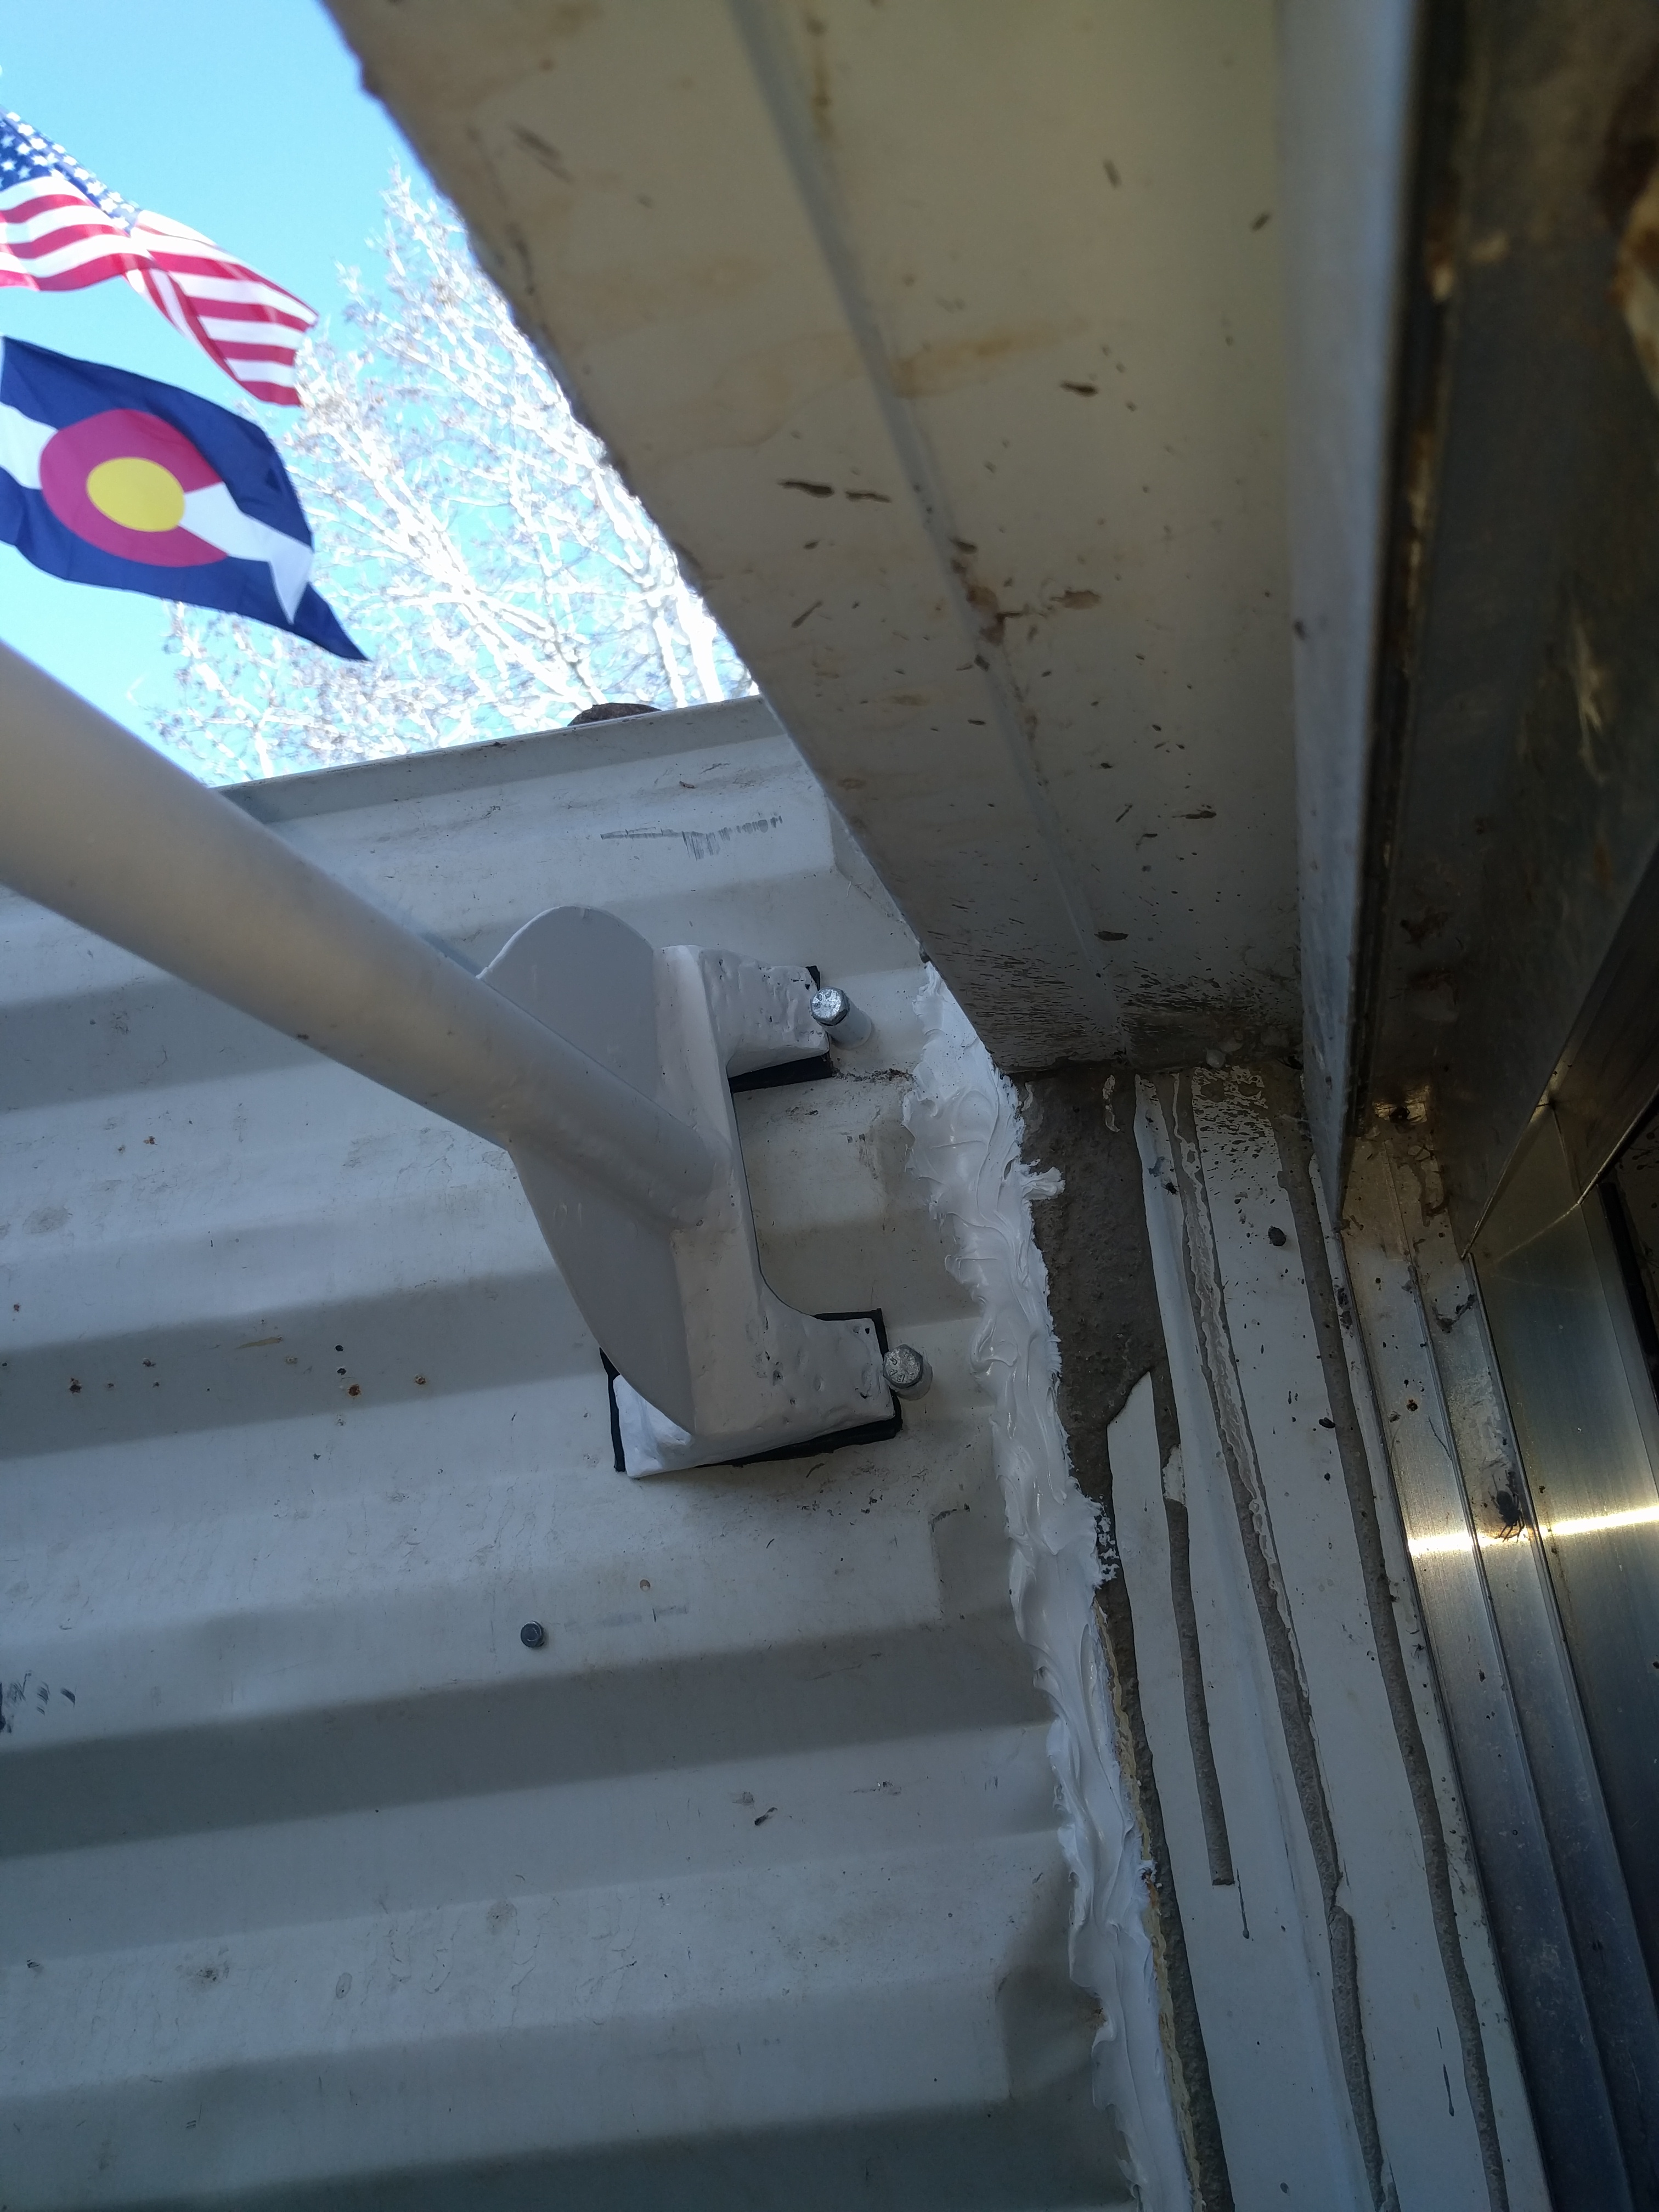 | 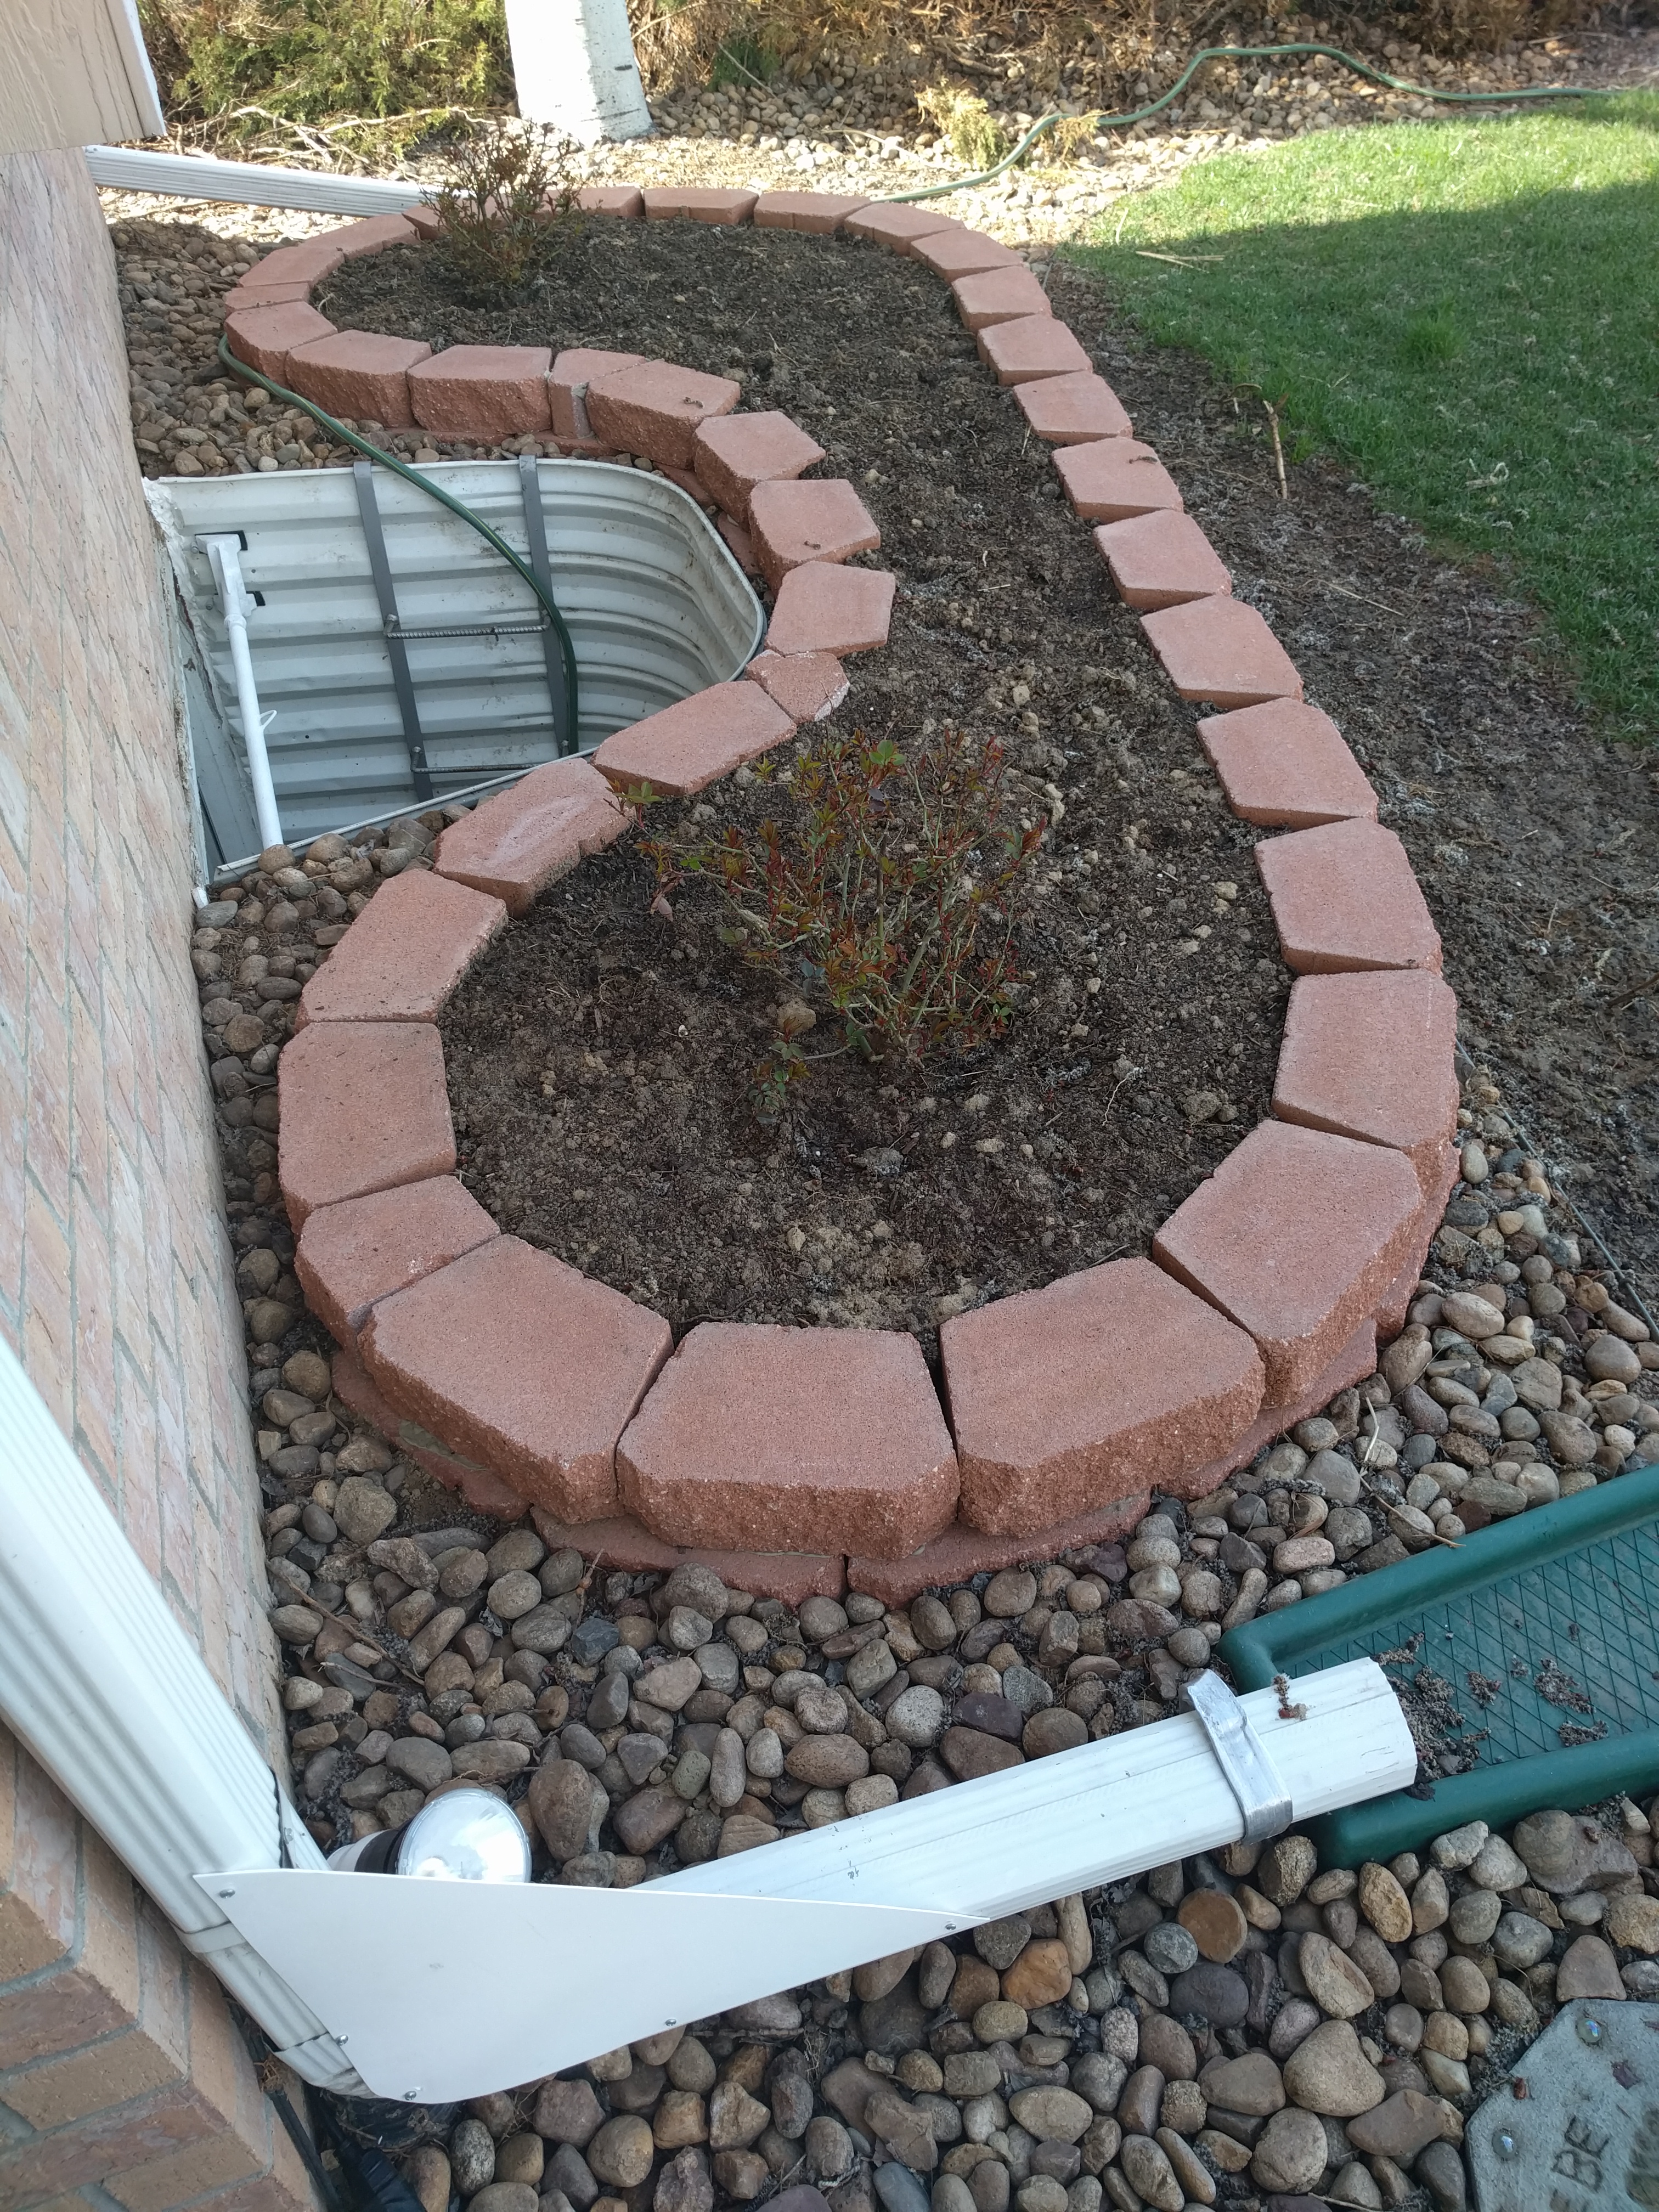 |  |
The window well is still not actually quite complete. It needs a cover, which is going to be another custom DIY. I also have to get around to cleaning up and painting over that rust one of these days as well…
Old-Fashioned Gauge in a New-Fangled Car
The low pressure side of the commonrail fuel system often gets overlooked, but plays a crucial role. I was pleased to see BMW specs nominal CP3 input pressure at ~5 bar. They probably used a fairly good quality lift pump in the tank which will likely never need replaced, assuming you ascribe to the fuel lubricity additive concept. Fuel supply flow capacity needs to increase proprtionally with power-adding mods. That does not appear to be an issue with this setup. My lift pump holds a rock-steady 60psi with the go pedal matted and JBD at 100%. But there are other things to consider. Cold weather for example, induces fuel viscosity increase, severely reducing pumpability once temps drop near zero and below. That’s why we have a fuel heater, but it can only do so much. Anything constraining fuel supply flow can quickly lead to injection pump damage. Unfortunately there’s no shortage of different ways to get things FUBAR’d on the upstream side of the CP3: cold weather, bad fuel (water especially), filter degradation, various lift pump malfunctions, etc.
The failure mode varies, but sudden catastrophic loss of the CP3 can take out everything in it’s path. Many parts are subject to damage, potentially requiring replacement of injectors, sensors, and at a minimum, a complete fuel system flush from head to tank. Dealers confronted with it often elect to simply replace the entire fuel system. It means lots of parts and labor hours, but ironically, ends up being quicker and easier in the long run if one thing after another starts turning up bad during a piecemeal approach. But this is all easily avoidable with a little monitoring. I understand the car’s sensors and software will set codes for a plethora of fueling paramter anomalies. But I doubt it’s ability to forewarn impending problems or long-term degraded conditions in the fuel supply like a simple, mechanical guage.
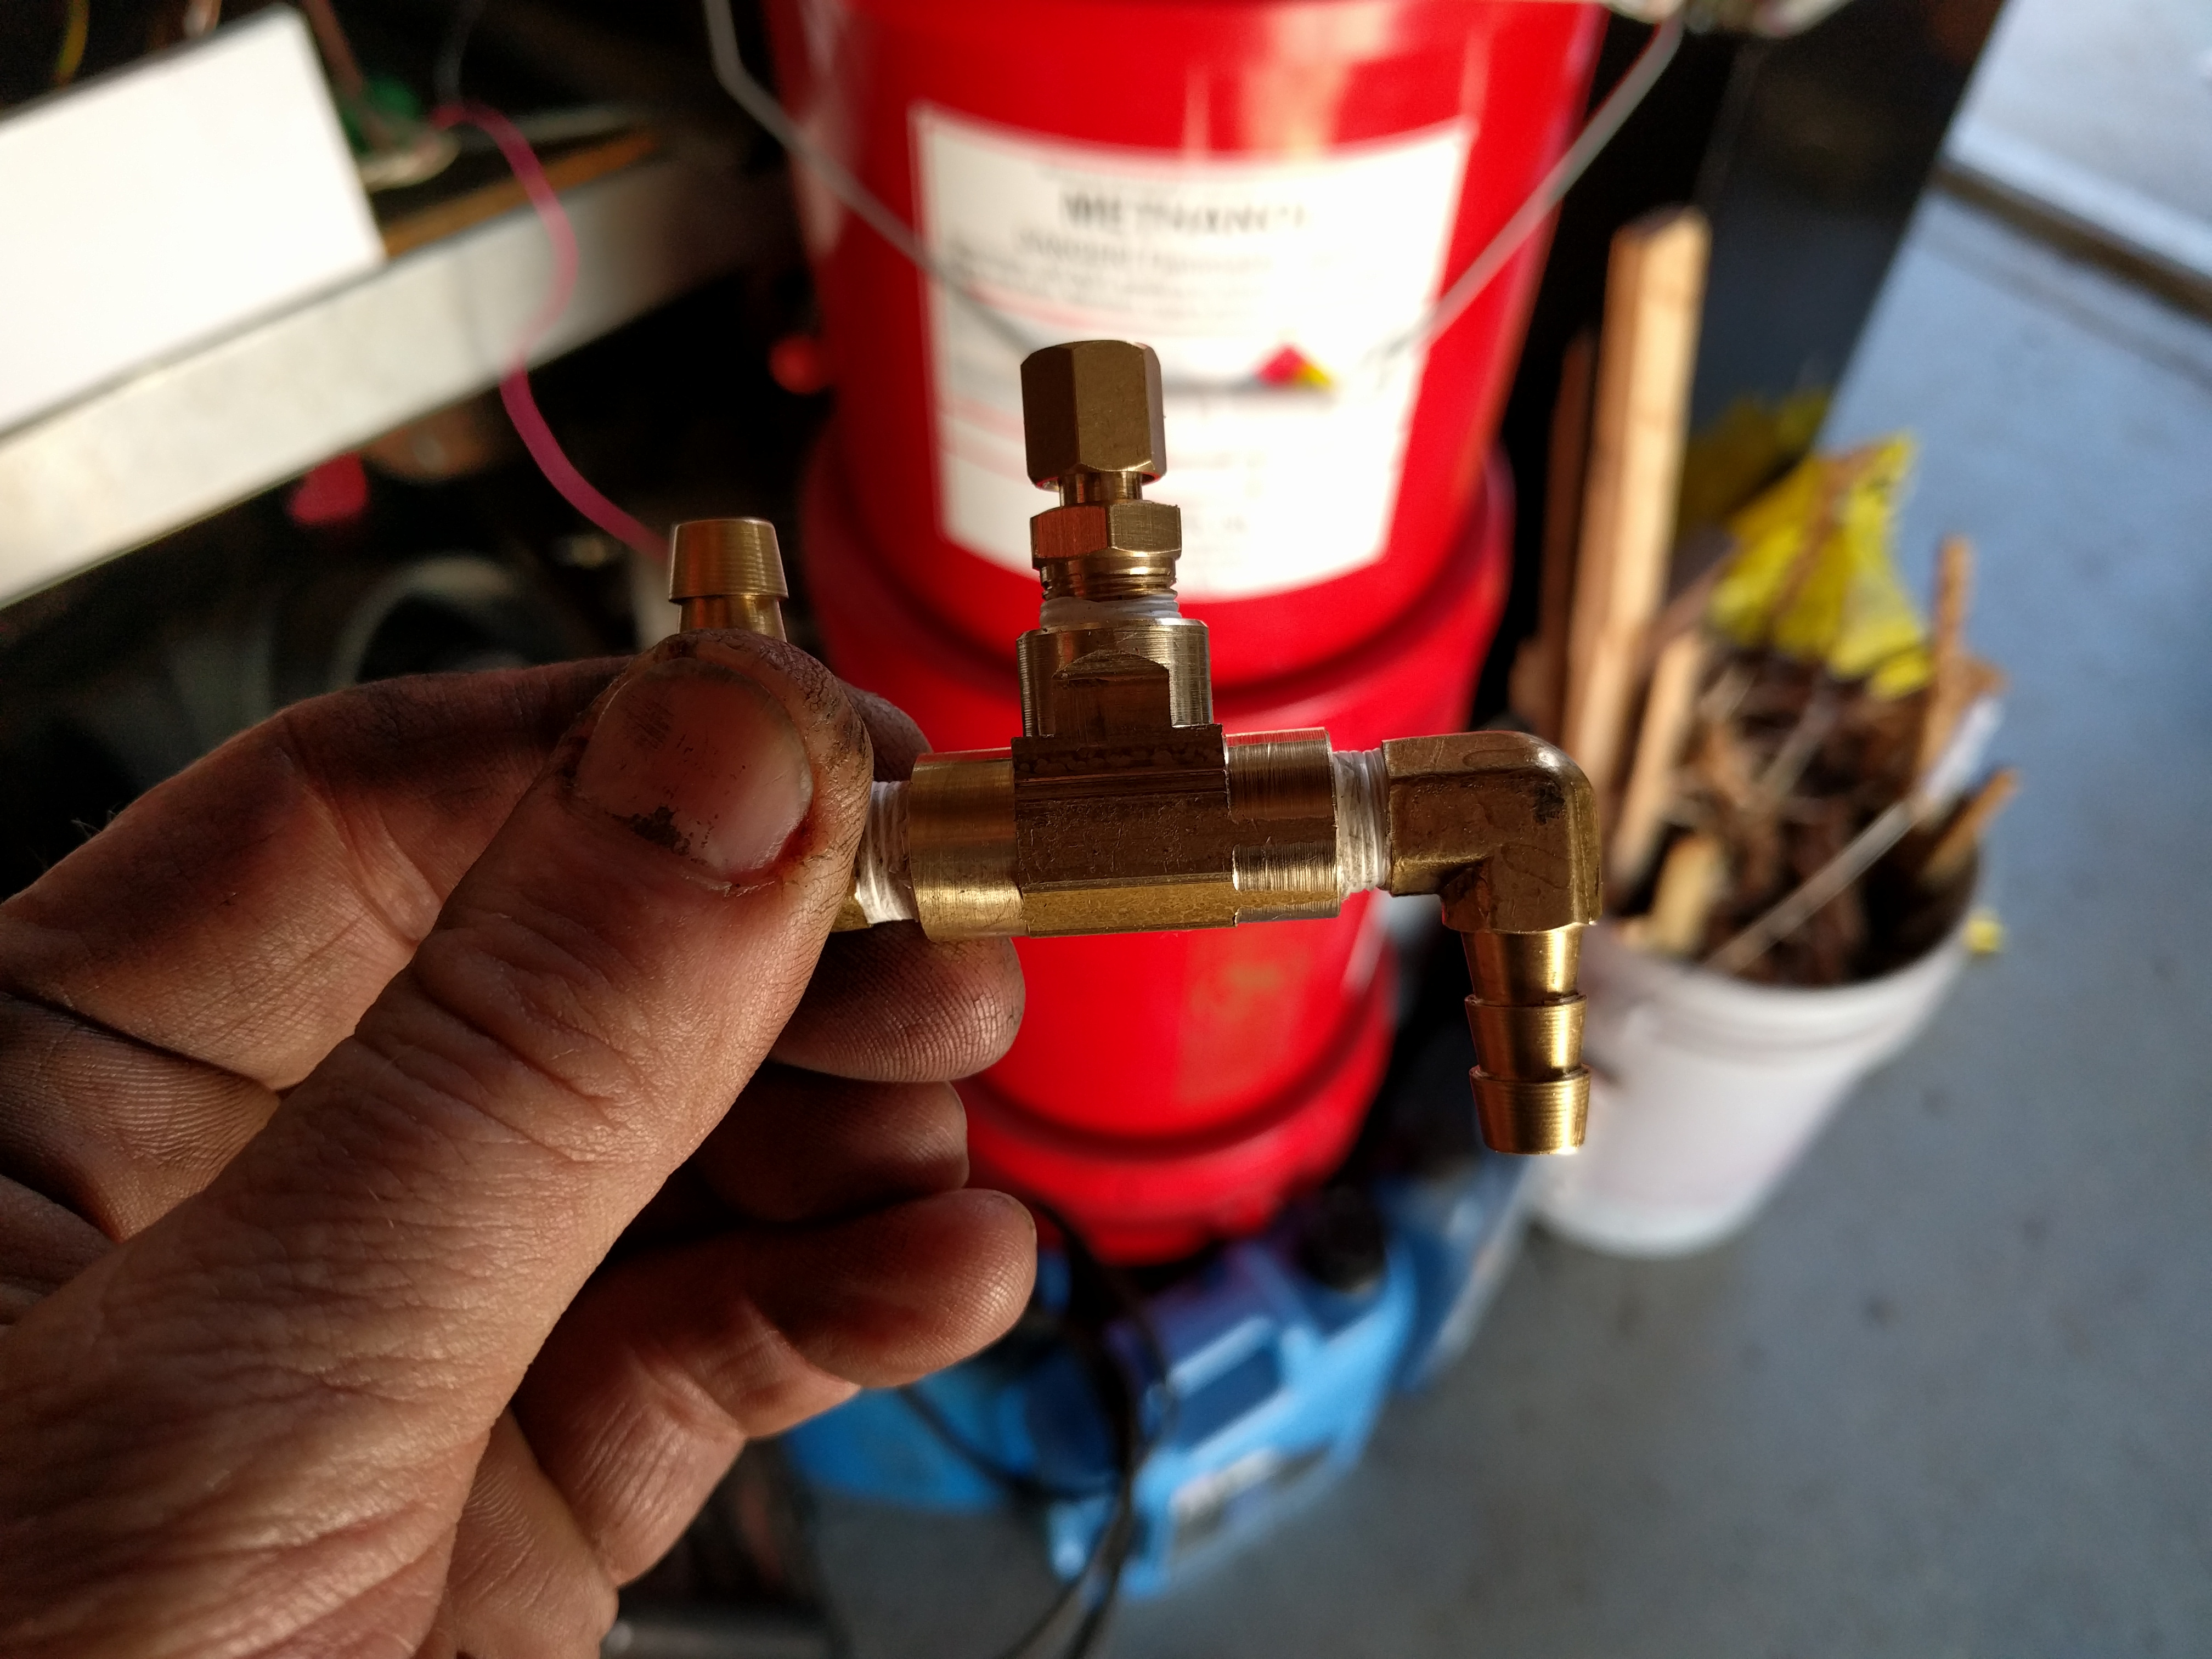
There are a couple of fairly serious issues involved with using a mechanical fuel gauge in the cabin. There’s a small chance it will fail in some way as to allow a leak. A worst case scenario might be something like it explodes spraying fuel in your face while driving in heavy traffic smoking a cigarette. My customized combination shutoff valve/snubber mitigates this issue and another problem fairly well. The other problem is CP3-generated pressure wave reflections wreaking havoc with the gauge readout. Installing a ball-bearing poppet in the valve’s gauge port stifles that phenomenon. The rubber valve seal gets soaked in gear oil while doing up the valve assembly to induce swelling to the point of actually making the thumbscrew harder to turn after reassembly. Done right and reassembled using JB Weld for thread locker, the valve will never leak and just cracked open provides a safe, stable analog/mechanical fuel pressure reference to the gauge.
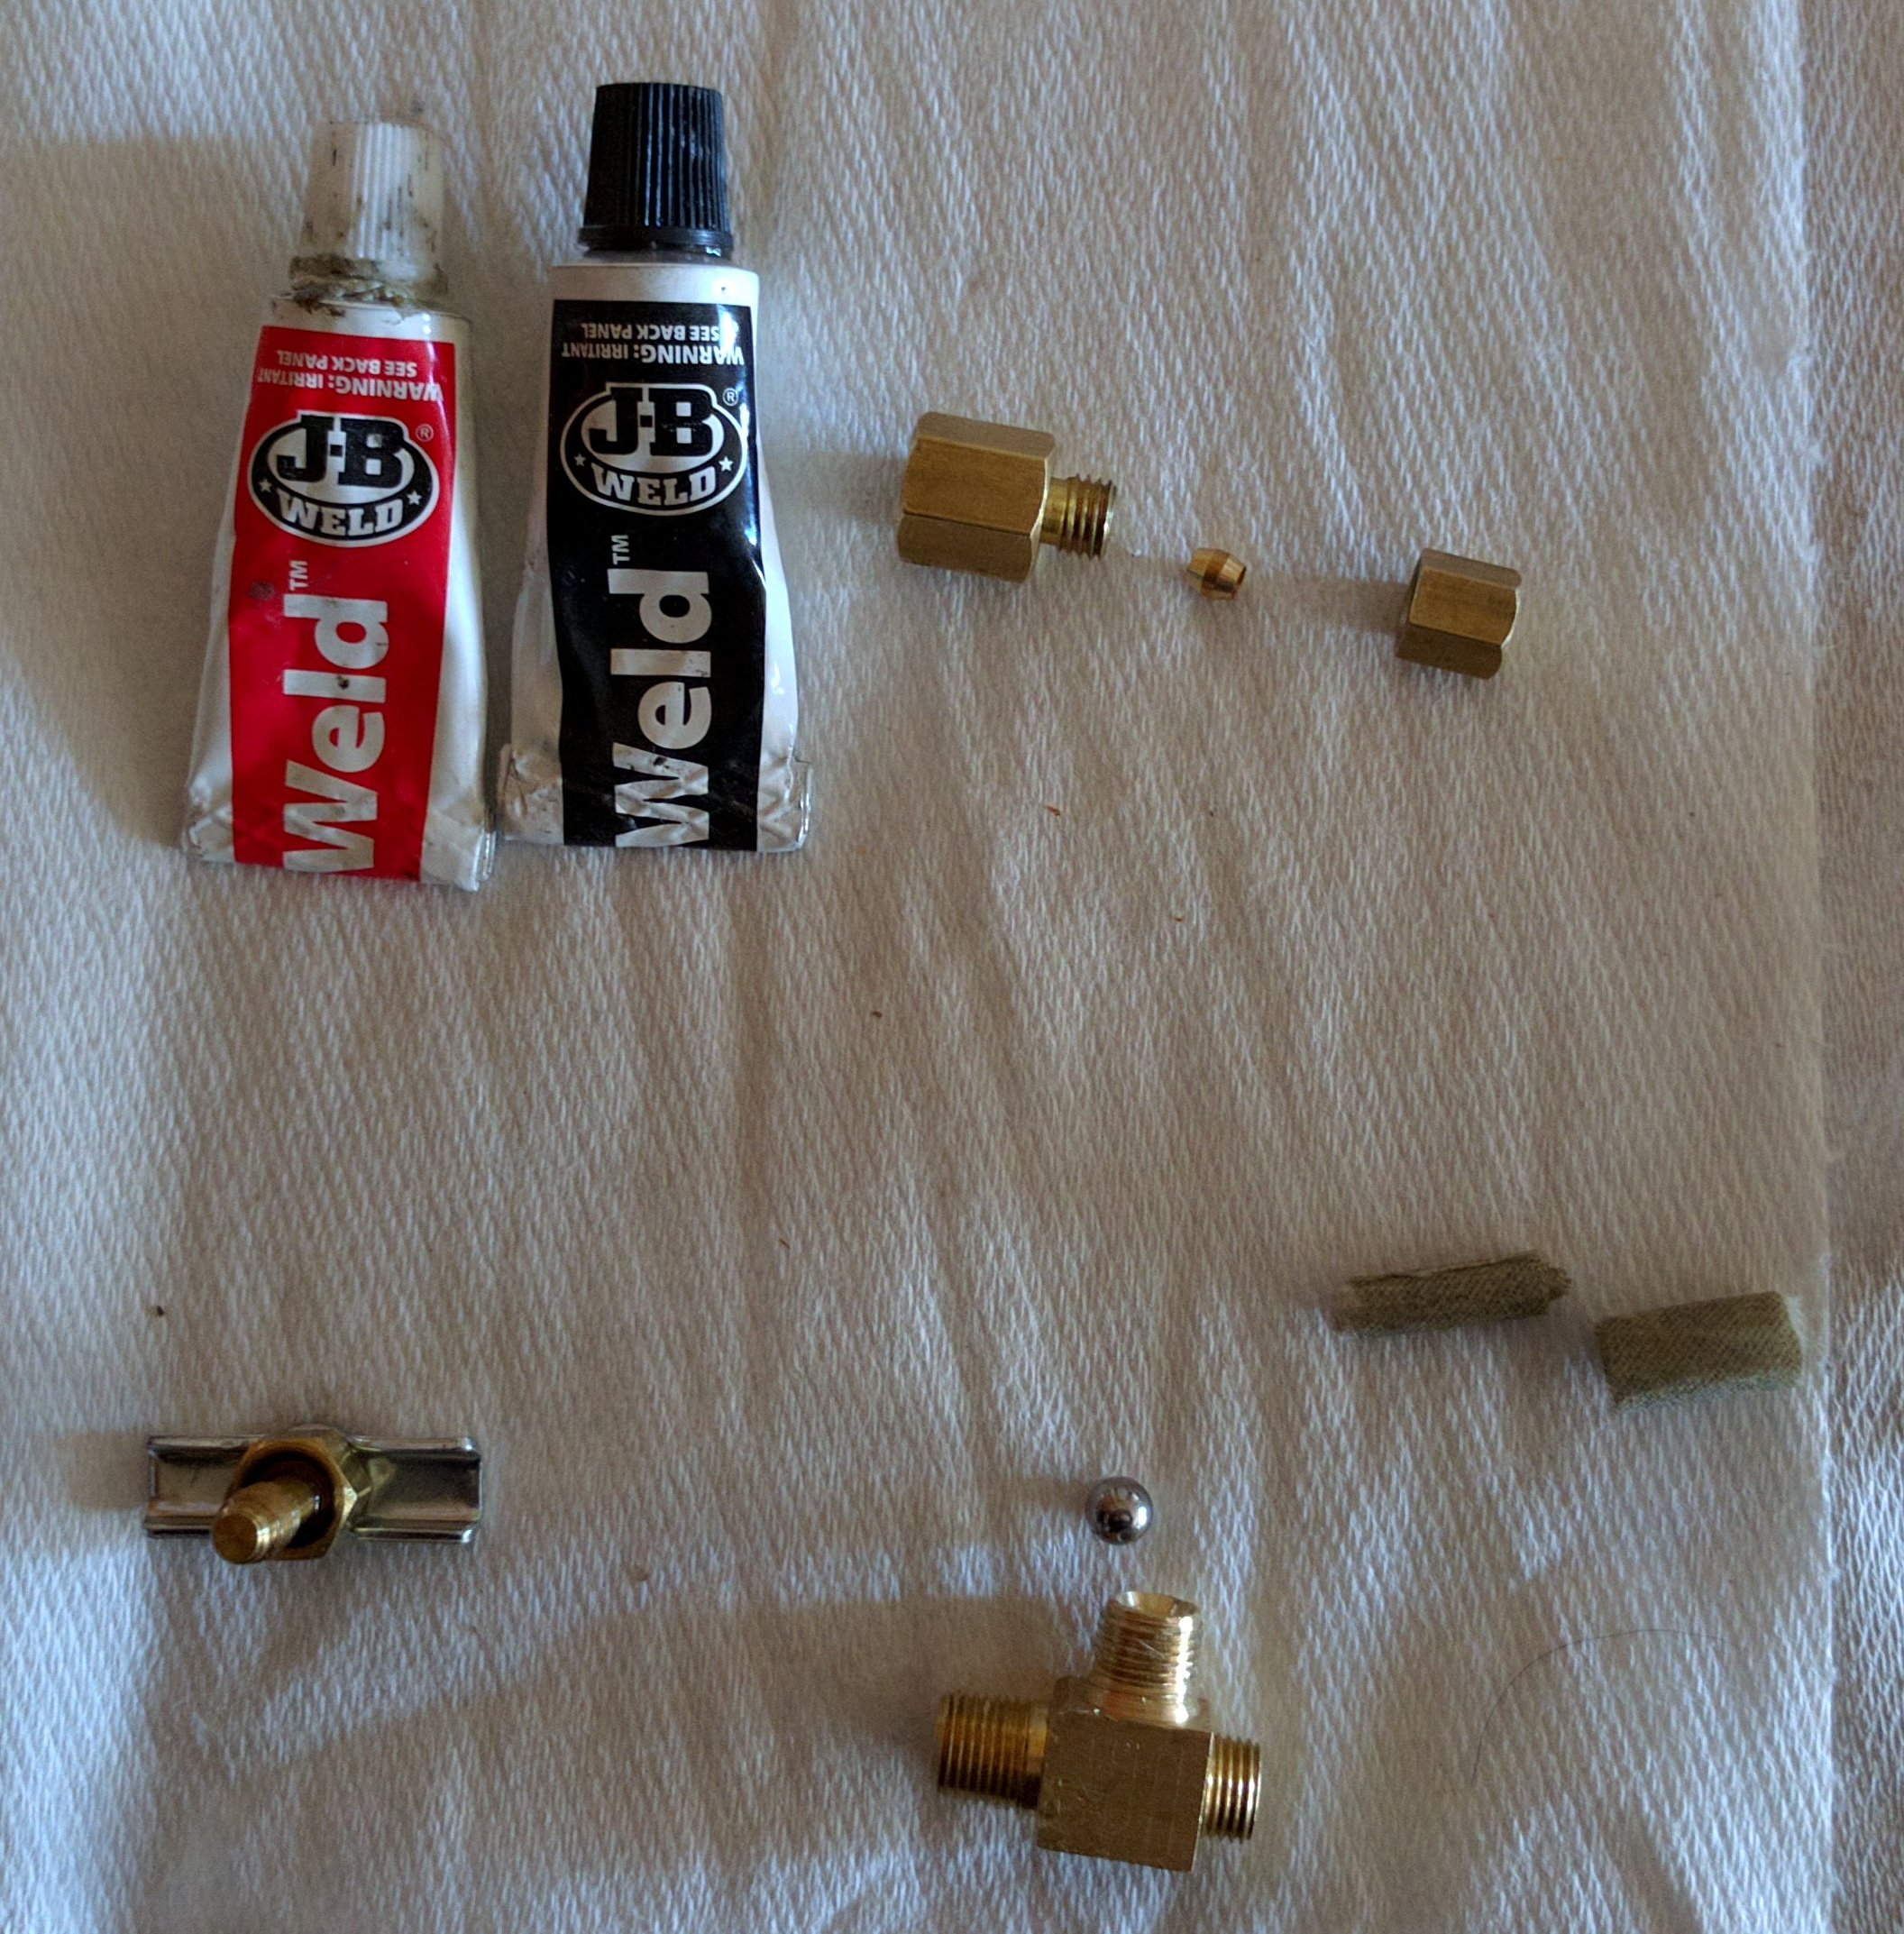
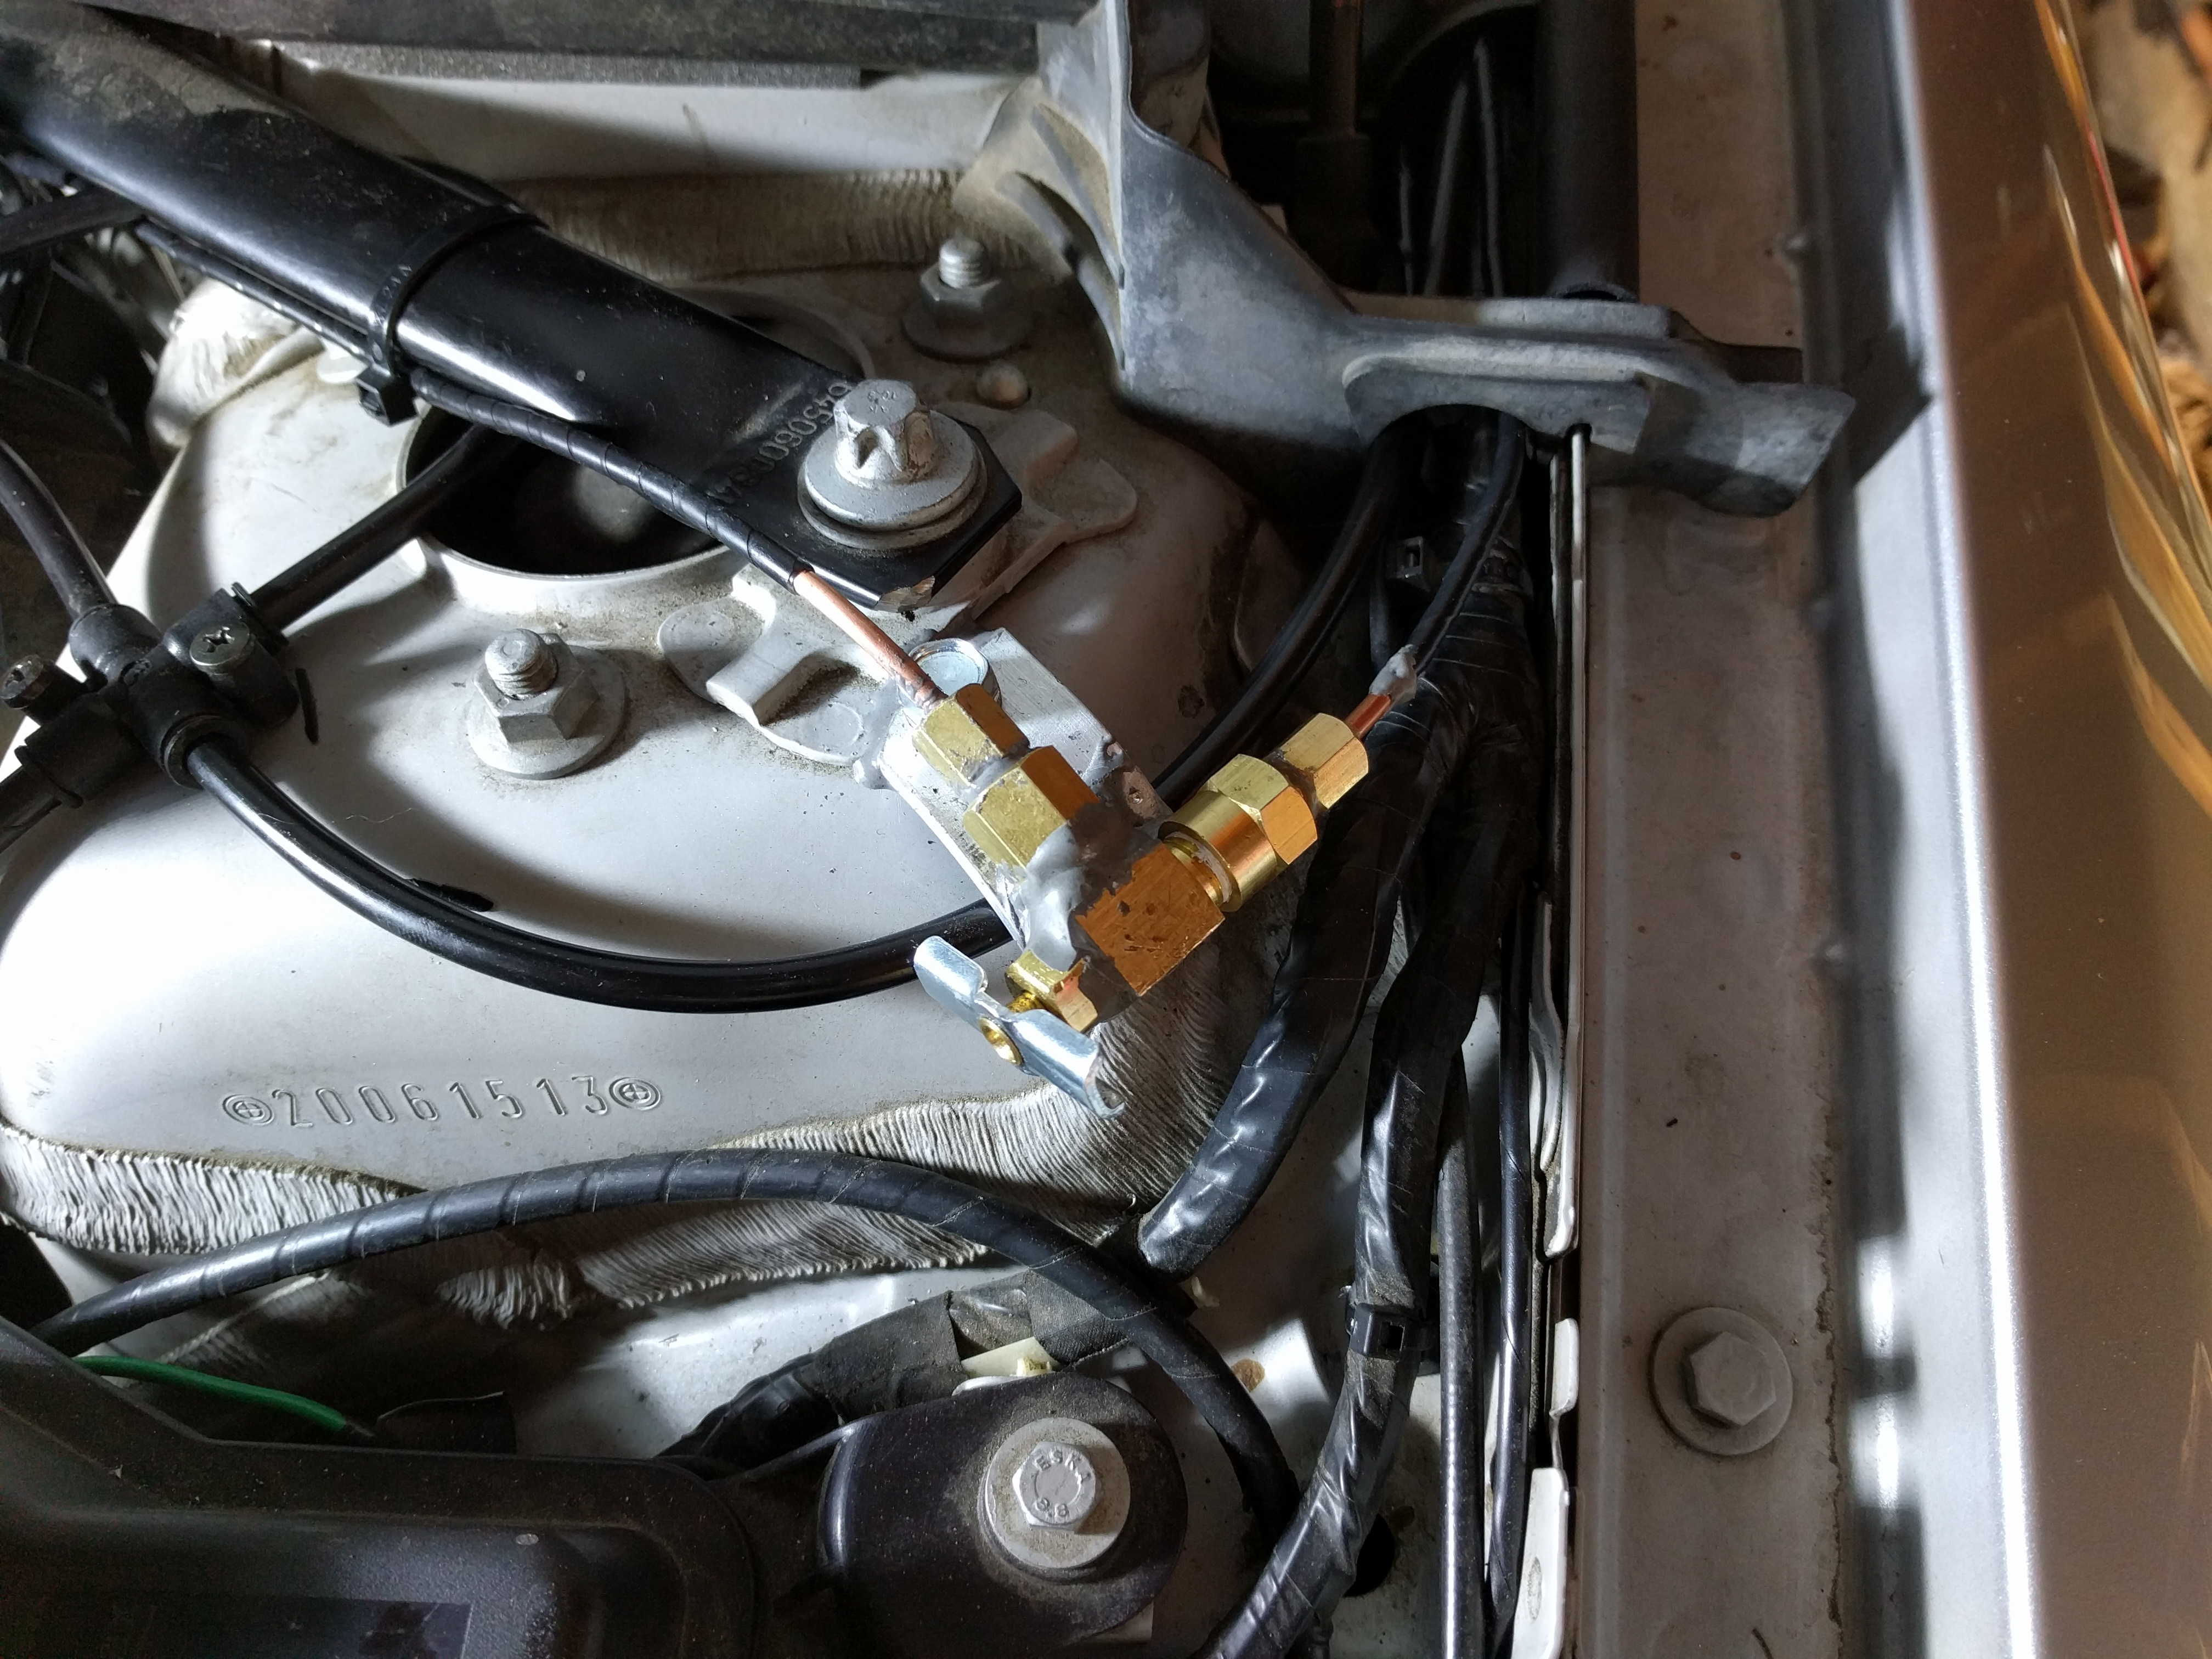
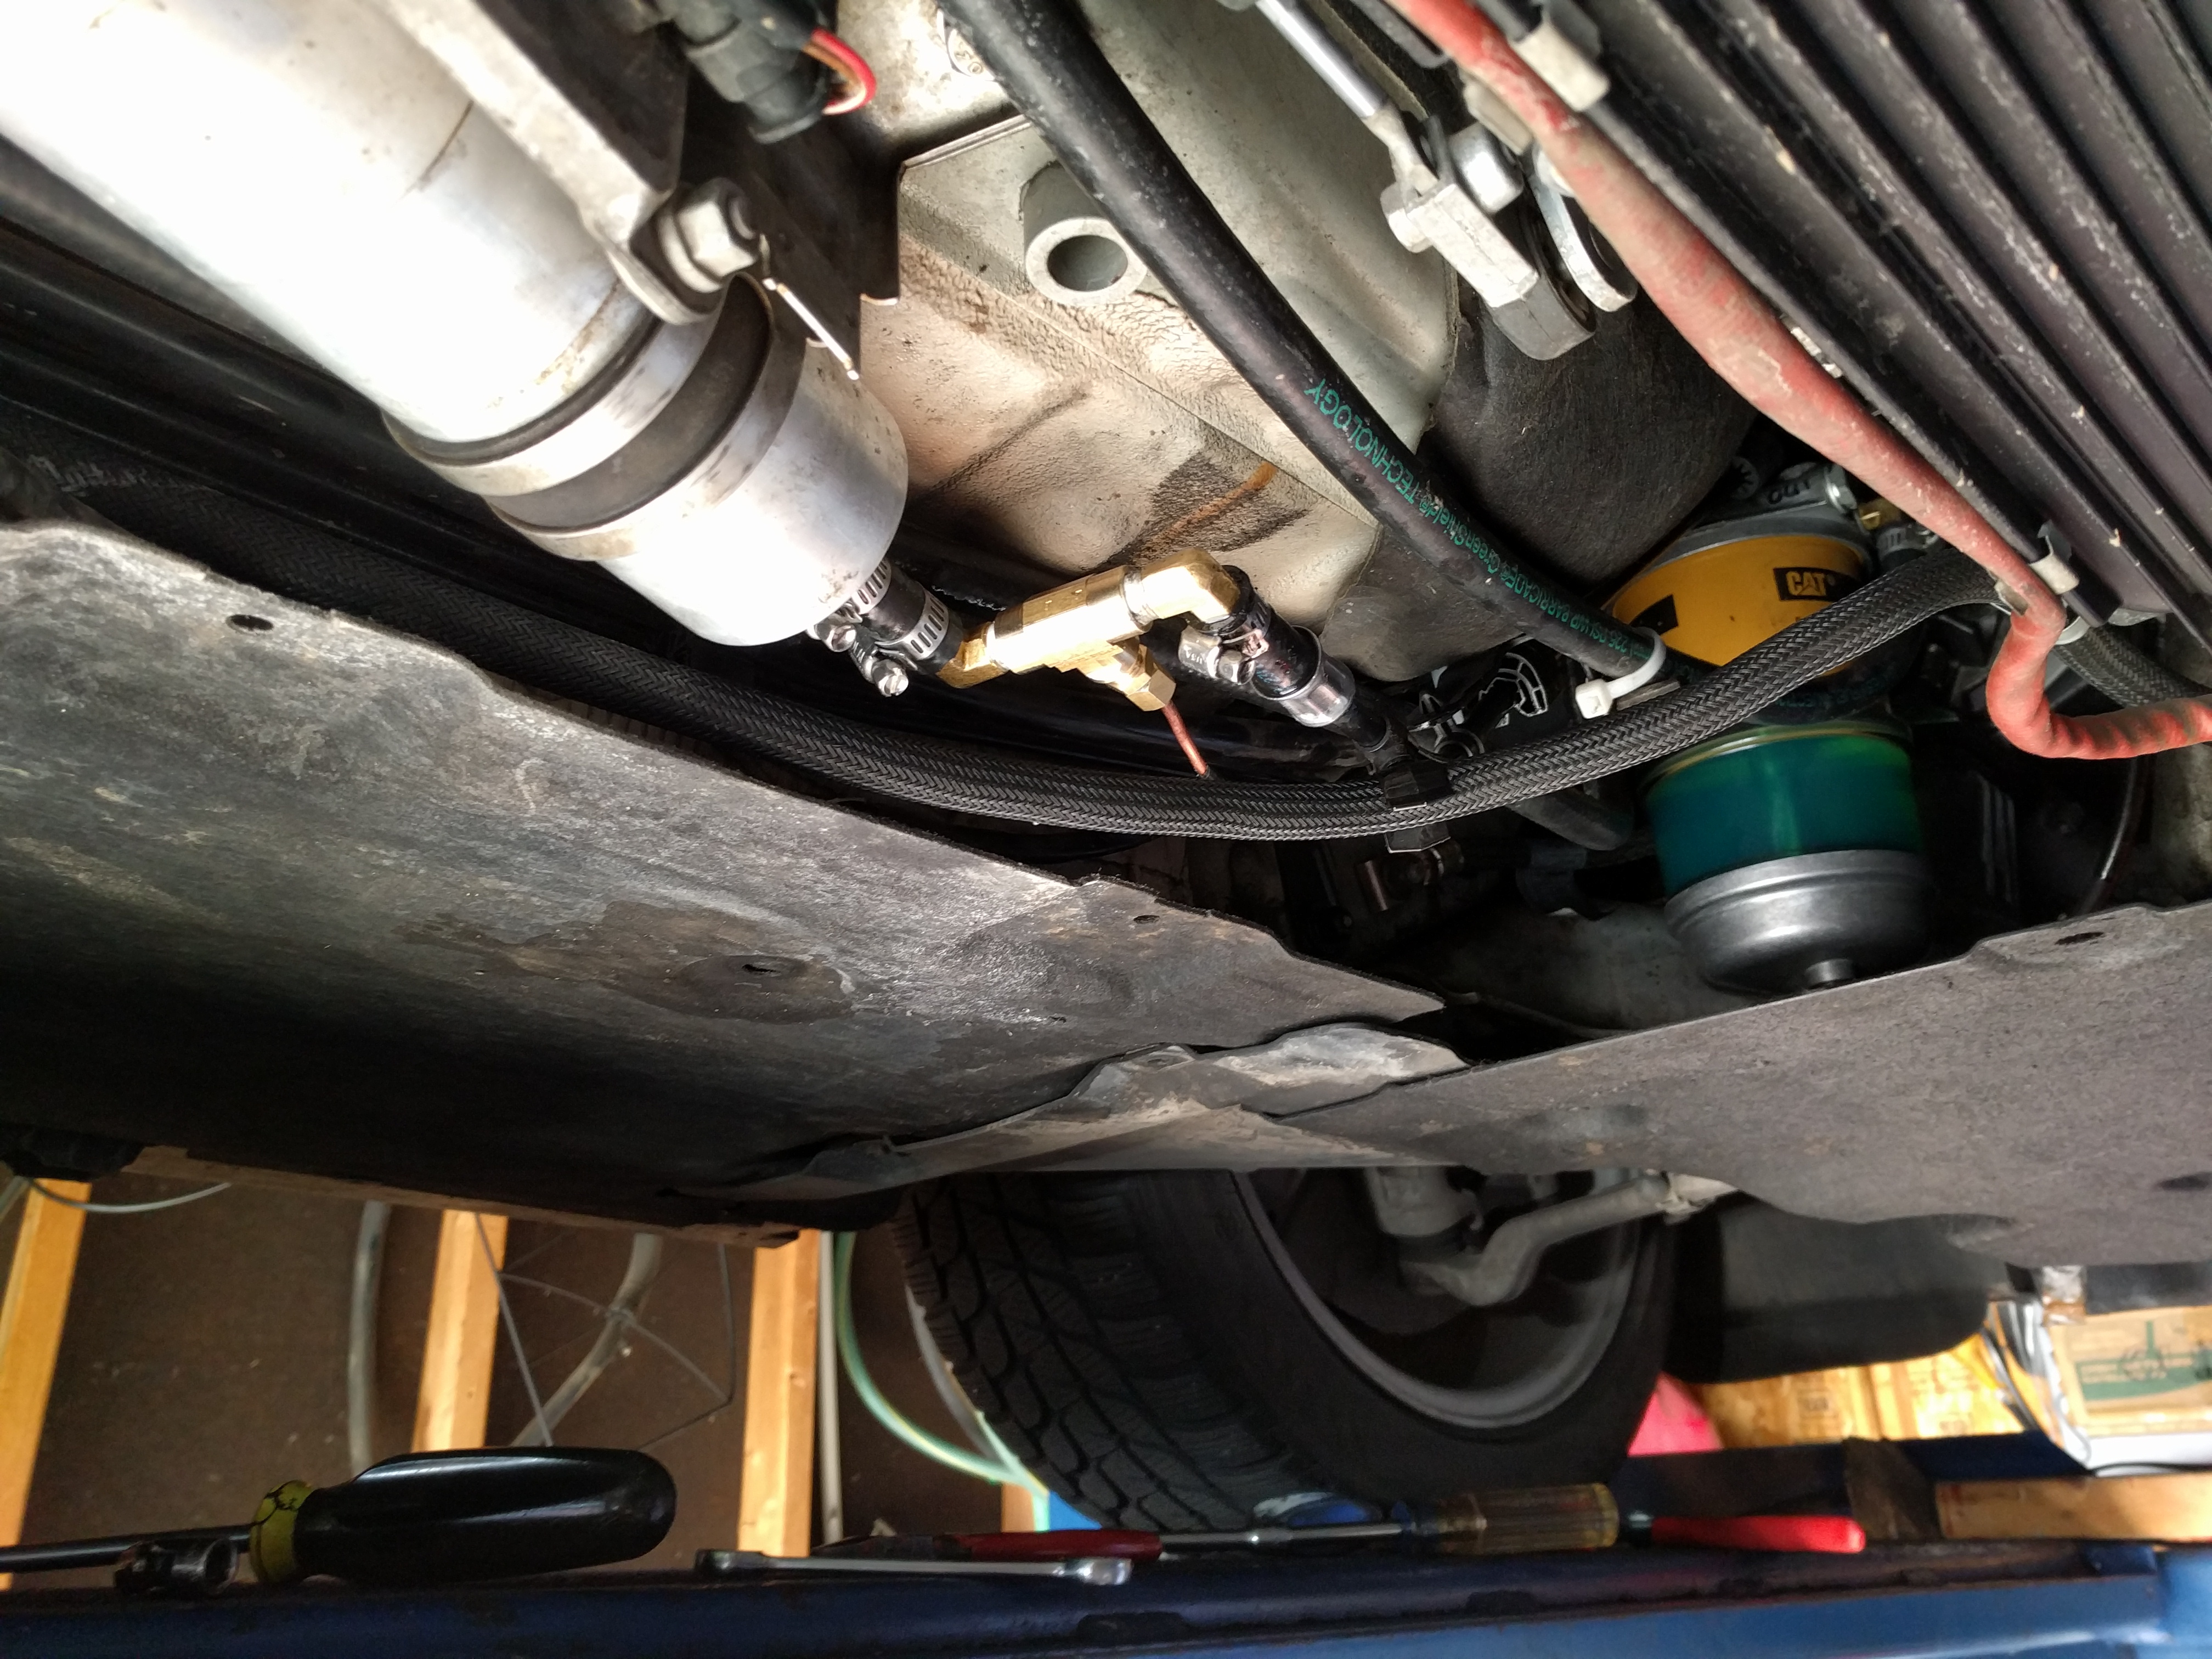
Tapping the fuel line post-filter is not exactly straightforward. There are lots of candidates for places to do that, but BMW’s proprietary faux plastic lines and fittings everywhere take all the fun out of it. A good way I found was to slide the stock filter back a couple inches in the mounting clamp and clock it about 15 degrees. This creates enough room to splice in the adapter quite nicely. Remember you are working on the clean side of the filter, so parts and activity related to opening it downstream of the filter must be meticulously maintained in pristine cleanliness. If not, the car will immediately tell you about your failure to do so upon restart.

I expect fuel filter maintenance intervals to increase significantly with the ability to actively monitor fuel pressure. Filters filter better the longer they are in service, right up to the point where they can no longer meet the flow requirement. I believe changing filters of almost any type on a schedule is just dumb. Of course there are specific exceptions to the rule, but they are limited to special types of equipment and conditions not in the consumer automotive realm.
Dumpsters behind quick lube joints across the country are always full of perfectly good filters. Also, it should be interesting to see pressure fluctuation (or not?) with a hotter tune at some point. I have a feeling fuel supply is not going to be an issue. The 9mm ID tubing should be adequate for up to around 400hp.

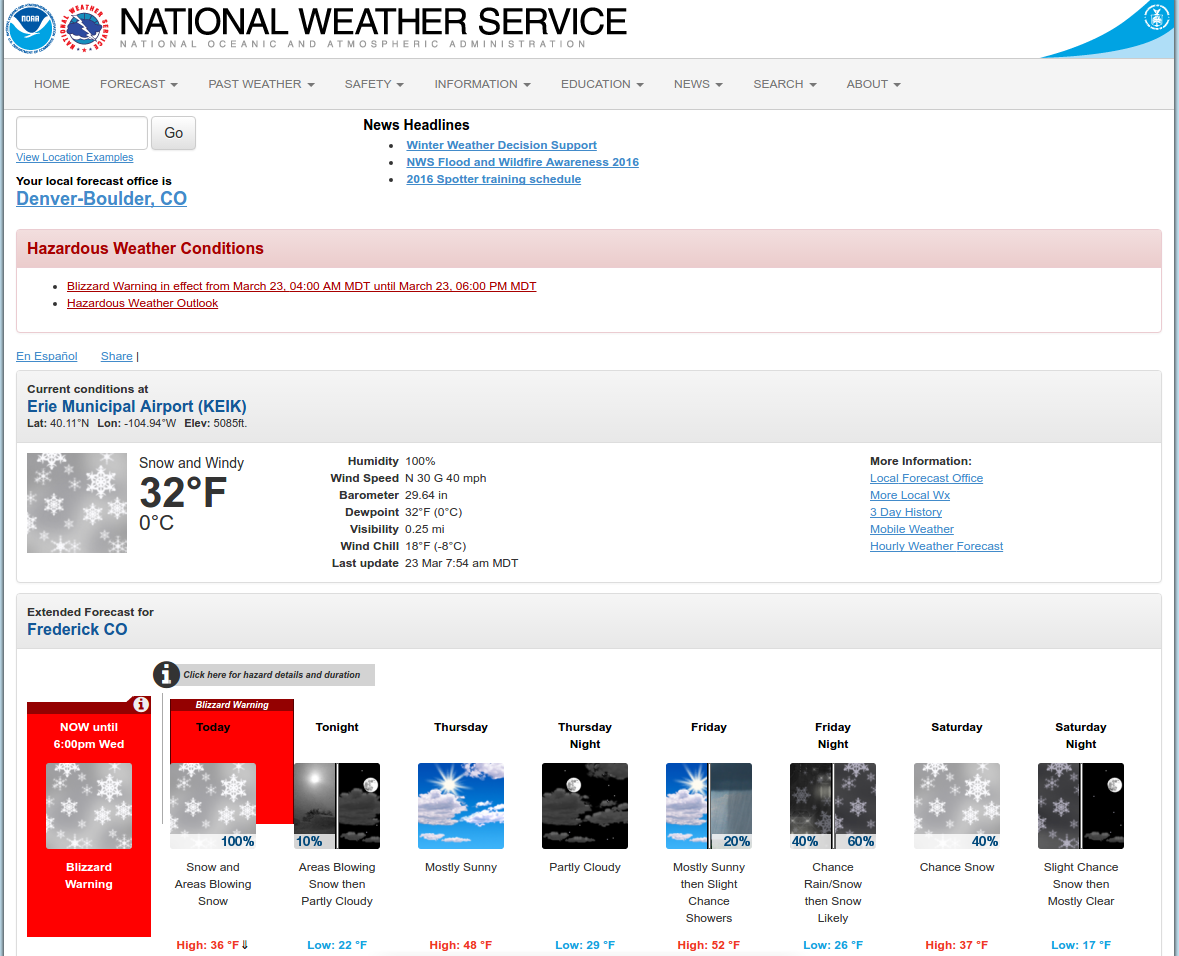
Spring Blizzard!
Last week’s snowstorm was nice. I mean, really – we needed the moisture. Looks like we’ll get double that amount or more today, and the wind is howling. It’s a full-blown (and I do mean blown) Rocky Mountain spring blizzard!

Spring Snowstorm!
We have 7″ after 24hours of pretty much continuous snowfall. Some places got more, others less. Should be over by this afternoon and gone by Sunday. Does make for an interesting Friday morning commute though, no doubt. The only roads not jammed are around the airport, and that’s probably only because alot of flights are cancelled.

Francie's Off to Orlando
Francie left for the airport with Avery about an hour ago. This is the big Volleyball Club trip she’s been looking forward to. Hopefully they will do well in the tournament and she’ll have plenty of new stats and video to impress the college recruiters with. It’s also her first trip away from home more-or-less on her own. They do grow up fast.

UI Claim Official – "Exhausted"
Paul D. Shaffer Status Update: Retired! And that’s OK by me, because I really am “exhausted.” Apparently my unemployment benefit ran out. At least I haven’t heard about any extension. So if the government no longer considers me “unemployed,” I guess that means I must be “retired,” right? Excellent.