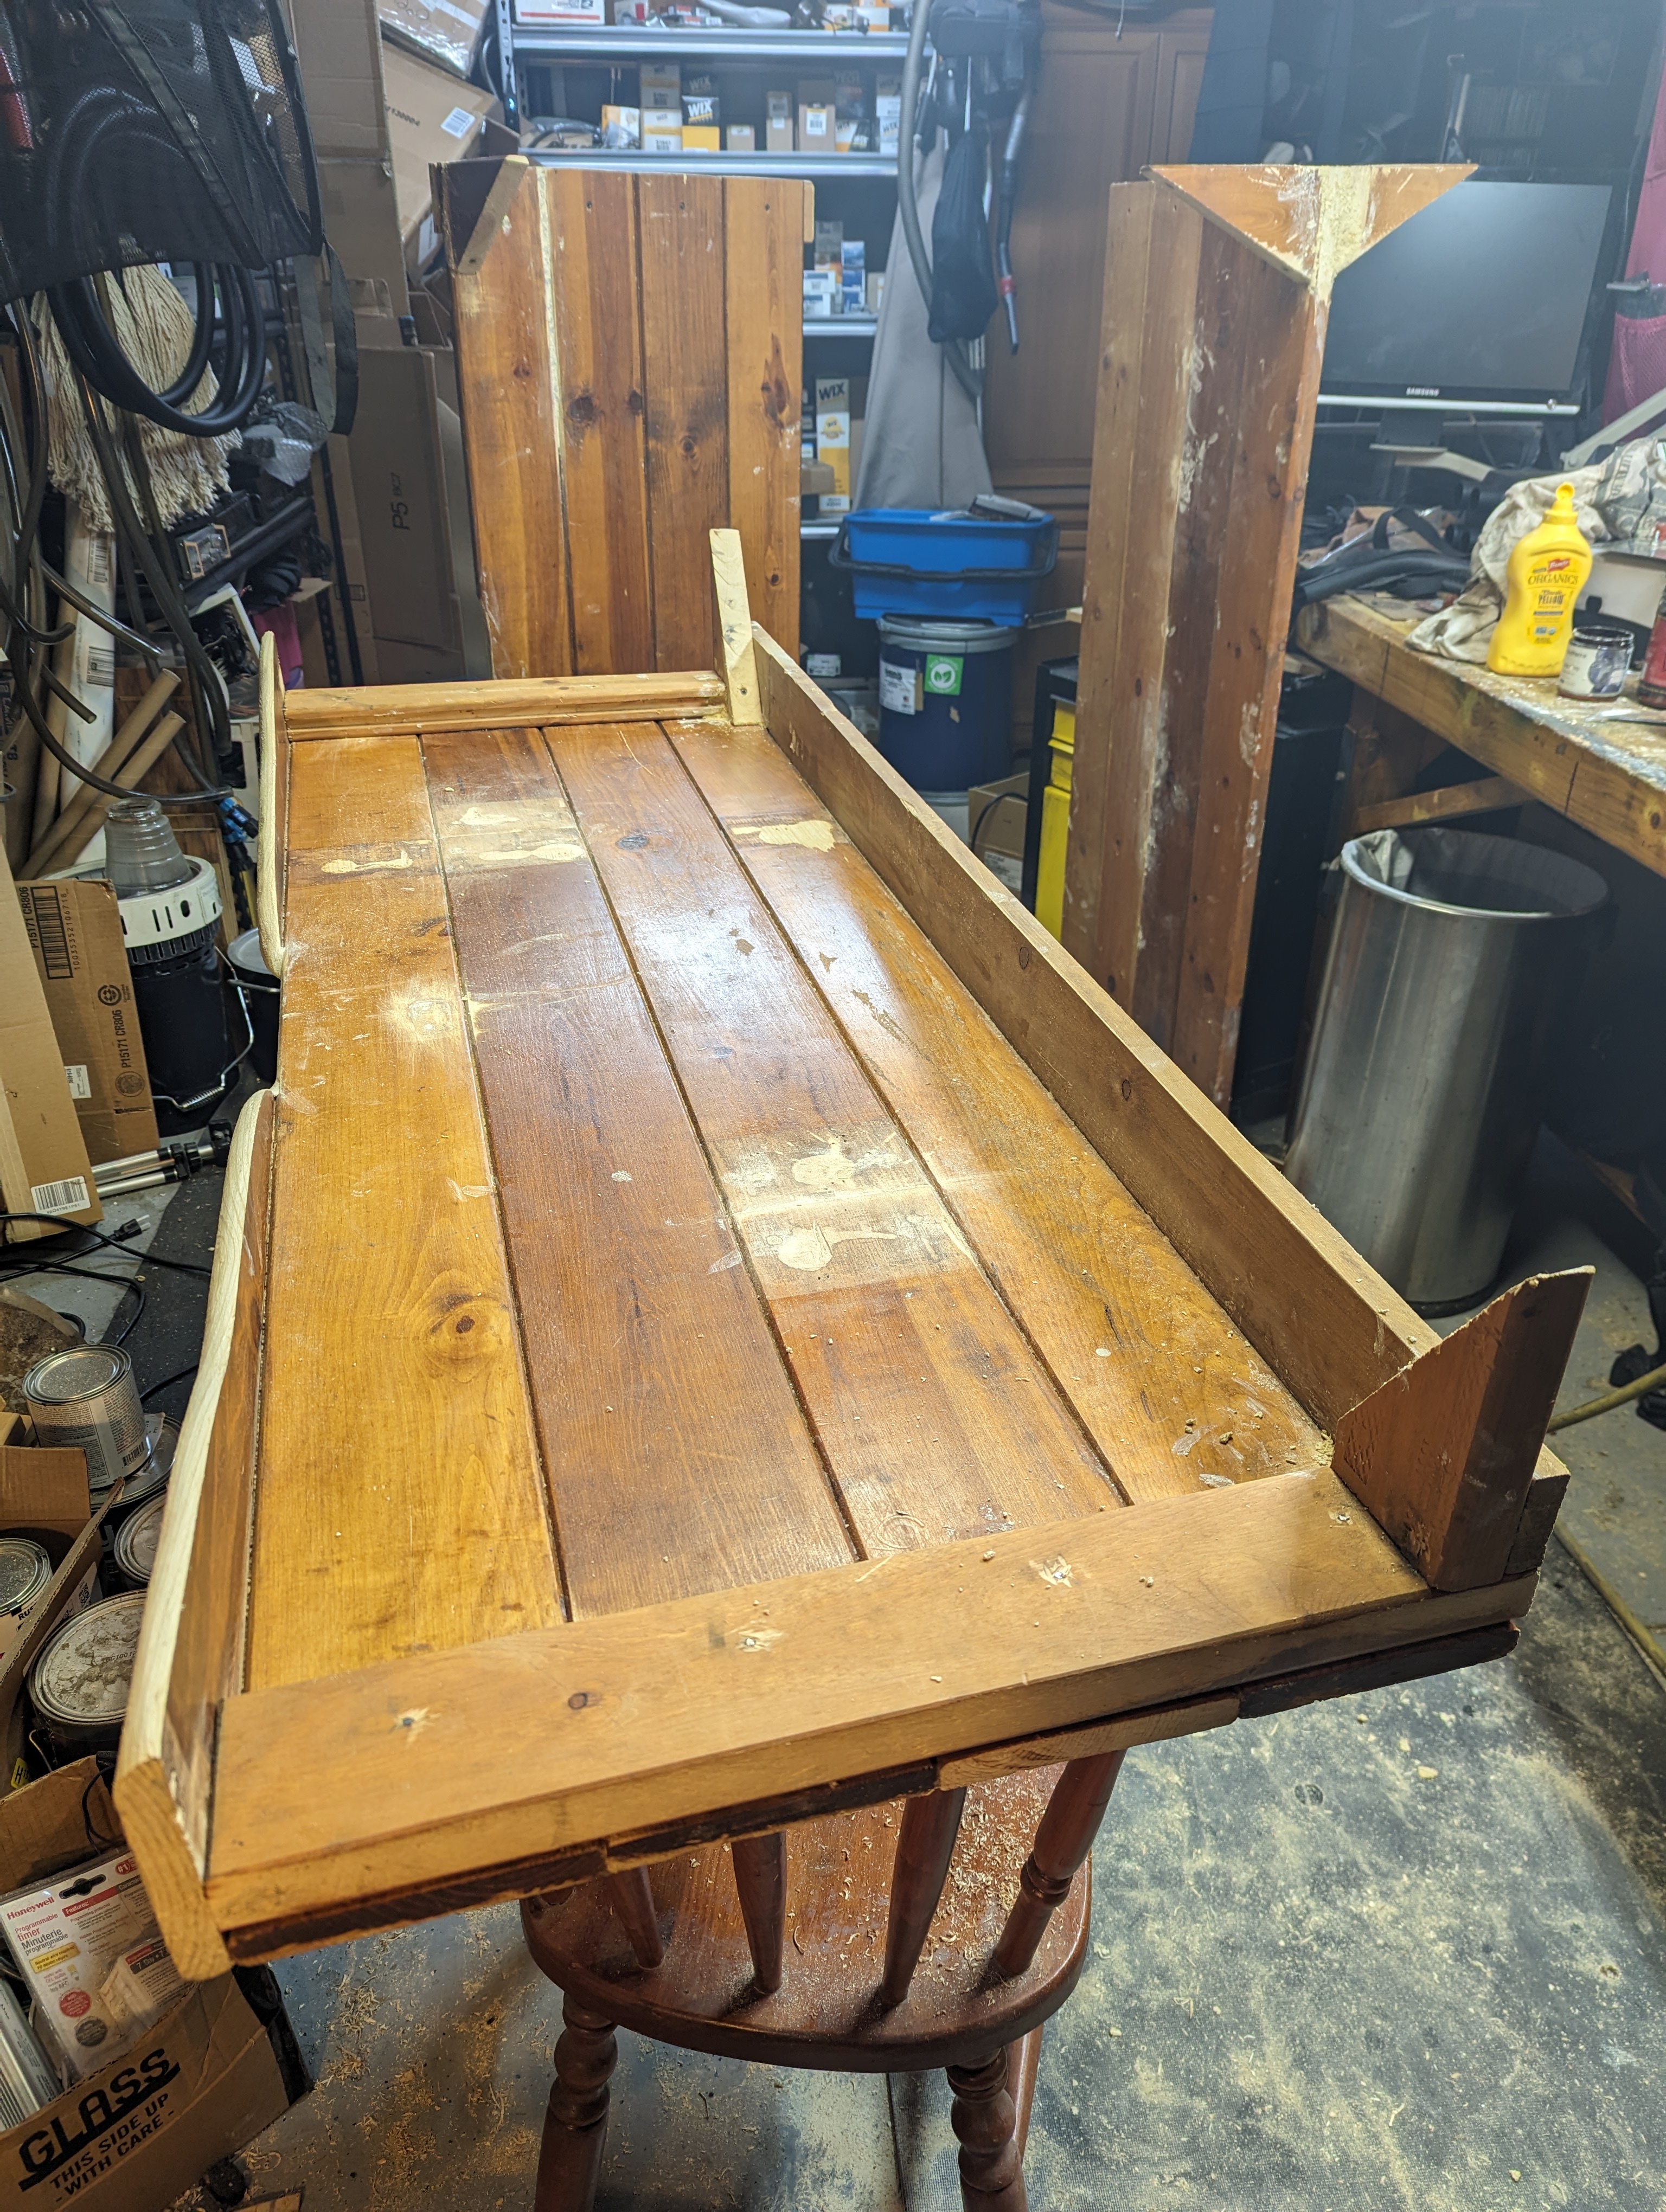
I’ve been doing some woodworking again lately. It’s inside stuff doable without moving around much and minimal exertion. We had three of the girl’s old beds taking up space in the basement, needing transmogrified. It was either that or burn ’em. They will become a big, sturdy shelf unit, making for a nice place to put another aquarium. The fish are one of those few hobbies accomplished mostly by just standing there staring at it. 😉
Probably at least a couple more weeks working on it an hour or two a day as time permits before it’s finished. Shelves almost done, still need sides assembled, put together and finished. Probably a week’s worth of just sanding still to do.
Those chairs and toolbox came from 3 different places we lived in Europe. The workbench was one of my 1st projects, built in Panama.
[table id=119 /]
Long Time -Boston
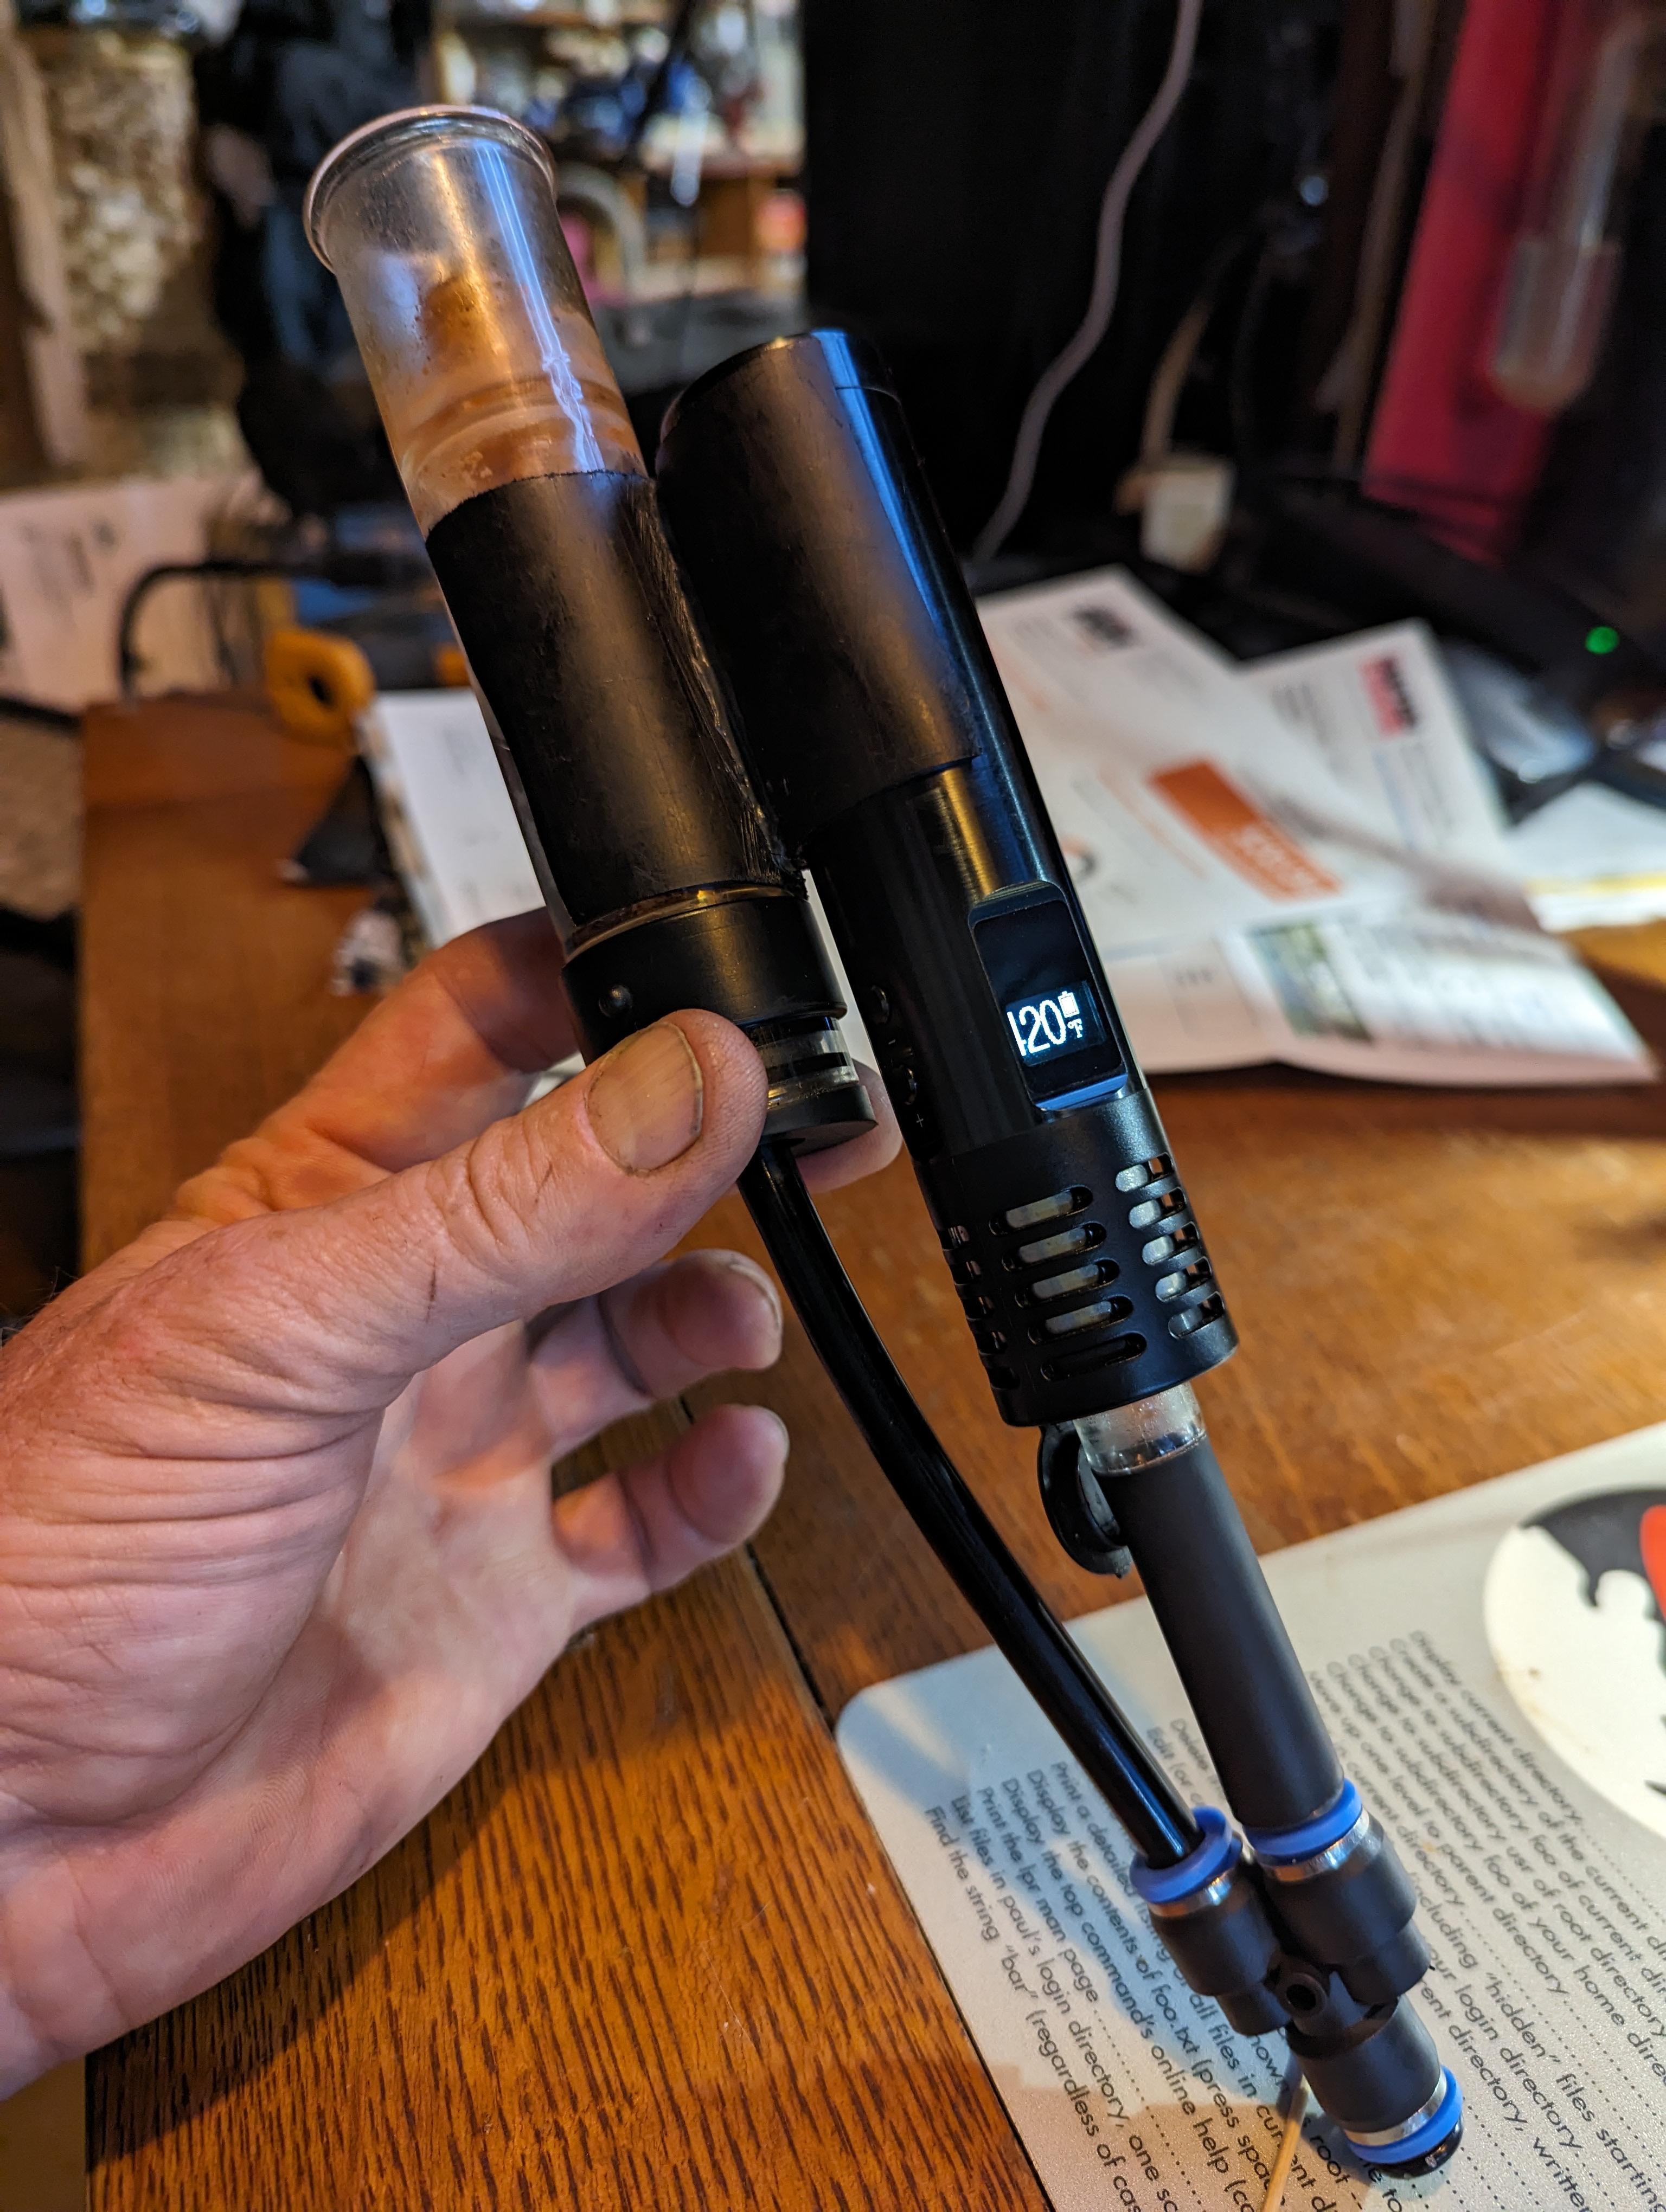
The Utilian water adapter is great, but not real practical for mobility. I stopped using it after last vacay just being lazy. Sitting around dreaming up ways to cool the oft-used gadget caught me looking at the glass part of the eyedropper from Jax’s just finished bottle of Cyclosporine. It’s now being utilized in an Air-Max stem.
My lungs must be so parched I can’t really tell the difference now, but it’s obviously doing something by the looks of much-increased condensation. That only comes from cooling. I grind the stuff to a powder, so it cuts down on any particulate getting through, as well. Stems get switched out weekly for cleaning. It’s already looking like a week after five days.
The real verdict comes where the rubber meets the road. Even a long stem used to get uncomfortably warm right at the mouthpiece with me huffing hard on high towards the end of a bowl.
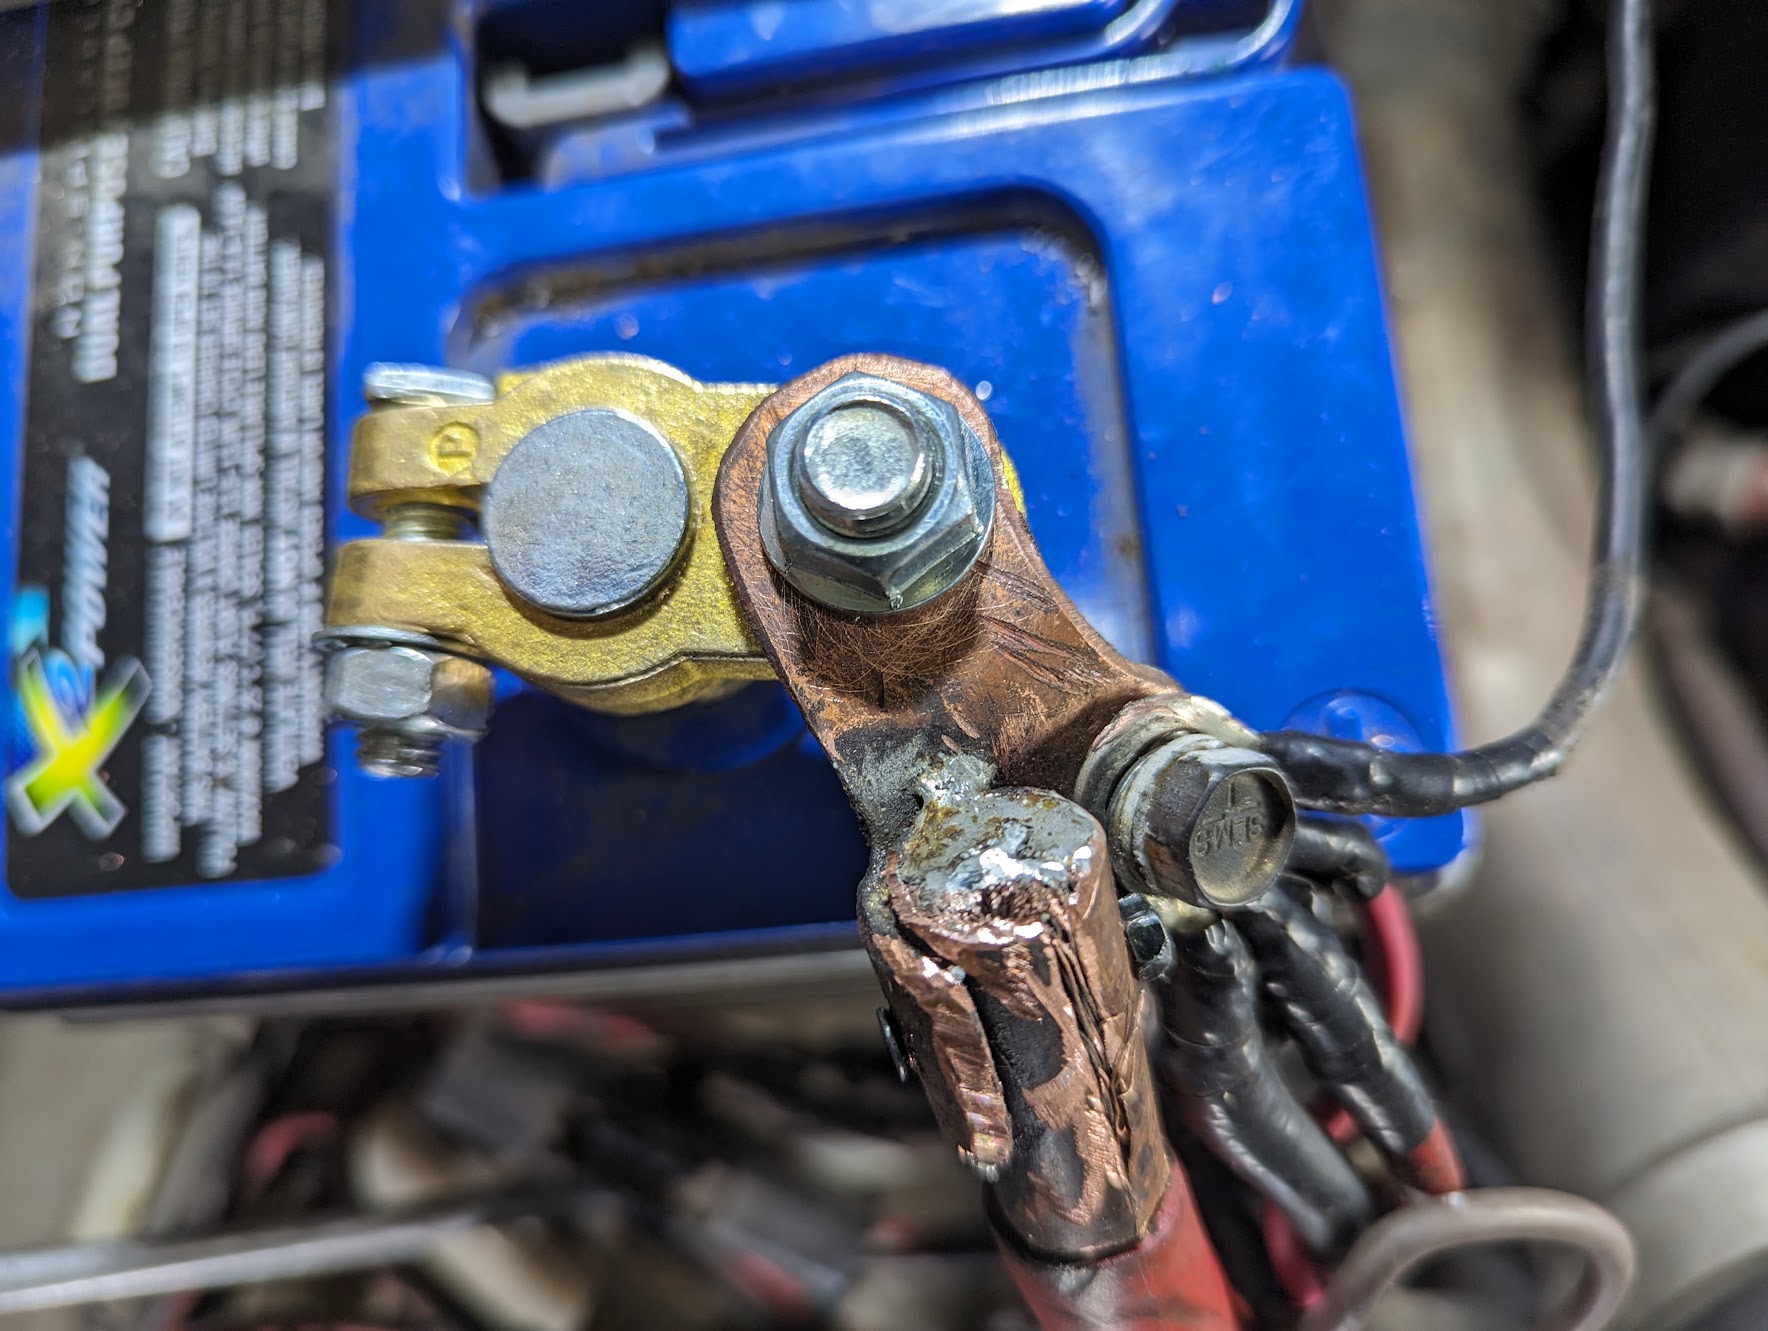
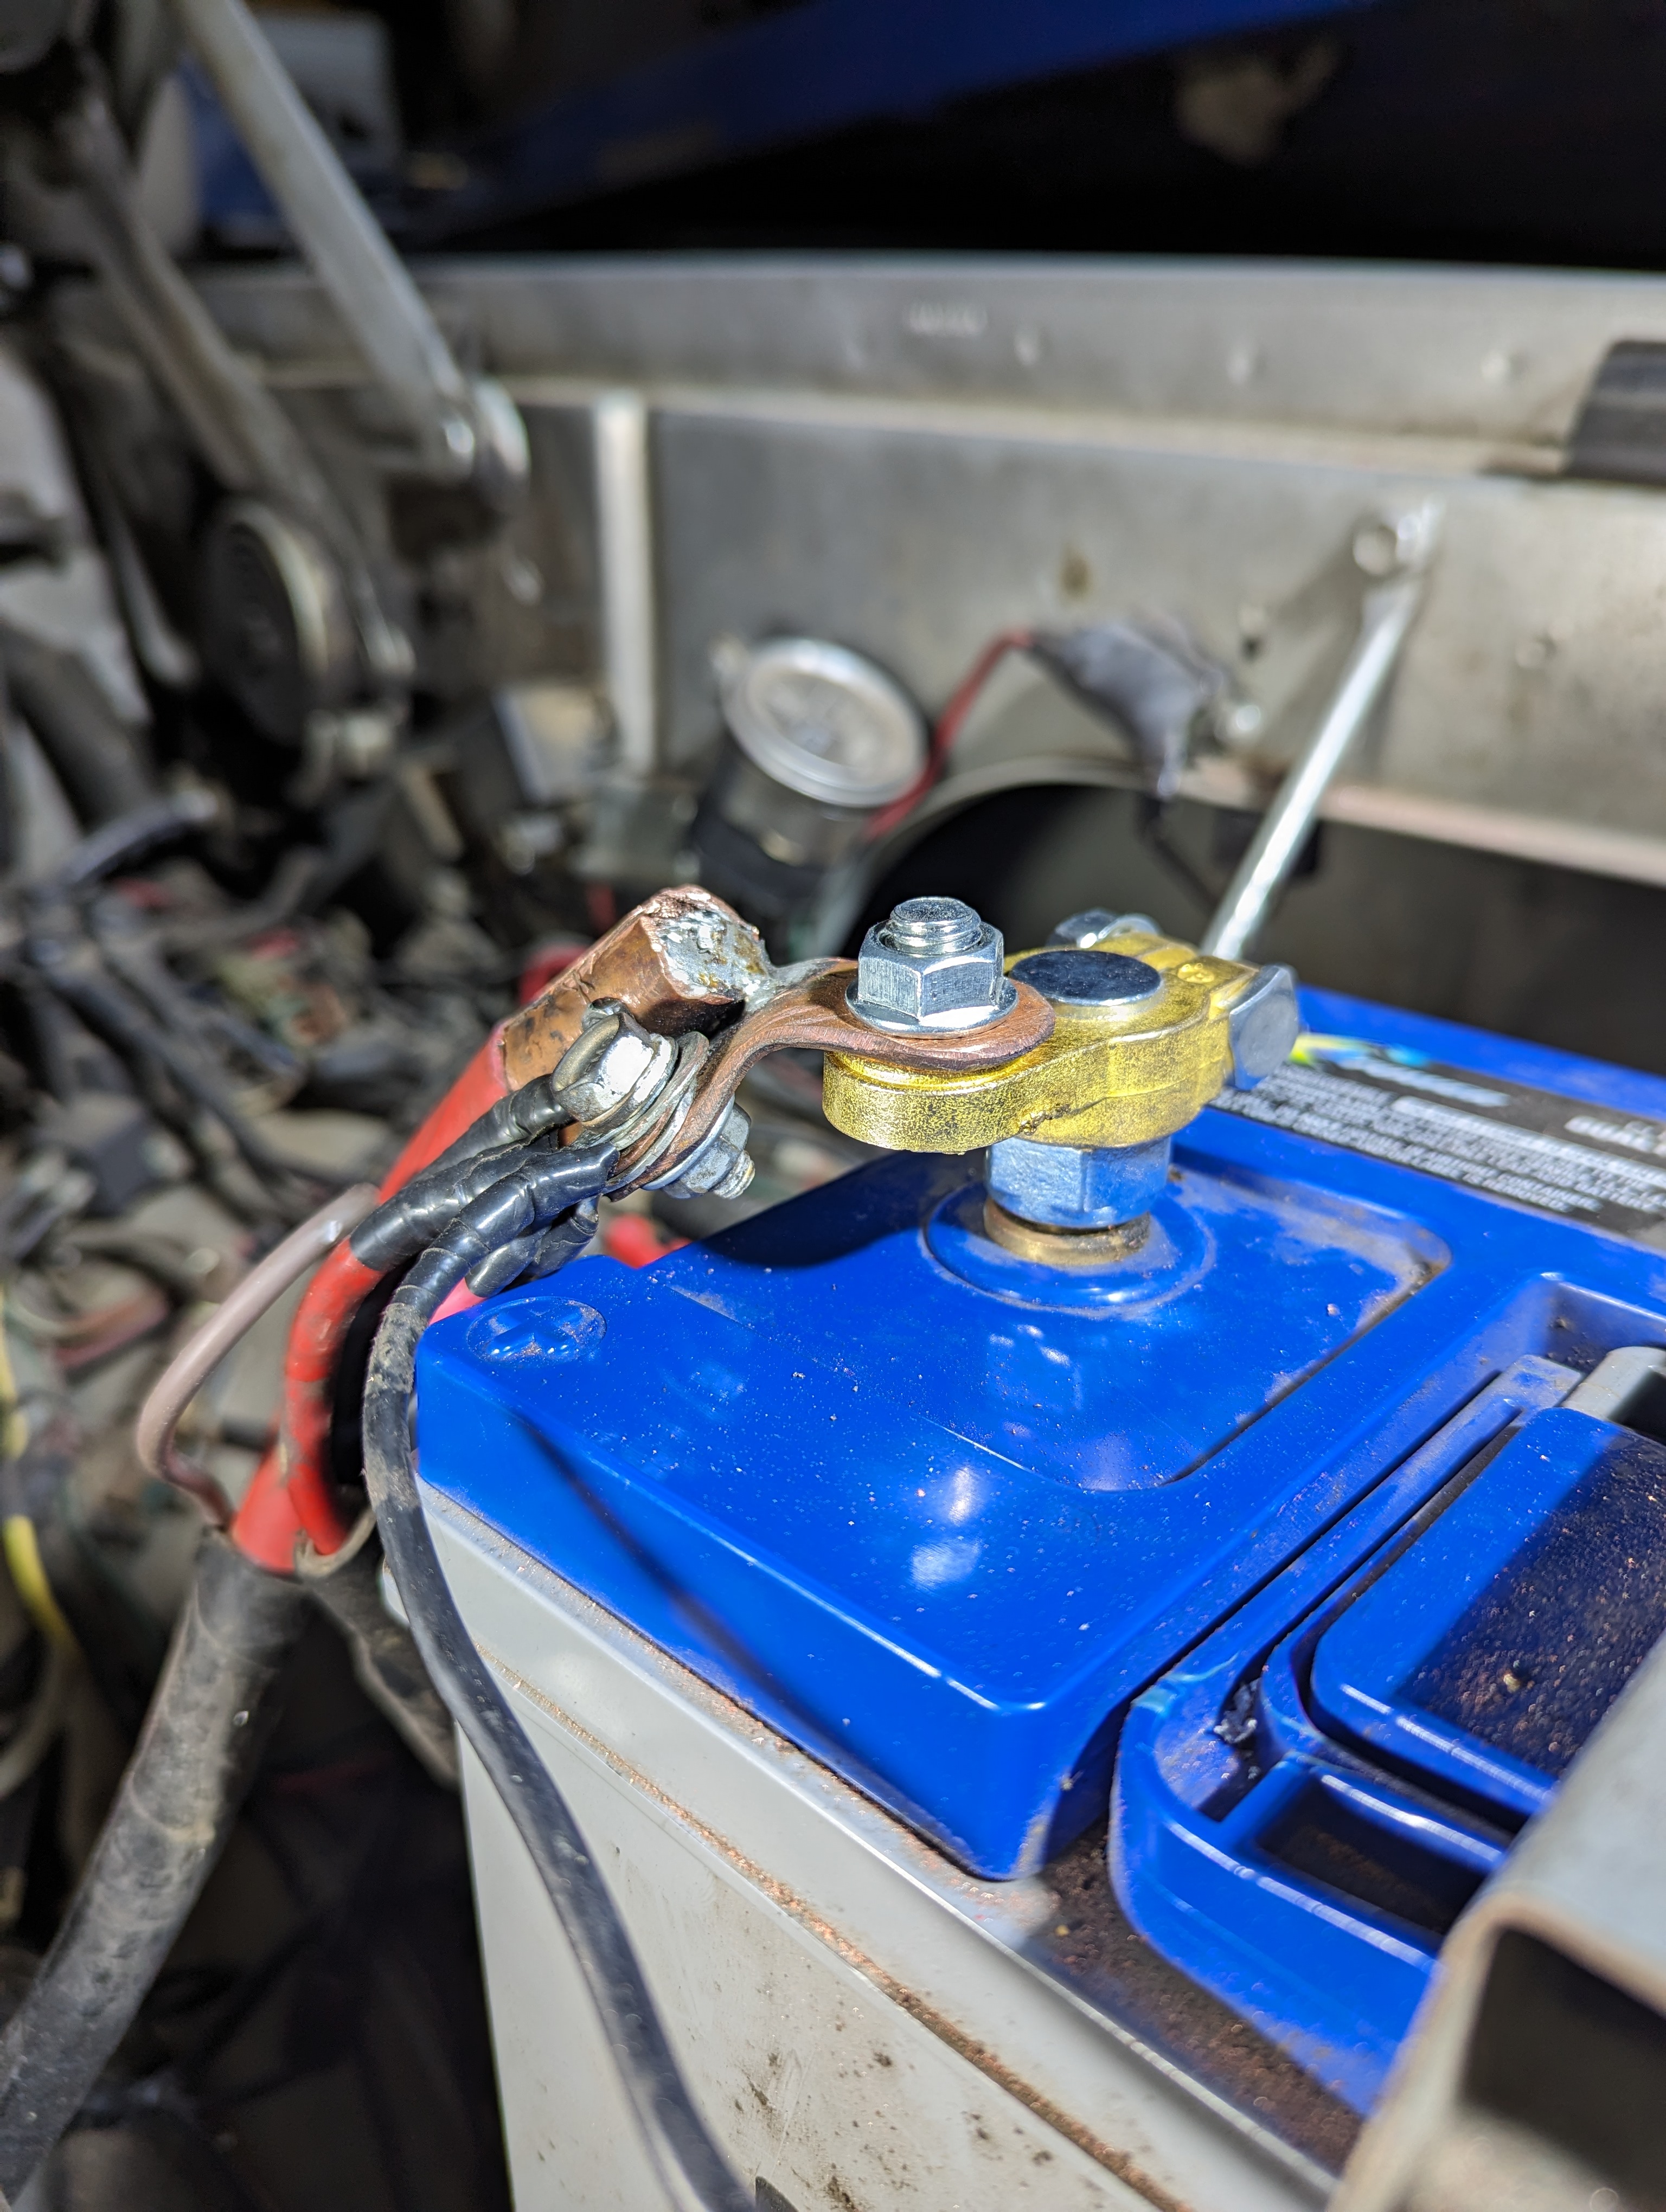
I don’t know who designed these things, but the manufacturer application in alot of vehicles I have owned over the years really sucks. Soft crimped-on lead connectors coupled with enhanced corrosion potential in certain environments simply doom them to premature failure.
I finally decided to repair/upgrade the Dodge’s terminals one last time after they failed me for at least the 4th time. Not difficult to wiggle the dang things for a start after they come loose, but it gets old after awhile. These are done with a piece of sheet copper formed to shape and soldered into the cables with fail-safe clamping pins.
Hardened top posts and brass clamps seal the deal.
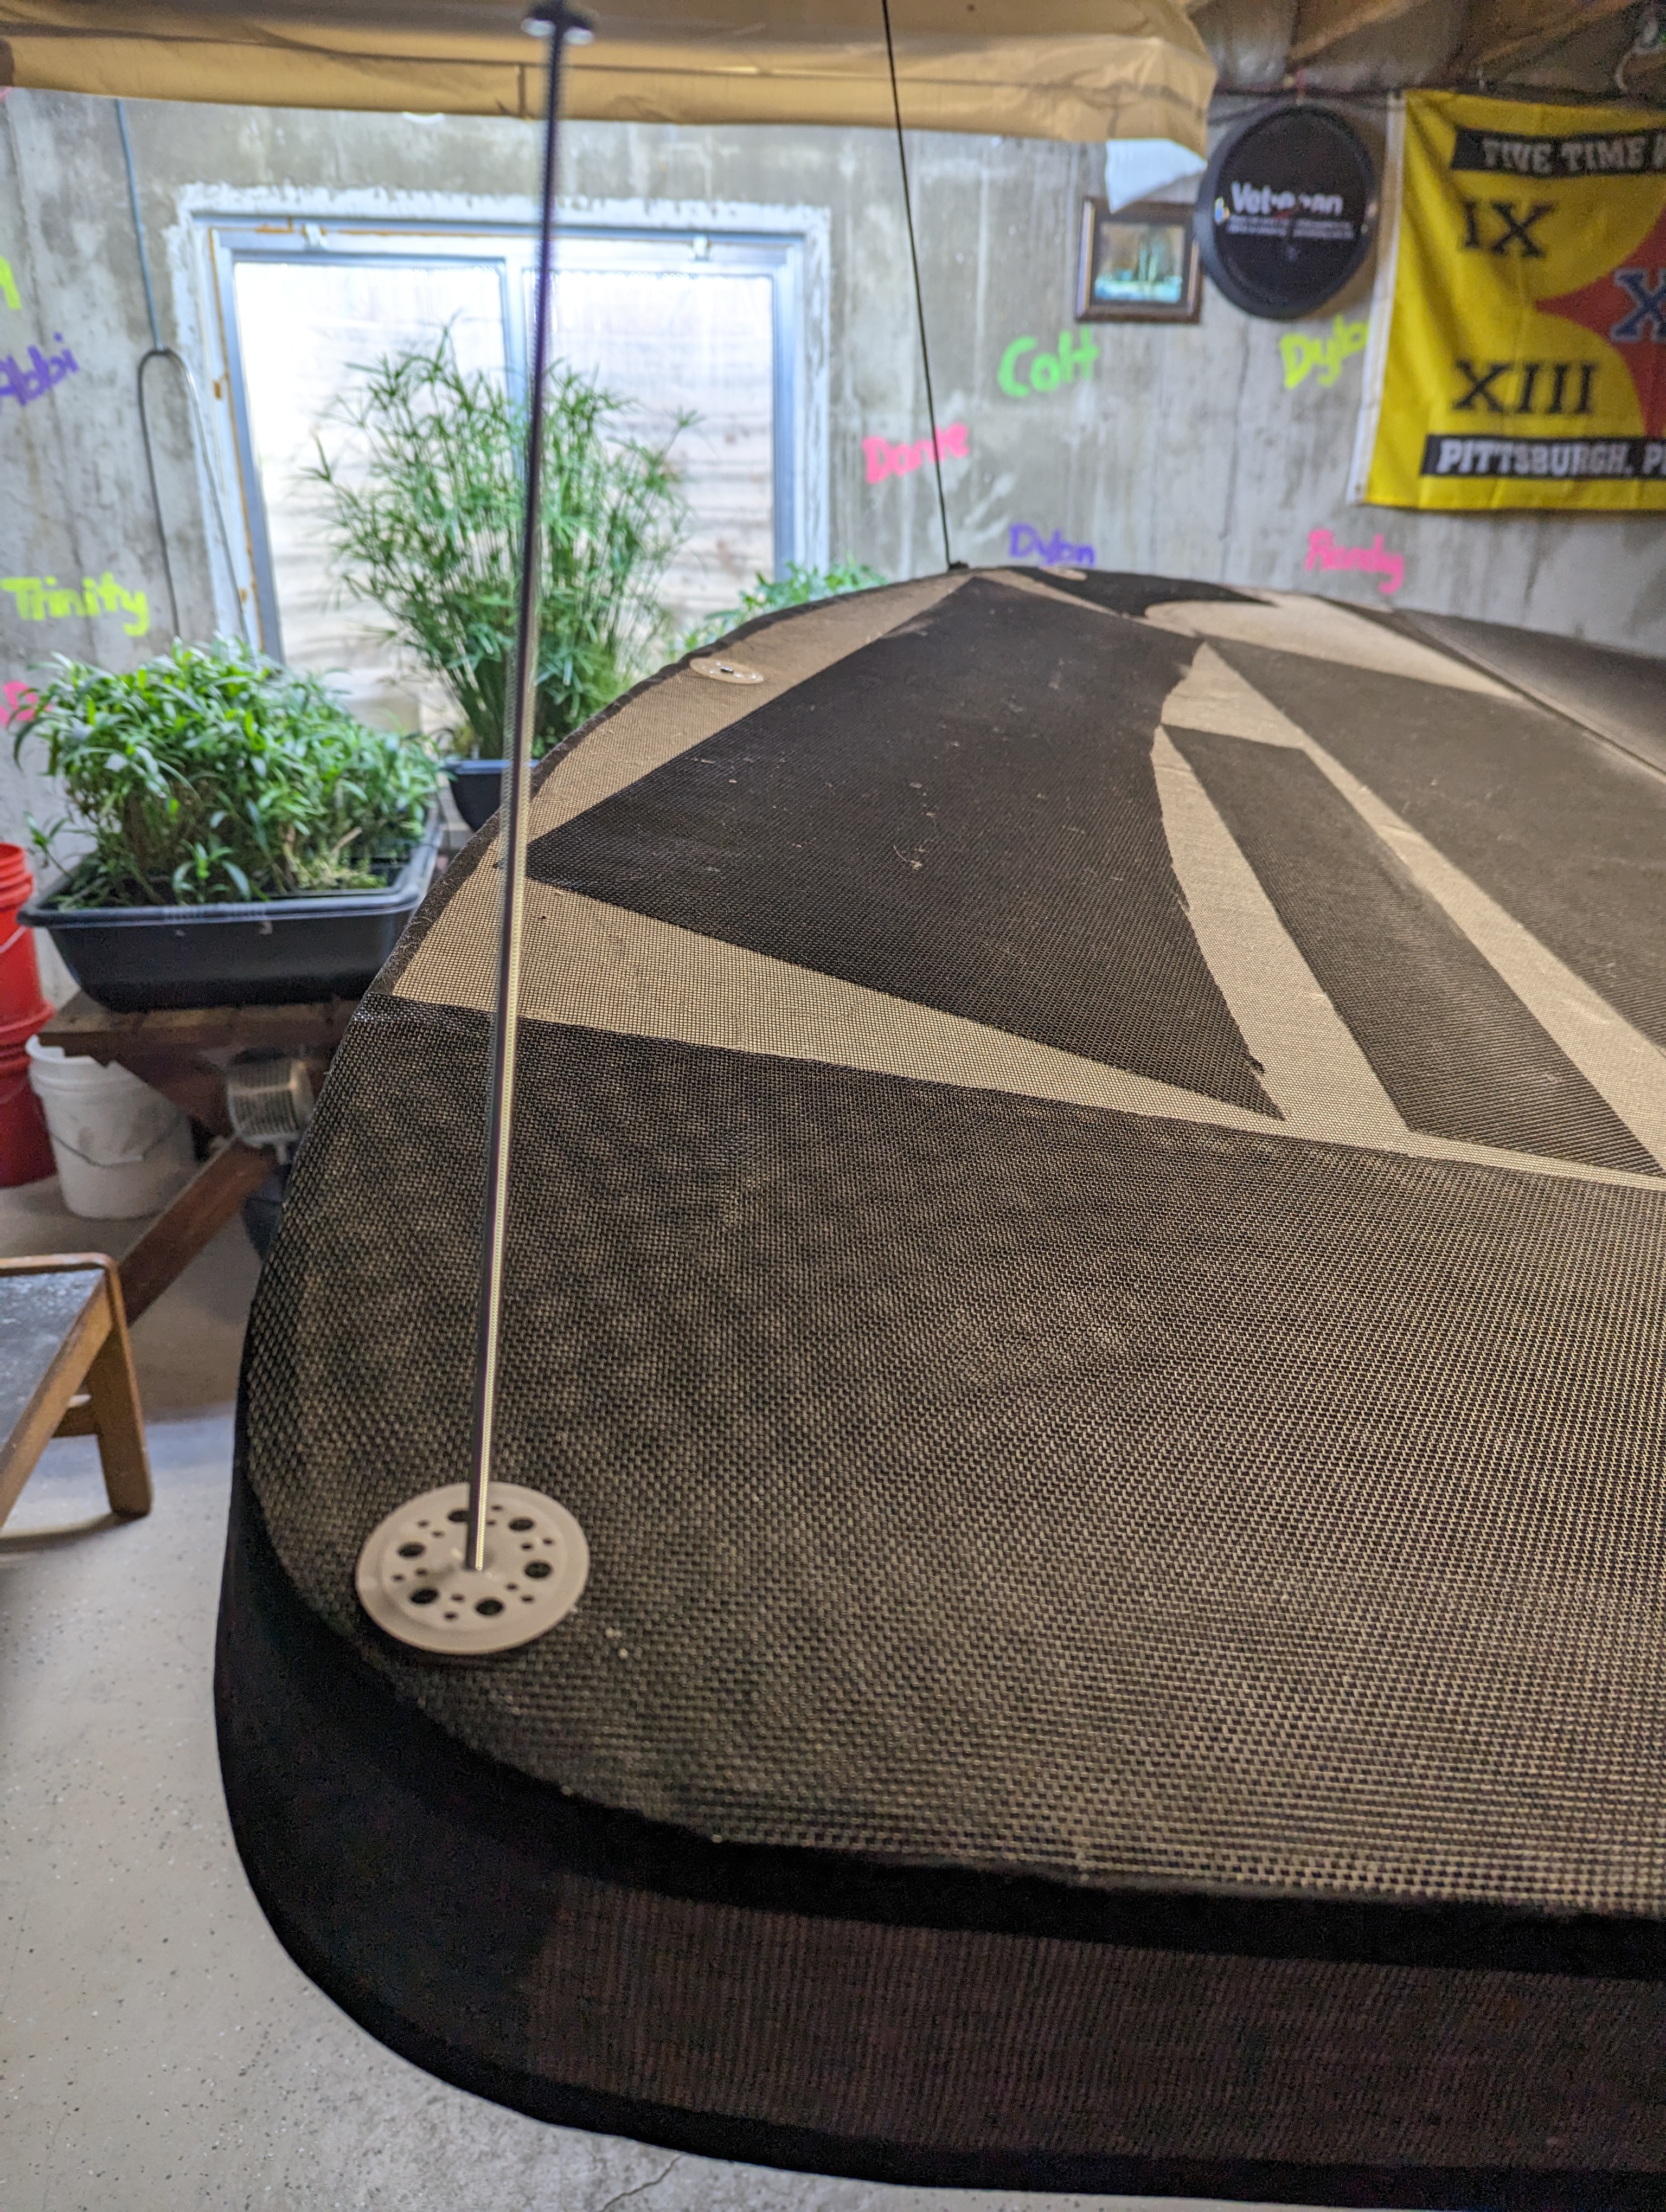
I hate these things, doomed to premature failure. Anybody who ever owned one knows it. They’re manufactured this way for two reasons only: cost saving and max profit. Ends up being one reason, at the end of the day. Styrofoam and vinyl fabric are cheap. Sewn together in handy hot tub covers they can even be quite attractive and useful. Leave them on the tub for a few years and they become waterlogged nightmares as the stitching unravels. Go ahead waste ur time trying to dry them out on sunny days. Then either buy another one, or probably like rich people do, get a whole new tub.
Admittedly the materials bill for this one was probably as much as the cost of a new replacement due to the skyrocketing price of glue, coatings, and materials of all kinds, not to mention the disturbing trajectory on my time premium lately. With the exception of the fasteners, handles and reinforcing fitment hardware were fabbed from on-hand scraps. The center handle insert was a big aluminum safety sign that used to hang on a wall down at Redneck® years ago. The thing is mostly just Styrofoam, but now practically impervious to all patio hazards, including moisture ingress. It’ll probably outlast me.
I won’t bore anyone with a step-by-step or itemized bill of supplies because it’s really simple, just time consuming and tricky: Cut stuff up, glue/screw it together and paint. I’m pretty sure you could do this with just the Styrofoam and Truck Bed Liner (TBL) for around $300 if you can find the right thickness, cut to size and coat, without all the fancy design queues. I just like things a bit more robust and serviceable, so I’ll mention a few items of note with some examples and pics. There’s a little video showing how to make fastener holes in the Styrofoam for anyone wanting to spend some $$$ going for the full monty.
Most importantly, be sure to get the water-based TBL and test it, for at least the first couple coats – goes for glues, as well. The Super 77 pictured below works well, BUT (big but) the carrier/propellant, which flashes off in seconds, is styro-reactive. Just go very light on direct application with it. Acrylic paints are mostly safe for non-reactive Styrofoam application, but the TBL is all you really need. You might imagine any number of even more expensive epoxies, whatever. How much is totally budget dependent and probably directly correlates to longevity. I’d say a minimum of three TBL coats would give decent durability, if you’re careful with it. Have a place with good, active ventilation to work on the coating for as long as it takes to do that. Outside in the summer would be ideal.
This prototype is a 2-layer design spray-glued-and-screwed together for reinforcement and handles. The screen added as a first coating layer gives it better chip and impact resistance. Just remember everything you do to it adds weight. I can easily handle this one with my back broken in two places, so it came in light enough on the scales. That value would be the amount my hardware and TBL out-weighs the old vinyl fabric. Not sure how much of the coating mass cures off but IIRC, this one is just a bit heavier than the dry original with six coats on it. It’s what instigated this project in the 1st place – I can’t handle the old one anymore – too heavy. Still debating if I’ll put an apron on or just paint it again with white roof coating later next summer after it’s completely cured, leading to the last important note…
Total time spent on construction probably around thirty hours including stuff like looking for fasteners at Lowes. Be sure to anticipate at least a couple weeks curing time before actually placing the thing in use, if you go the TBL route. The stuff dries to touch quickly, forming a soft rubber-like coating in just a day or two. But it continues gassing out for weeks until a much harder surface eventually emerges. That’s why it’s sitting on the tarp now. Otherwise it sticks to the tub top.
OBTW, the Styrofoam itself is 50% thicker, so it should pay back with electricity savings over time. Already noticed it’s not running as much. There might be a market for this and I bet they could easily be mass produced for less than $100 a pop. Just need the right equipment and facilities. The handles and reinforcement could be 1-piece injection-cast plastic or aluminum with a real 1-pass commercial-grade spray-on or dip coating.
Hot tub tops are a real PITA. Replacements can be had for up to around $6-700, depending on the size of your rig. You can get one for less, that won’t get waterlogged after a few years with a little home arts ‘n crafts to scale. Full write-up coming in another week or two, depending on how long it takes to get the thing through this last couple steps and out of my basement…
Added the 4th member of this group last week. Started with two, it’ll be finished with six in two more years. That entertainment center’s really packing a punch now. I haven’t checked labels and done the math, but with inverters wired up and diesel heaters running, we can keep the house habitable for some period of time in a cold-weather power outage now.
They’re wired in parallel with 50-amp fusible links, on a float charger. Next step will be integrating a commercial-grade whole-house-capacity unit into the solar system and we’ll be off the electric grid. I’m tired of the bullshyt. I encourage everybody who can afford to do so, follow suit, in some form or fashion – every little bit helps. Solar panels of all kinds are available for ever-dropping prices.
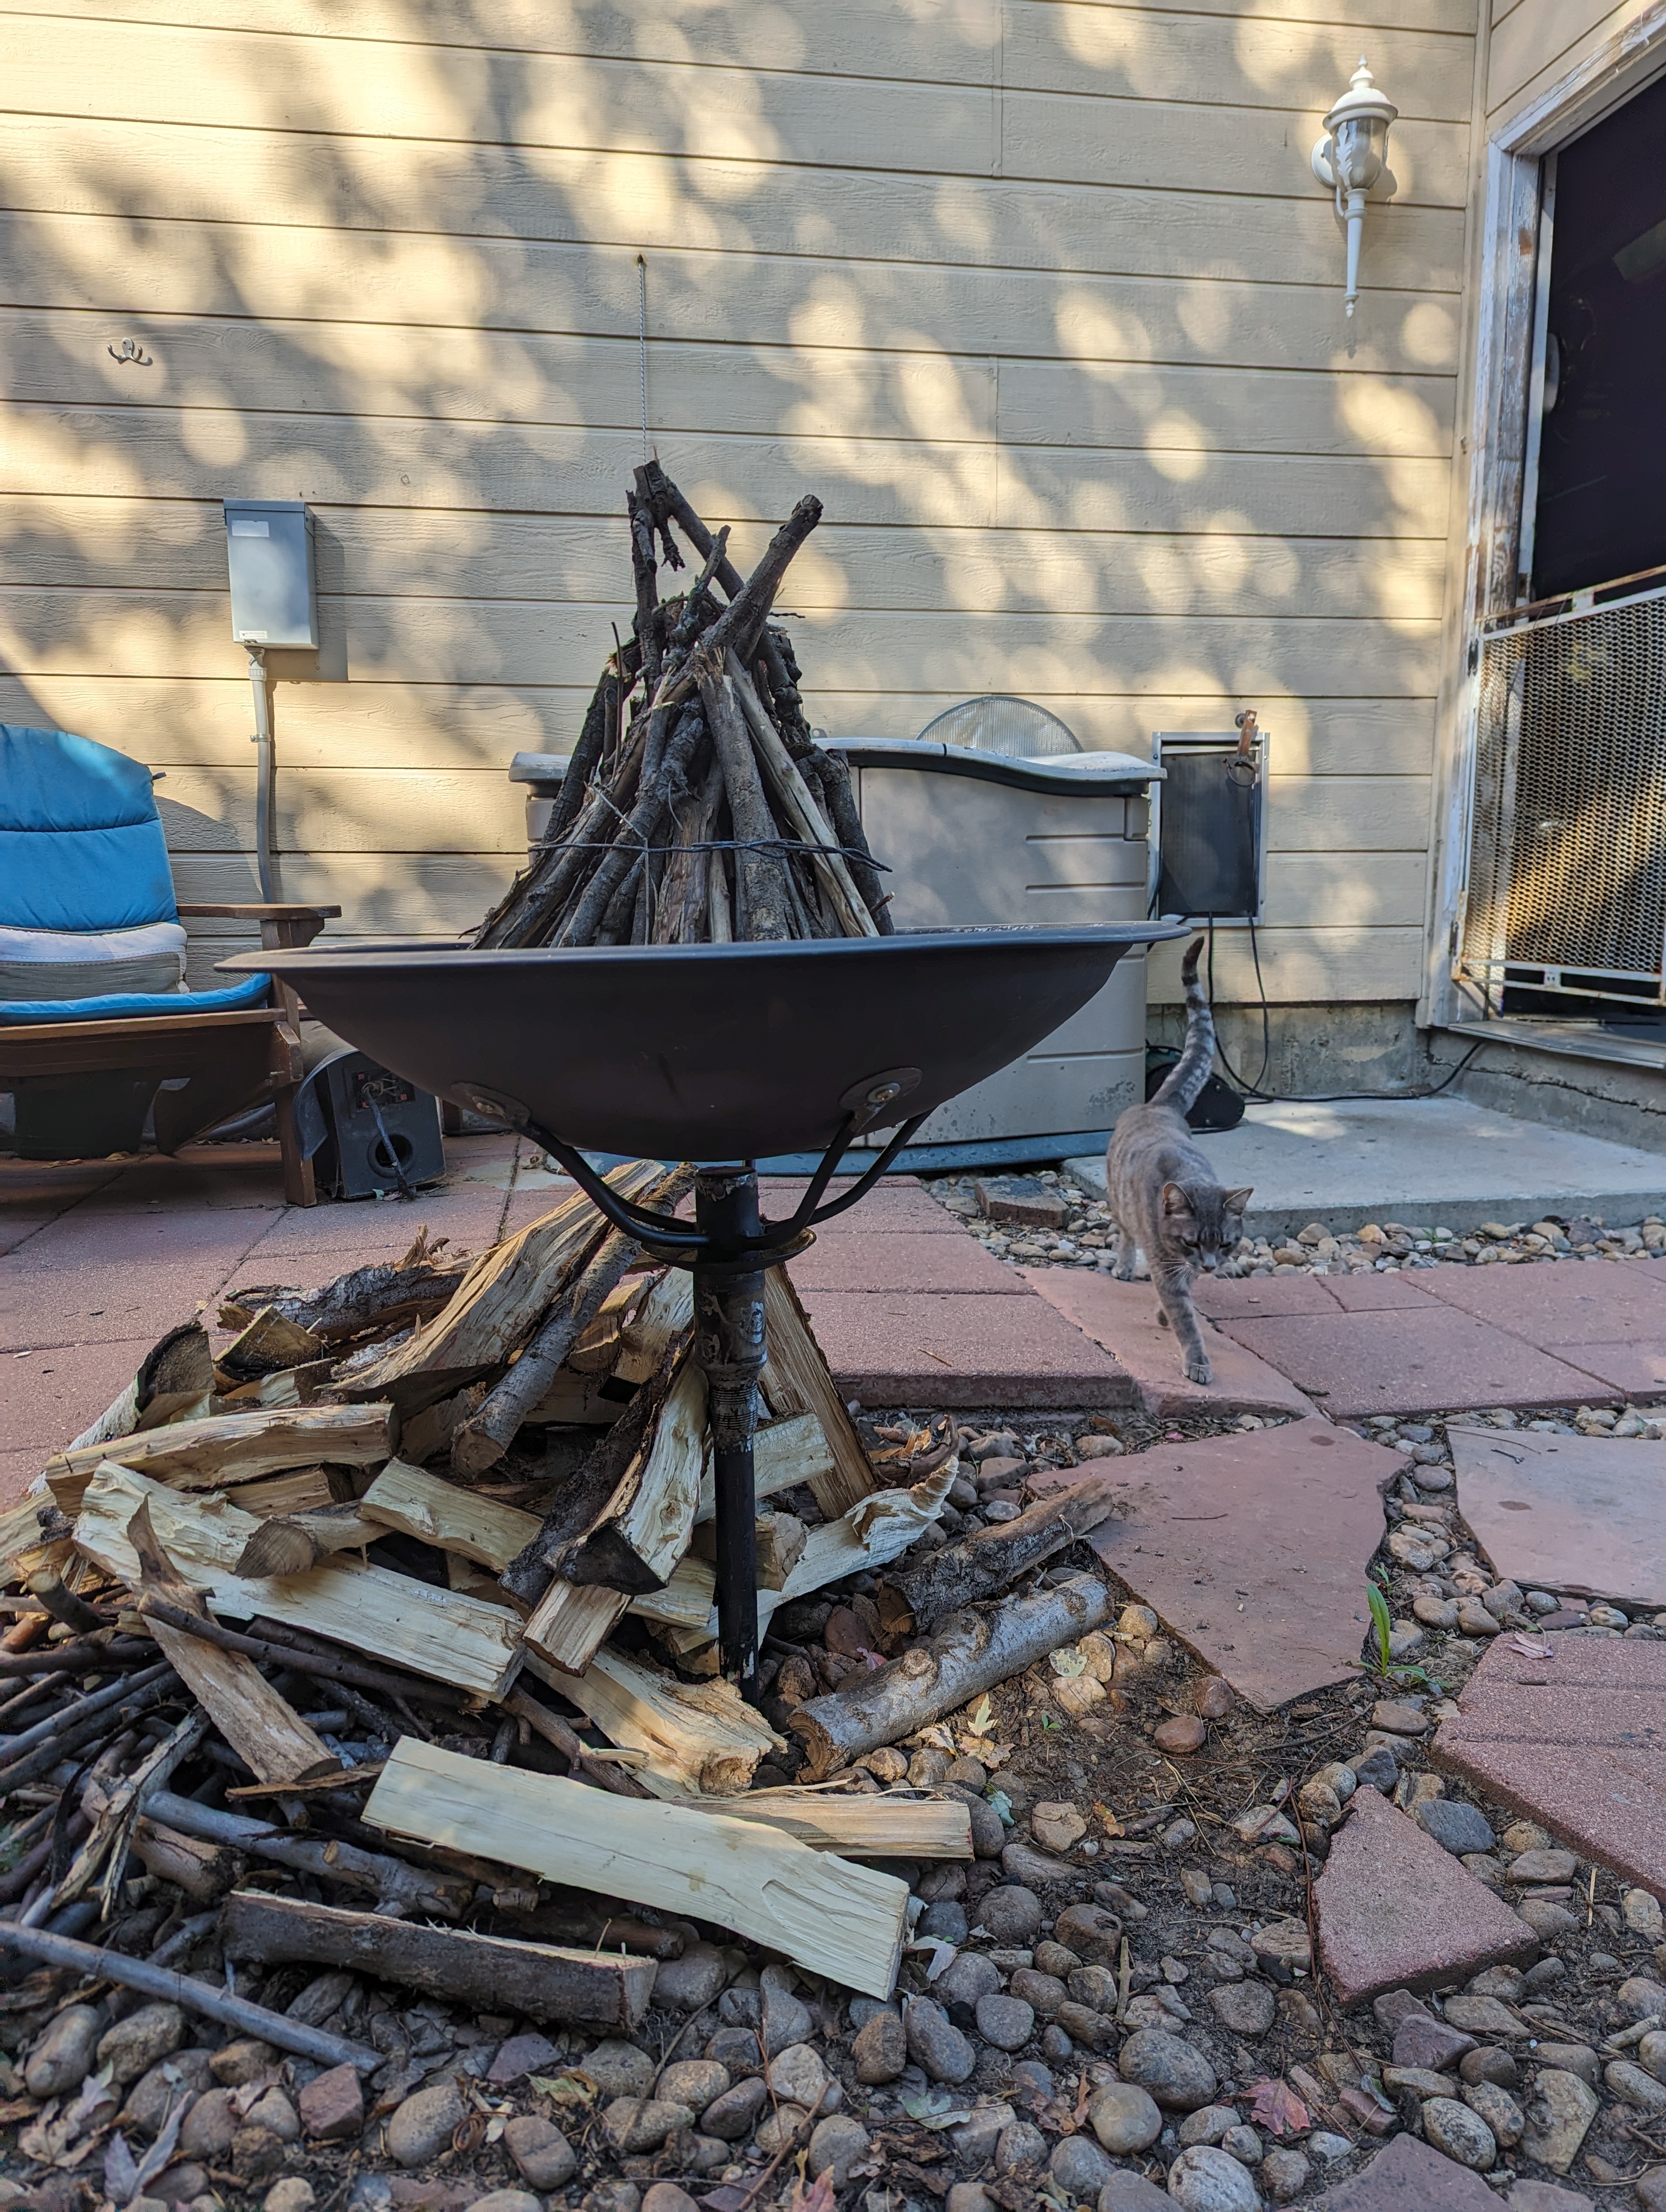
This was actually completed about a month ago, but didn’t rate enough interest for posting until today. Getting the old cobbed-up junker repeatedly repaired over the past twenty years to the scrapyard last month was the triggering event for that run – too much junk piled up beside the garage.
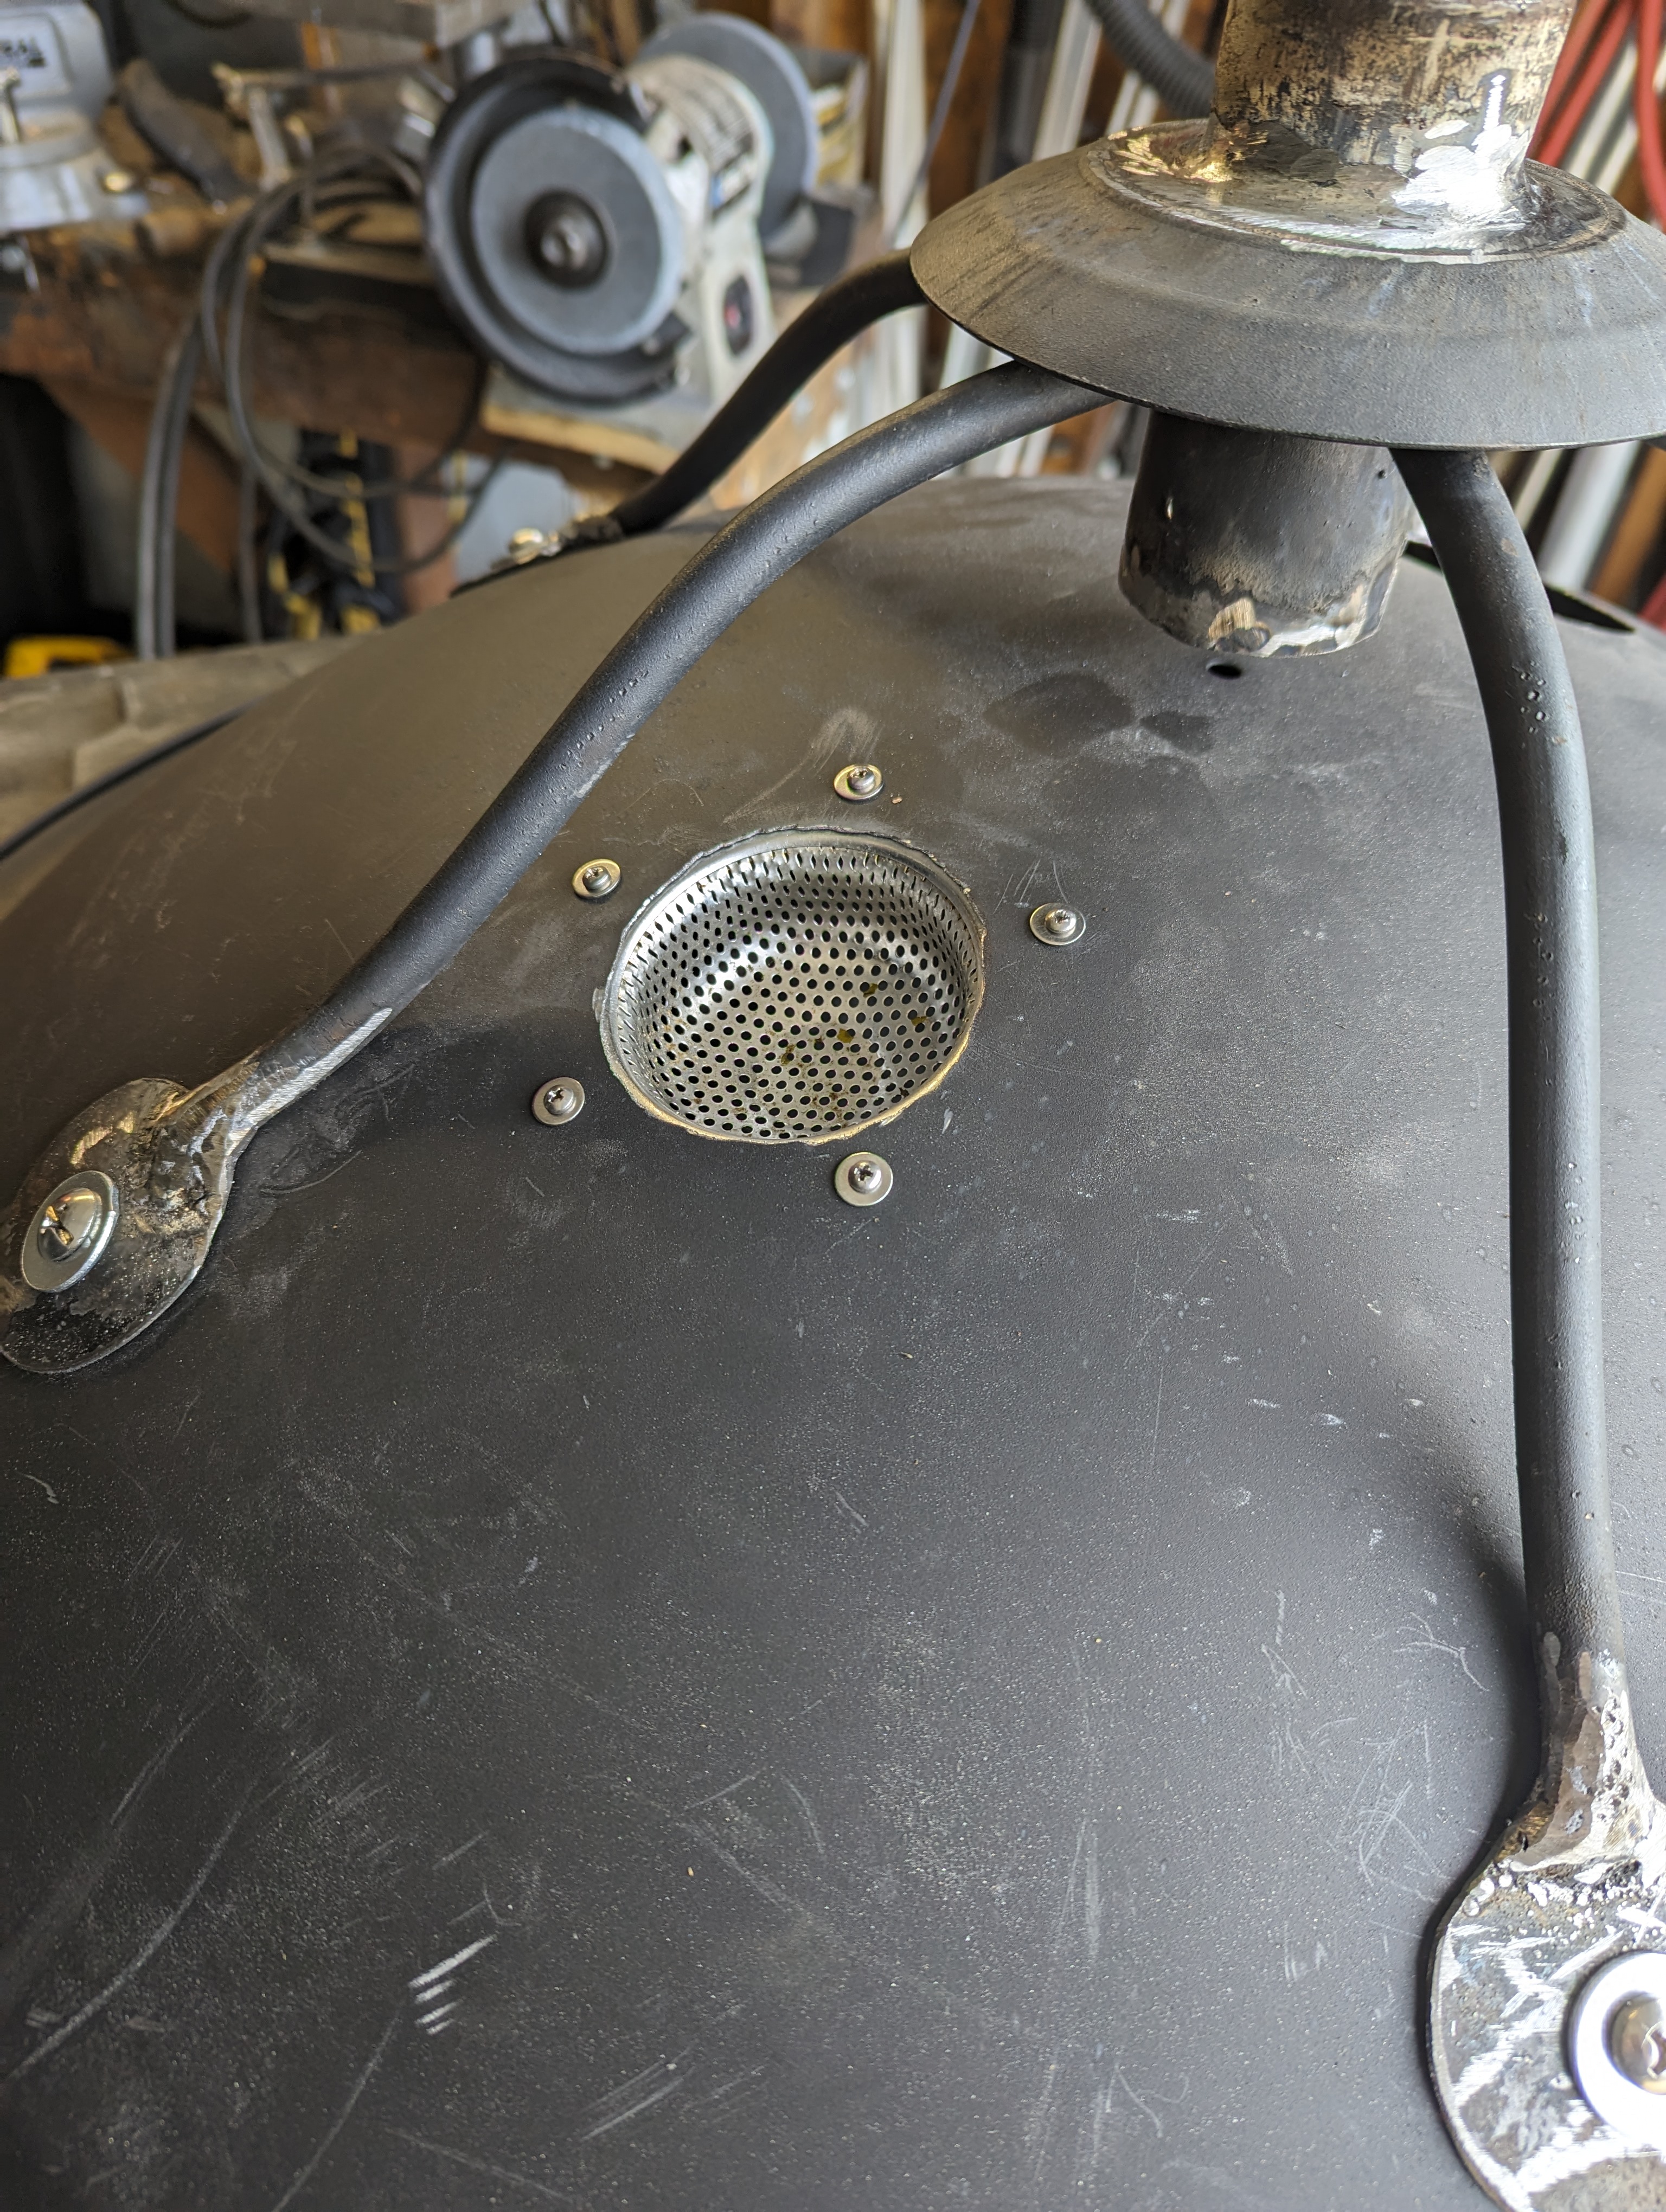
I made it more robust and maintainable in a couple of ways this time around. To start with, the ground stake is a full five feet long with stabilizing fins just below the ground surface. It’s solid and not moving. The new mechanism snugly sitting and spinning on the ground stake is part of the frame from an old patio chair. New stainless guts are screwed together with stainless hardware, so when the bowl ever rusts out again, it can be easily replaced by just drilling fifteen holes in a new one and putting it back together.
Actually, it would be 15 holes including the vents – sink drain filters, letting it flare up pretty high for a small pit.
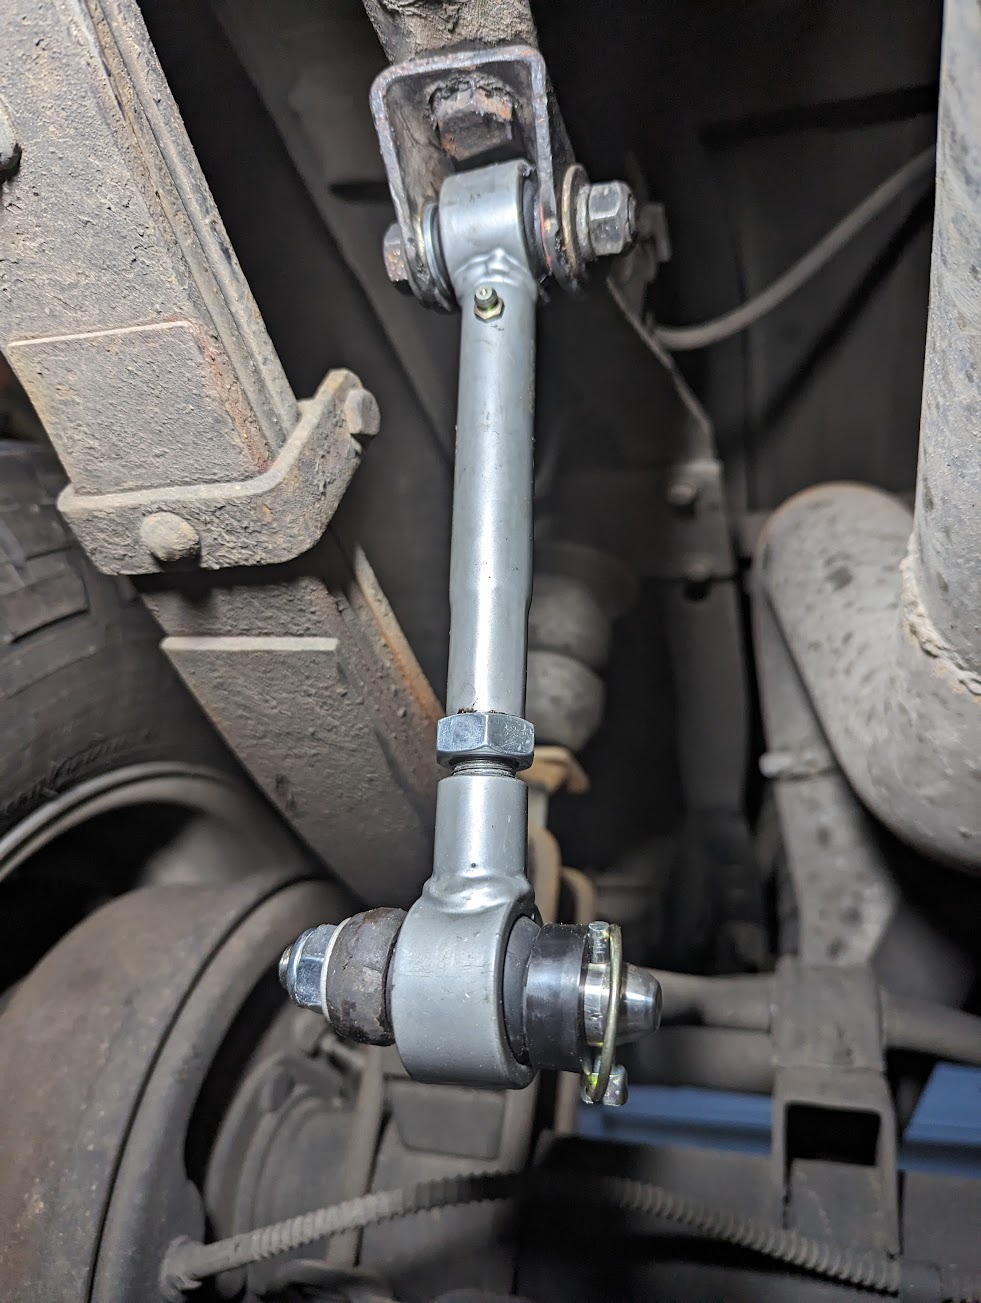
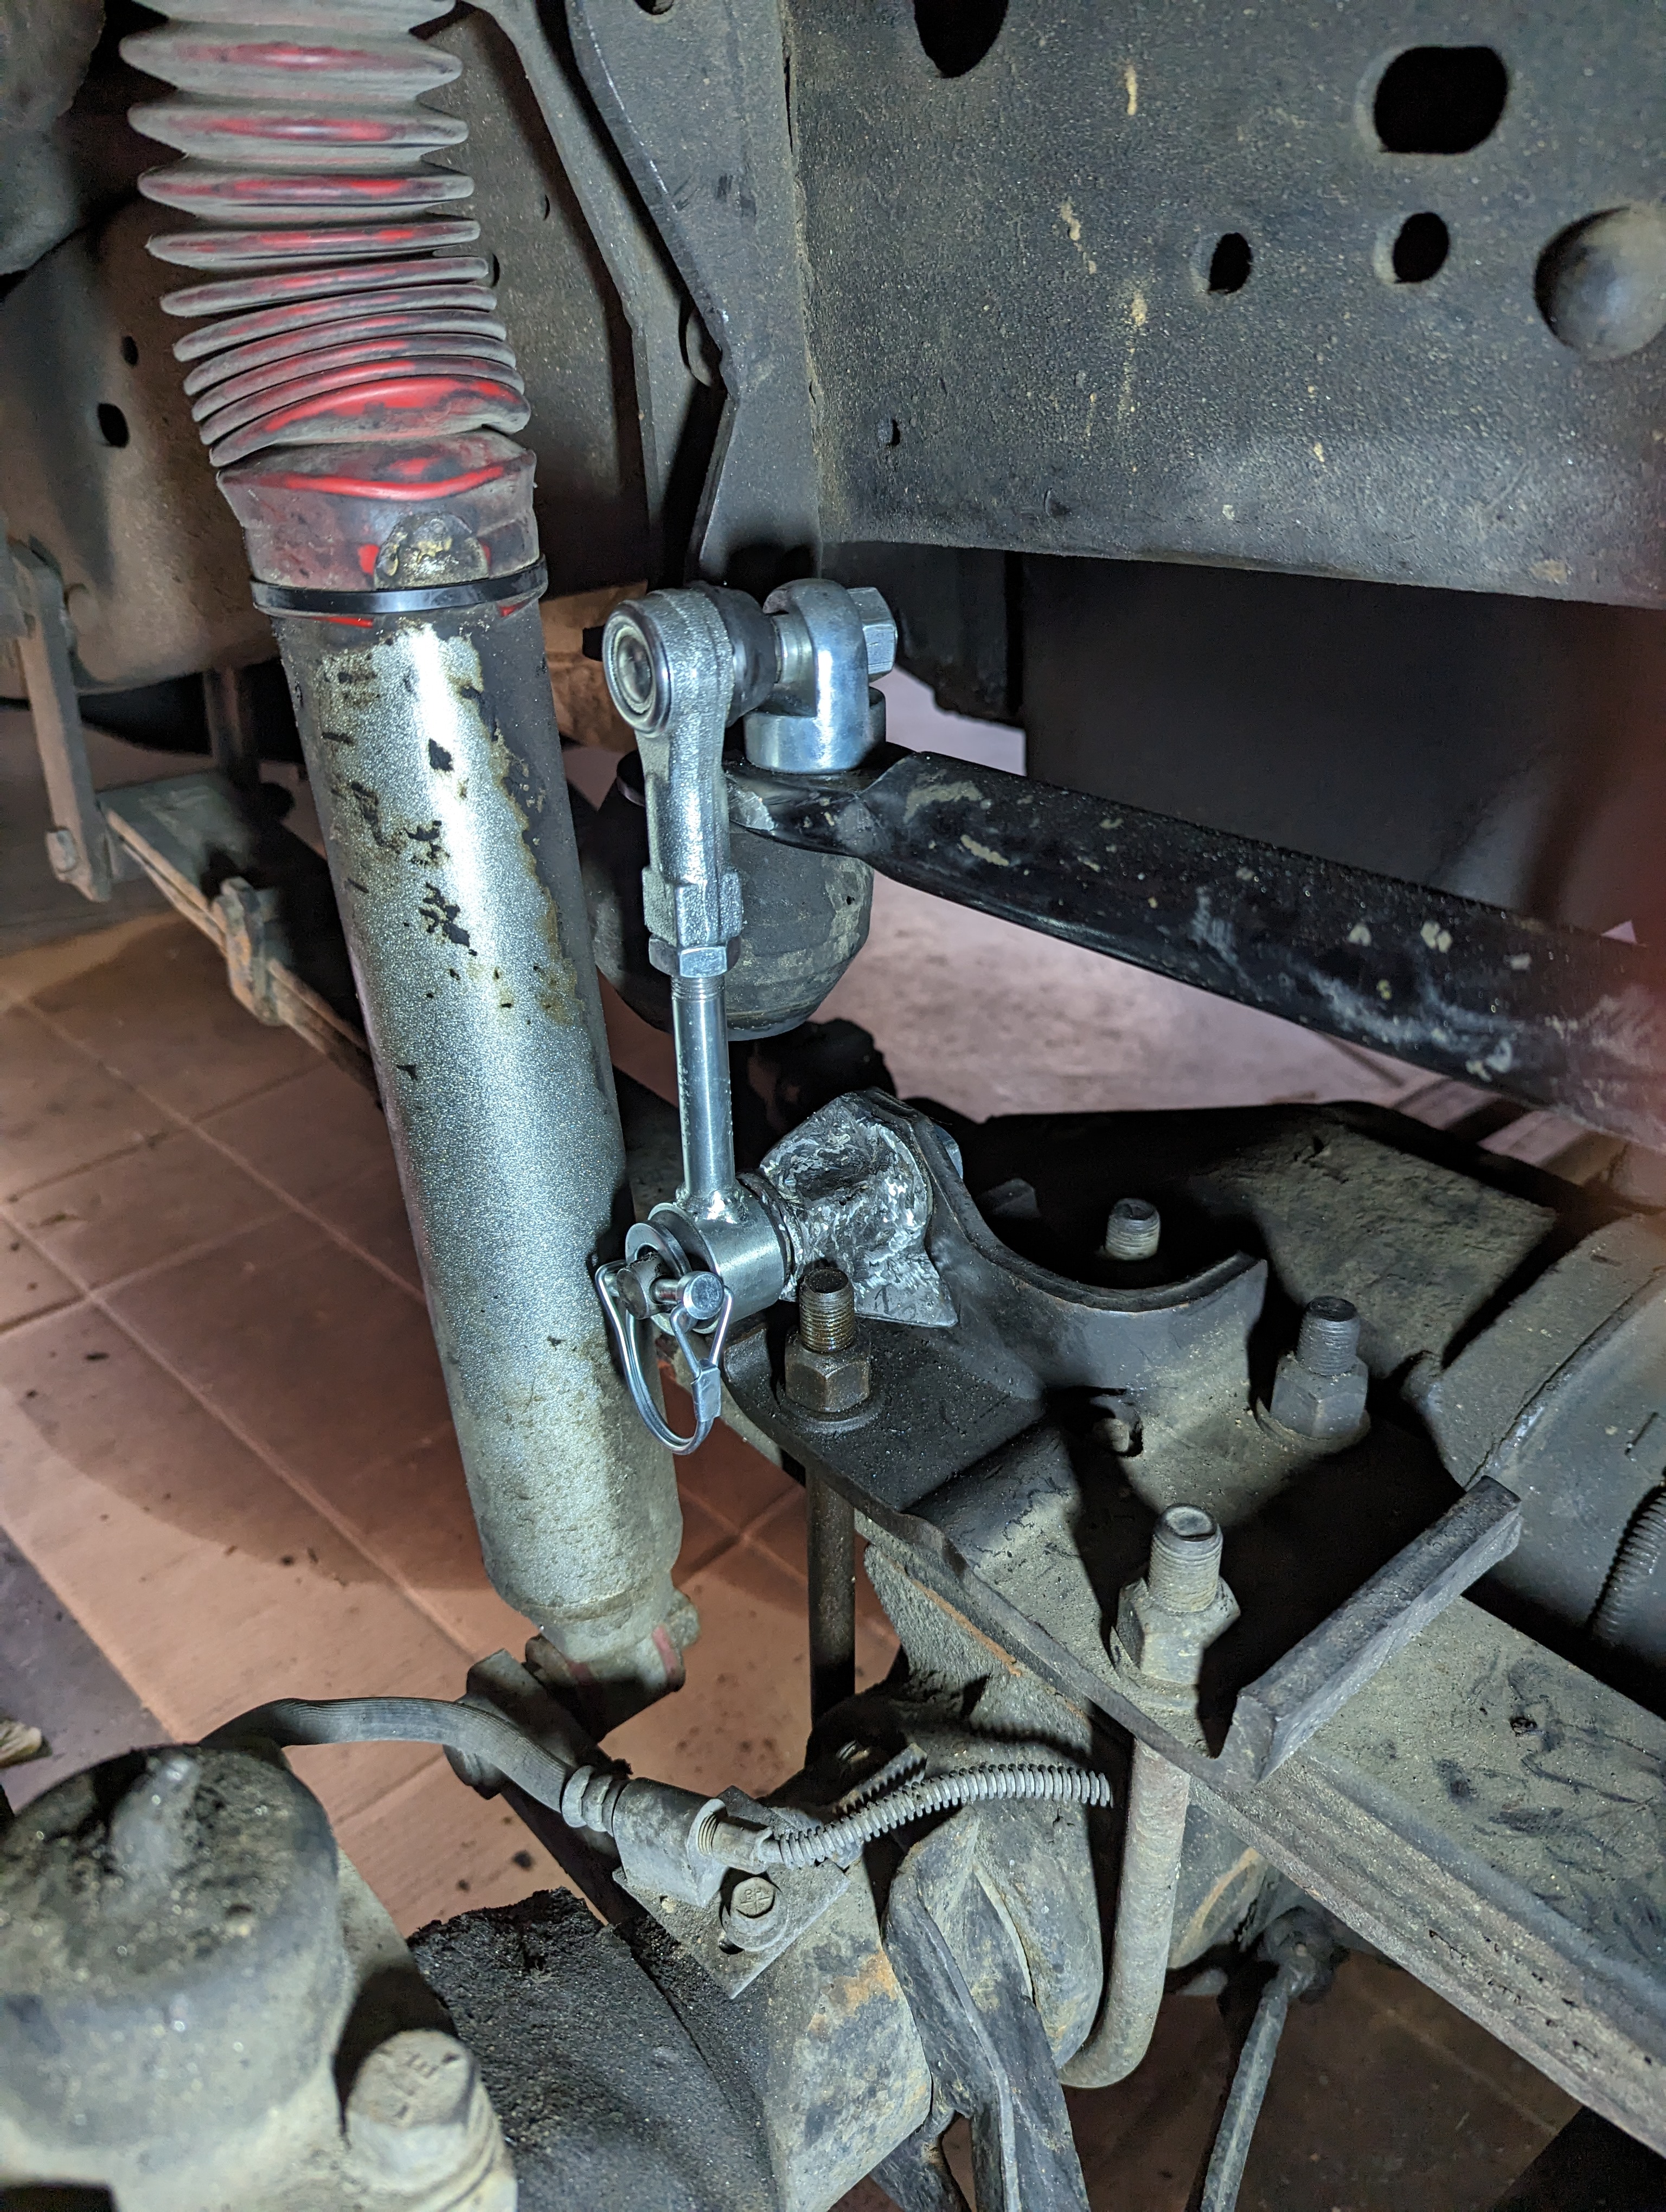
Spent the afternoon yesterday installing a rear sway bar disconnect on the old Dodge. The upper mount needed significant re-work due to the bigger new part and my insanely close manufacturing tolerance policy. Bottom mount needed a small brass bushing to stabilize the old, tapered press-fit joint. Front will probably be an all-day job with both mounts needing rebuilt for a new link.
CTD will be fully off-road capable once that’s done and a locker is installed in the front Dana. I’m going with the OX Manual Cable unit. Country Truck down in Ft. Lupton will be getting the call on that. They did a great job fixing up the ’07 for Phoebe and Tanner a couple years ago. Nothing will stop this truck unless I break it or drive it off a cliff somewhere.
I can still do the little nit-noid stuff like sway bar links, but even that wears me out pretty quick nowadays.
Took half the morning to get it loaded. Got $18 for 400 pounds. That covers my time and fuel + it’s getting recycled.
LATE UPDATE: Took two days up front. It’s a Jeep CJ link adapted to fit with a custom bottom mount. It was within a gnat’s ass of fitting on the inside stock position in a straight bolt-up with no fabrication needed, but that didn’t happen. It’s easier to reach the release pin on the outside this way, but it was alot of work hand forging that part.
Anybody remember the drain pipe bong that got wedged onto the side of the driver’s seat in that car crash from 1978 on Hozak road? I should’ve been a plumber. Seriously. You should see some of the shyt that’s been flowing stuff around in the vehicles here over the years. Just ask Tanner how many fuel filters are on that truck. It still had #6 injector crap out after whatever mileage they got it up to.
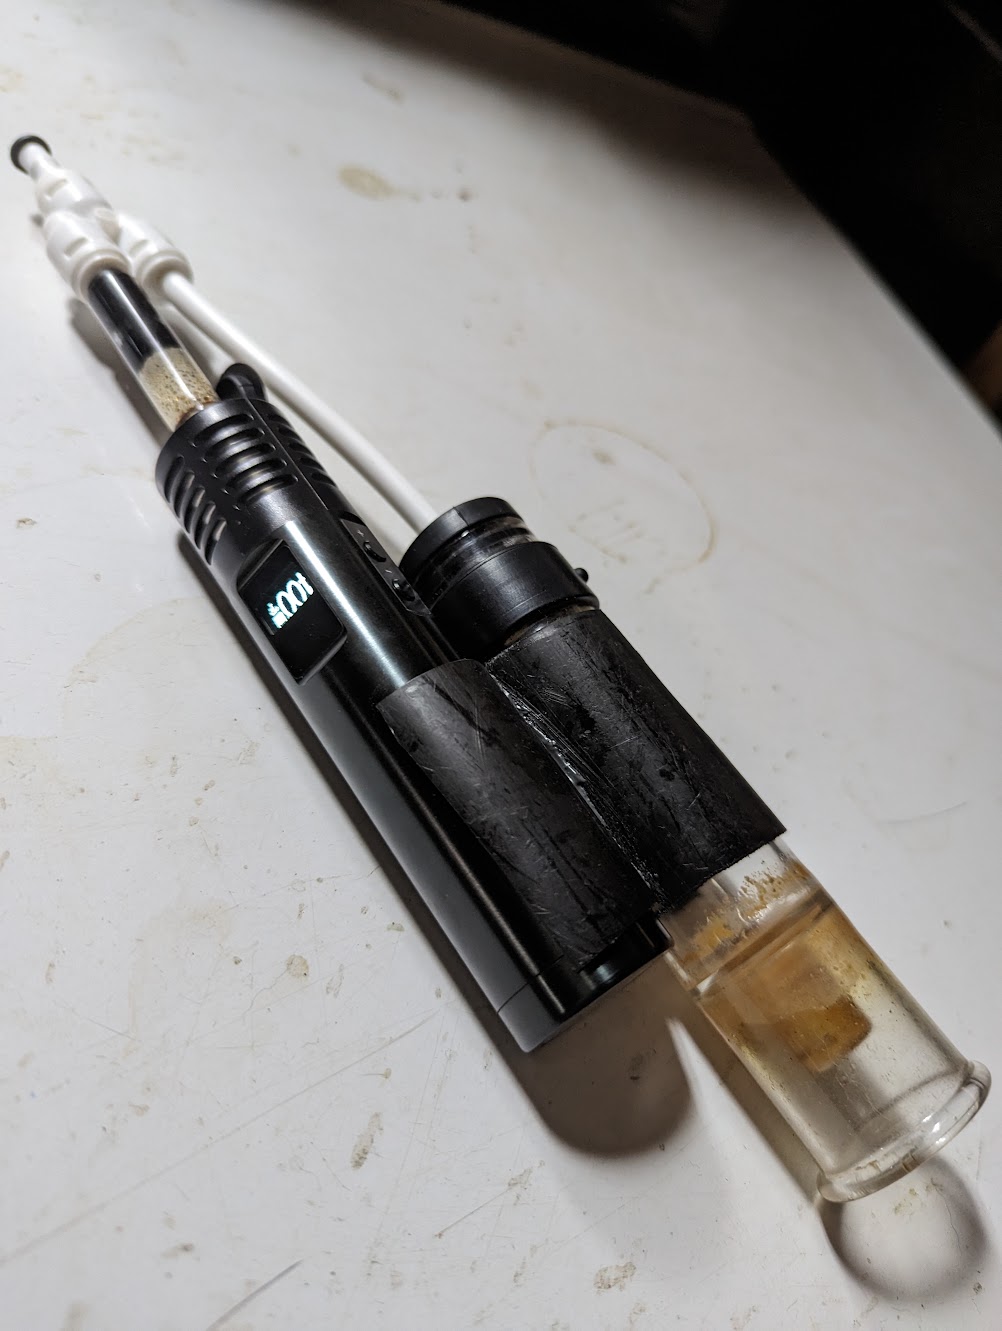
The Crafty‘s a nice little device, but the heater is weak. I can drop the temp on it with a long pull. Then there’s the plumbing to deal with. I need at least one hand free to deal with the keyboard and mouse. I could see the Air Max was a winner right away. It just needed teamed up with the Utilian. The white bits are from a refrigerator install kit, and the big black clip making it a 1-hand rig is just two pieces of plastic irrigation tubing glued together.
Arizer™ even made the display flip for this config. Sleeving the tubing was the only even trivial thing involved here. But it’s a killer combo! Basically just a 3-part assembly you pull apart and put together – heater, bubbler and stem plumbing.
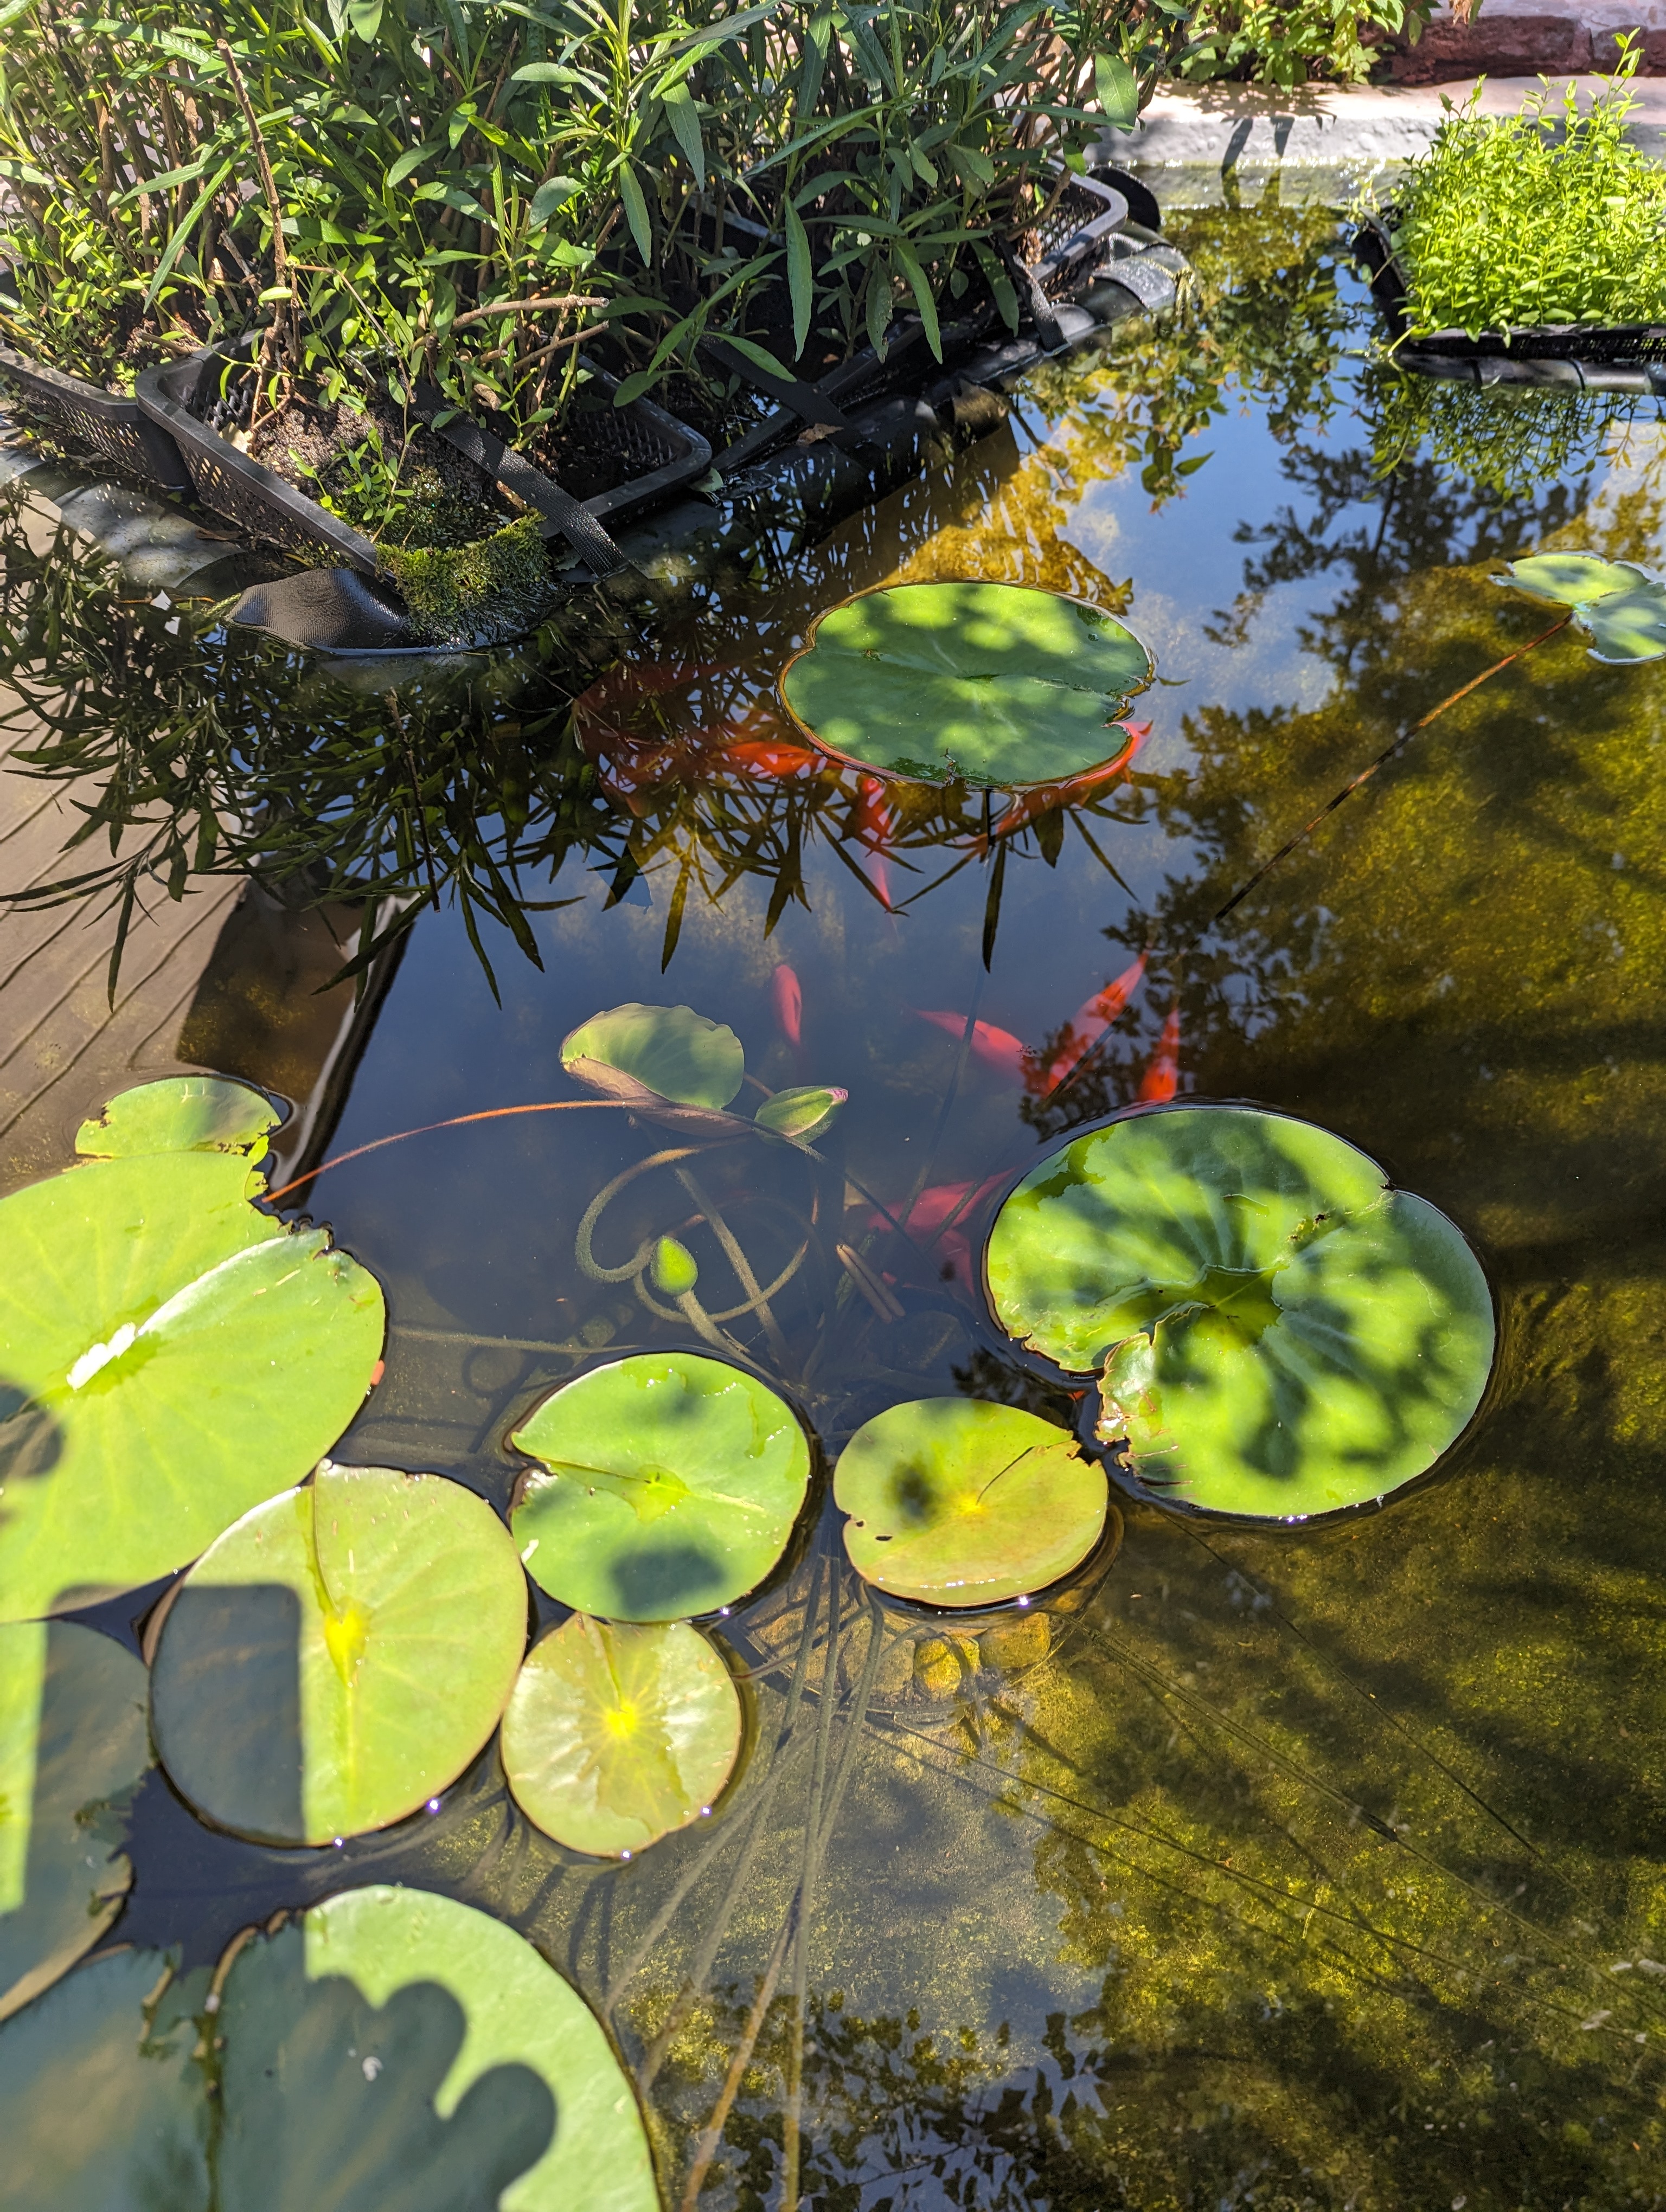
The pond ecosystem appears to have cycled at around the 3-week mark after putting the fish out. You can tell when the filters stabilize by water clarity. There can be the random bacterial or algae bloom, various particulates, whatever causing the water to be anything less than crystal clear. You might be surprised how green it can turn without proper UV protection. We’ve had none of those issues the past few years. Transferring some Java Moss and water from the aquariums is enough to get the good bacteria quickly started. I call it the insta-cycle process.
Saw only one racoon in the yard so far this year. Blue Herons seem to be around more than ever, but don’t come fishing in the pond any more. We scared a big one up out of the creek just this morning. Maybe the trees are tall enough to hide the pond from aerial surveillance.
As mentioned previously, the plants are lagging due to late start, but that lily really took off. It seems to like deeper water, quite happy in it’s new location. Only issue still being worked is level management. Evaporation rates swing pretty wildly between cool nights and blistering hot sunny days. A needle valve modulates the water supply, with the smallest crack I can get being a bit too slow, and anything more a bit too much. It seems to use around 3GPH on average, and I can only get 2 or 4 out of the needle valve.
So the overall effect makes the sump either always slowly rising or falling. Ideally, it would be rising at night and falling during the day. Anybody know if there’s some sort of more accurate metering valve I could use?
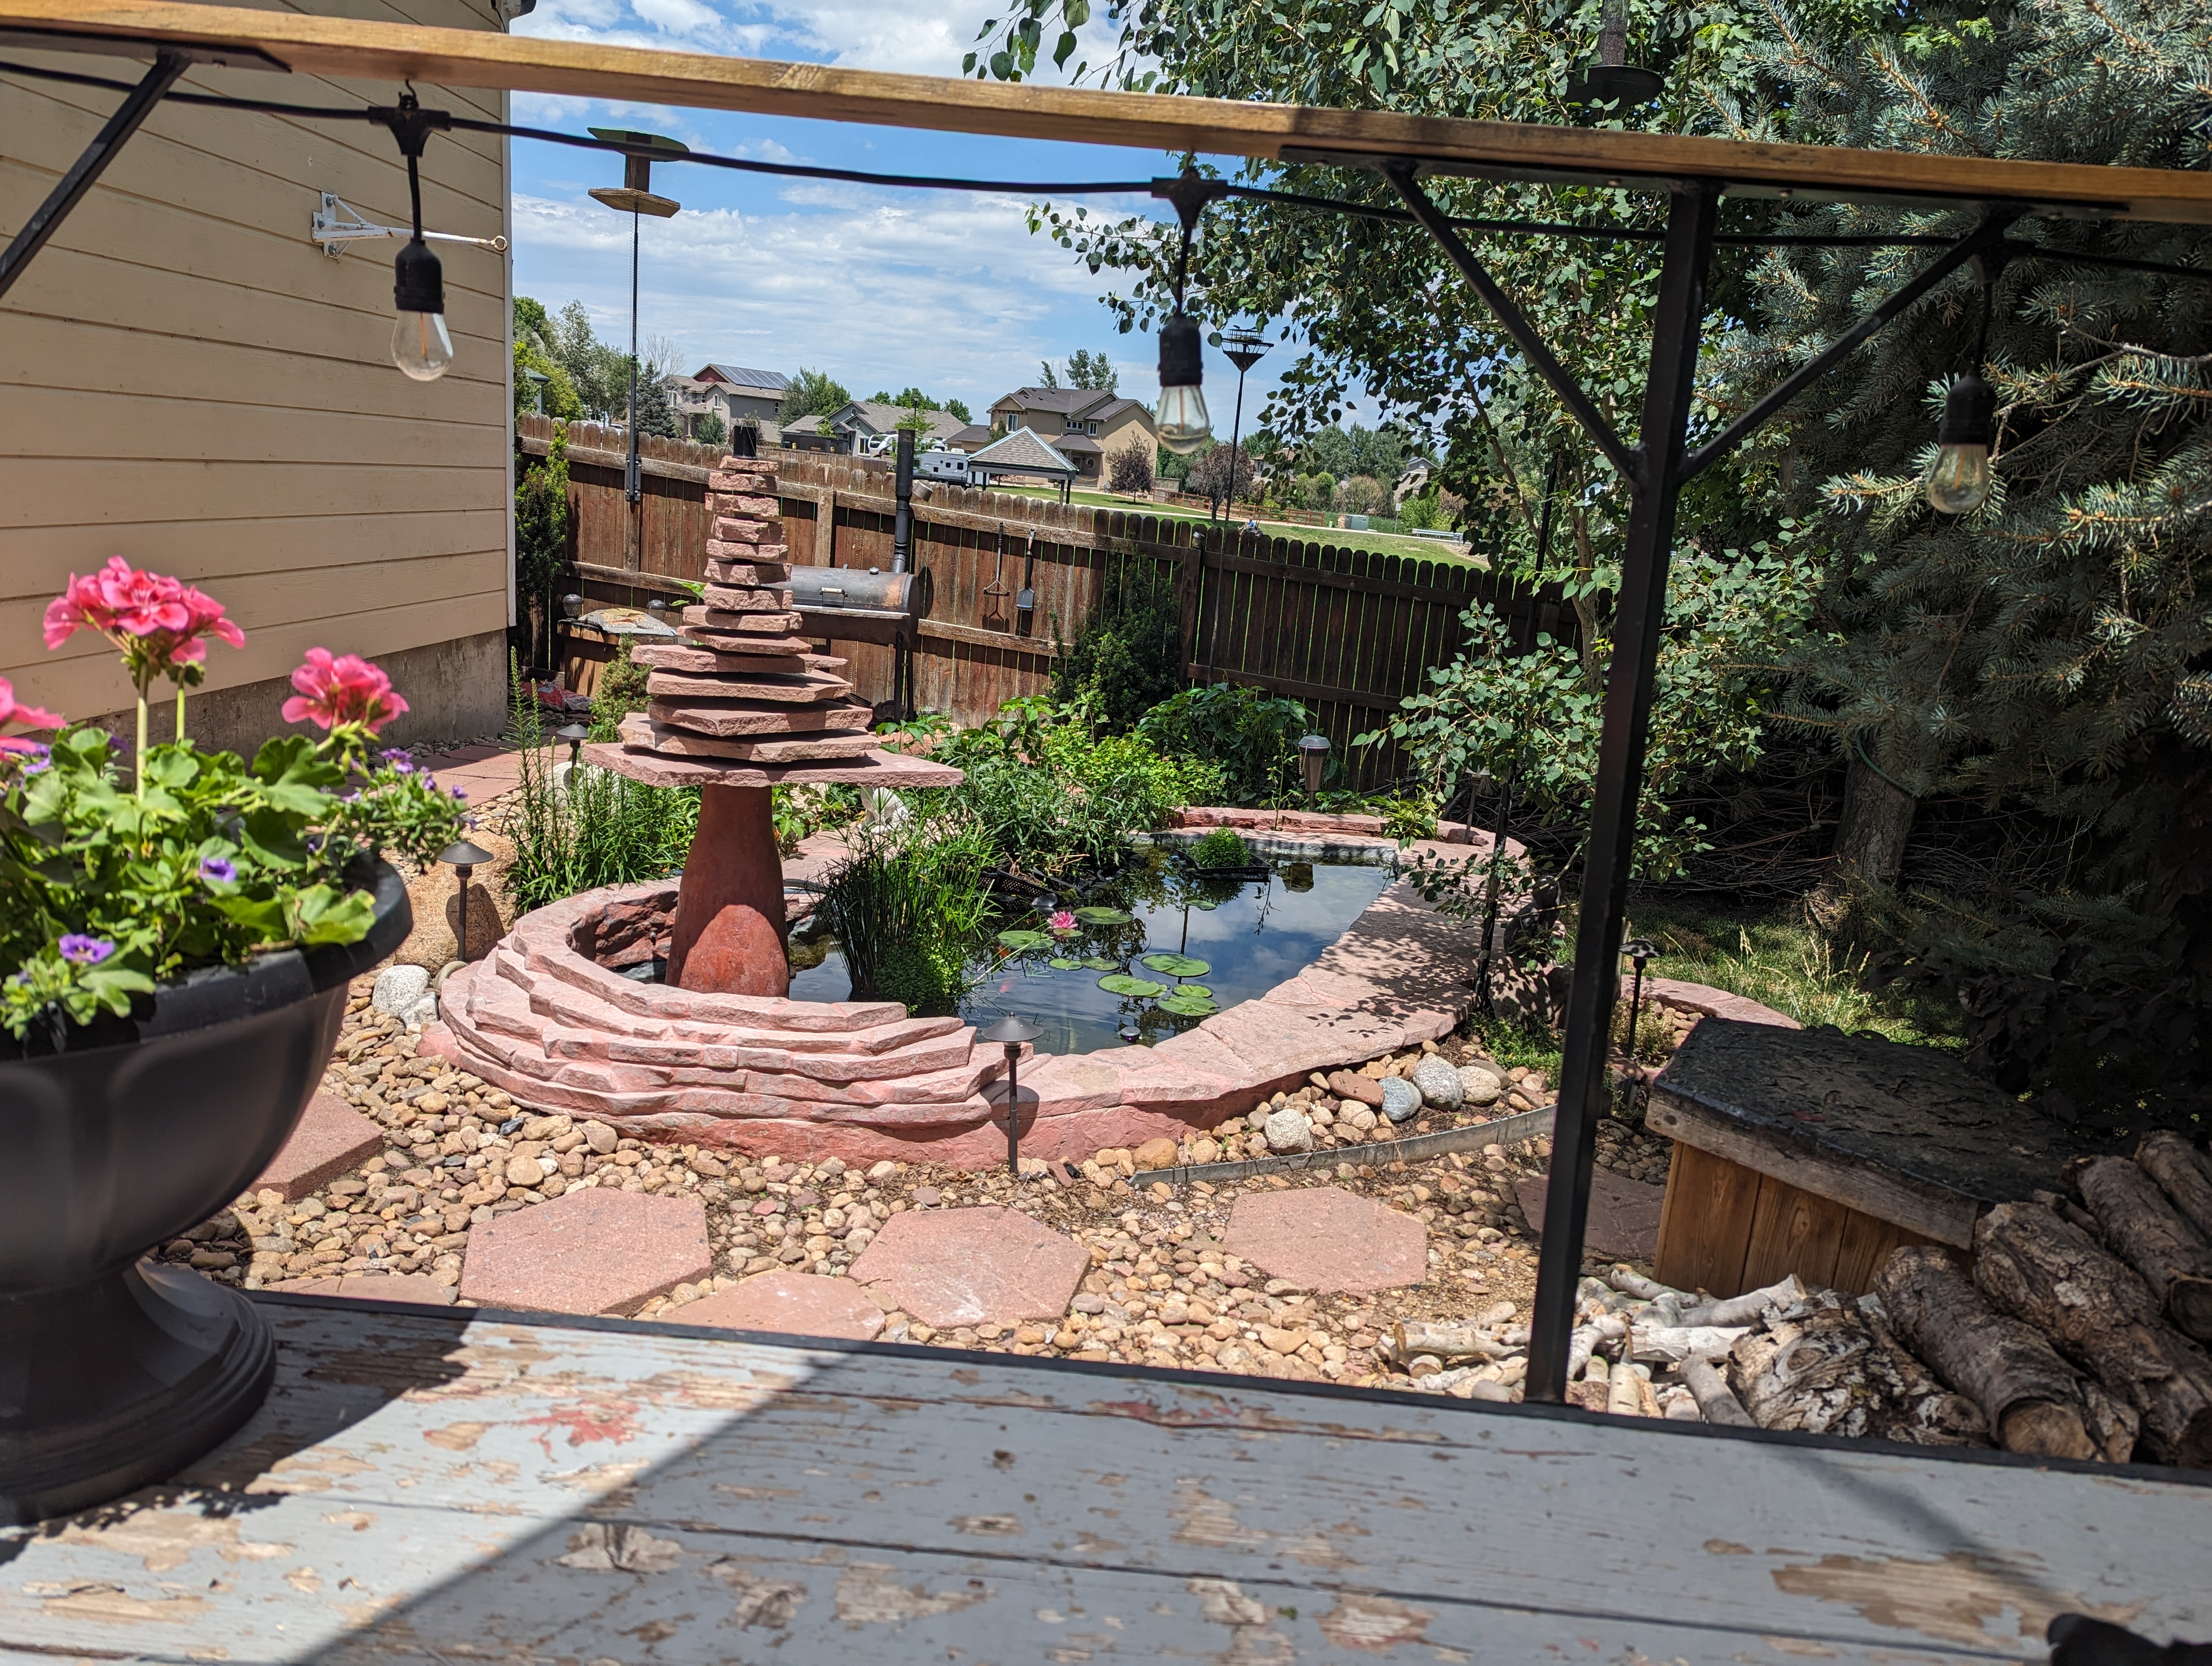
It took awhile longer than expected to get the liner in shape once again. But it’s looking good, better each year, so I wanted to get it near perfected in anticipation of winter ops, maybe for the 24-25 season. The system’s now running a secondary internal circulation pump and bottom filter, so the main pump and waterfall can be turned off during cold weather hibernation months without incurring water quality issues.
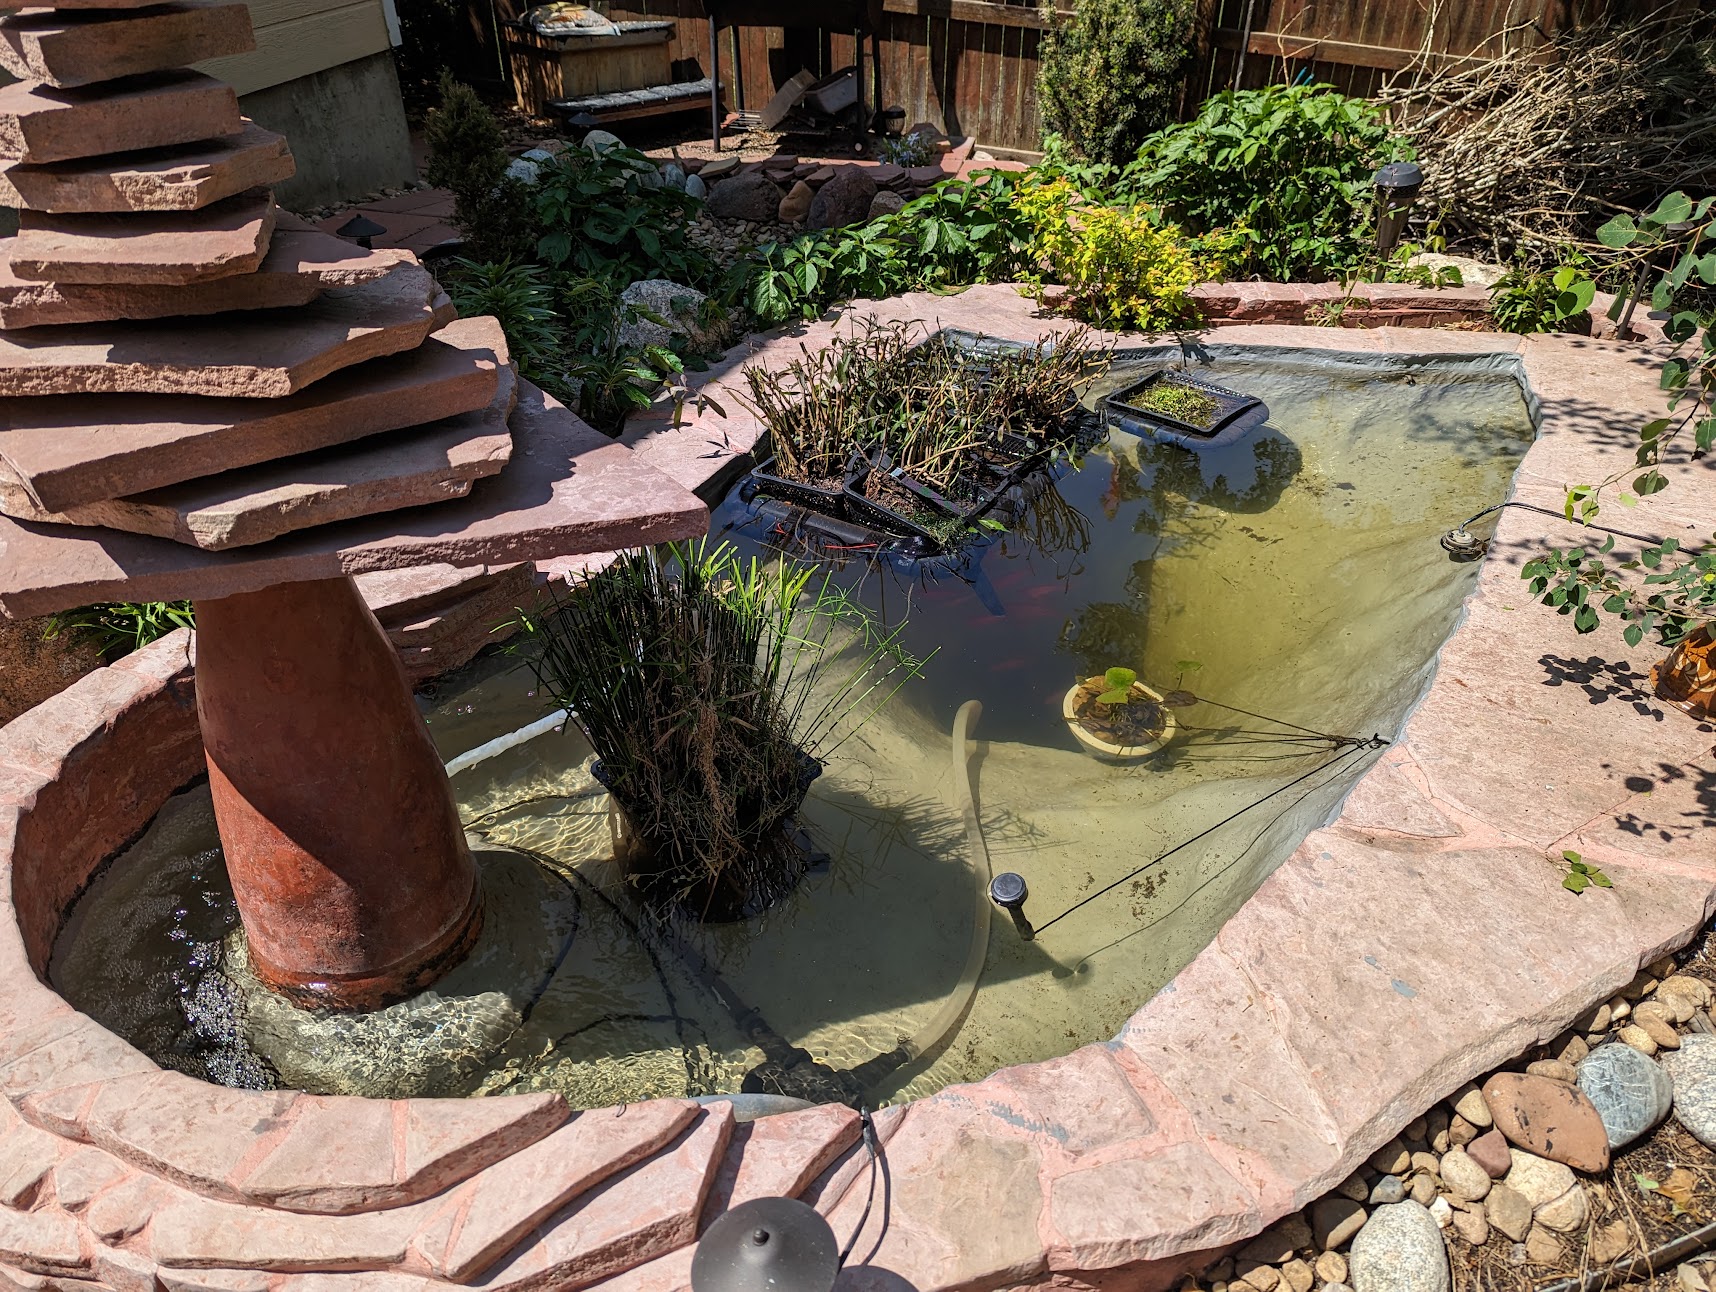
It will still need cleaning at season’s end, but that can be accomplished in a few hours with fish waiting in an aerated bin while the sump pump does it’s work. That’s a whole new maintenance process needing worked out, but we’re getting there. The lily needs re-potted and set in shallower water to get re-started. The plants were all stressed from being inside too long. We’ll call this the before pic for the year:
It would be nice not needing to maintain a winter aquarium for these guys in the basement.Still the Rain -B.B. Chun King and the Buddaheads
I just want you mutherfuckers to know you almost beat me this time. A little light research on the topic(s) indicates DDR5 and AM5 definitely were not ready for prime time at launch. I’ll never learn to stay off the bleeding edge. I was all set to give up running 128gig, when lo-and-behold, Asus decides to issue the first BIOS update for this board just yesterday. I now have a full set of properly trained DIMMS. Imagine that.
It’s been almost a month since I started that new workstation build before coming back up on some new hardware. But it wasn’t what was pictured in that post. People at the local Amazon™ warehouse must hate me. I had at least two of everything here before sending most of it back while looking for the bad DIMM. Ended up being at least 3 bad DIMMs in 4 seperate packaged pairs before they were all returned after selecting a different model.
Never found them intermittently bad like that before. It helps to have at least a midrange mobo with post lights. There really is a 1st time for everything – especially with all the junk coming out of China these days. This was the 3rd mobo. I kinda liked the looks of the AsRock model before it better, but oh well…
This tech refresh basically involves what we used to call a forklift migration to Rocky Linux, with a new workstation now online and Onion3 coming…
It’s all gaming in the DIY builder market now. I don’t have time to do the work, much less game.
Late Update: Latest replacement DIMM pair lasted 2 days before they quit. At least I can run it half populated. Longest PC build ever.
Here’s one of the crazy stories about what I did in Bosnia:
My Army Staff Sergeant partner was showing me around the MIB compound shortly after arrival for my first day’s work at Butmir. There was a storage area in the top floor of the main building containing among other things, ten brand new high-gain Tac Sat antennas, unopened in the shipping crates. Asked what was up with them, he simply replied: “They don’t work.” More in-briefing included plans for the upcoming week and a road trip ferrying floppy disks around the country by Land Rover, and I already knew what my 1st challenge was going to be.
Inter-service coordination has always been a challenge, but the U.S. sets the example to follow in that military regard, at least as long as I’m the one on the phone. The only reason Tac Sat was not up and running in Bosnia was nobody seemed to be able to figure out how to get crypto and point the antennas. The Army is great at shooting people and blowing stuff up, but satcom was a different story at this location. Their idea of secure comm was us driving floppy disks around with M-16s to protect them. It certainly was one of the more egregious government foibles I’ve disagreed with over the years. Only took about a week to locate the bird (Navy) and get crypto issued out of HQ for the radios.
We spent another week playing around, doing a little training. Started by taking one over behind the gym on the other side of the base and setup one day. I had the Lieutenant transmit a file, making sure not to tell me what was on it and read it back to her ten seconds later over the phone. She said “So you can take those anywhere and do that?” We started taking those antennas with us to the COYS, thankful to leave them and the radios behind, departing with hopefully the last of those HUMINT reports on floppy disks.
U.S. Air Force communications Airmen assigned to the 23rd Air Expeditionary Wing set up radio equipment during contingency location operations at the Rafael Hernández International Airport, Puerto Rico, Feb. 25, 2023. The Airmen were supporting Operation Forward Tiger, an Air Forces Southern exercise designed to increase combat readiness alongside humanitarian assistance and disaster response capabilities with U.S. partners and allies throughout the Caribbean. (U.S. Air Force photo by Airman 1st Class Courtney Sebastianelli)Used to be the world’s biggest collection of deployed landmines, back in my day.
The title of this post should probably be Webasto Heater Update. But the real topic is voltage. Anybody out there ever feel like they are cursed to learn things the hard way? I must be, because I learned about the wrong way to run a float charger last winter. You can’t just leave them connected and expect the battery to stay up in use – they don’t work that way. The circuit needs broken every discharge cycle to re-start the top-up. If not, the charge indicator just stays green while they discharge! This behavior is confirmed with a 2nd charger employed in exactly the same wrong way.
So the Webasto implication is simple: Like most forms of portable electronics, they work much better on strong, charged batteries. A green LED indicator means good one time only, in actual practice – use a voltmeter, if in doubt! Problem solved with a plug switch on the charger. Run the heaters, reset the charger. Duh.


