Managing Alerts
Security Onion generates a lot of valuable information for you the second you plug it into a TAP or SPAN port. Between Zeek logs, alert data from Snort/Suricata, and full packet capture from netsniff-ng, you have, in a very short amount of time, enough information to begin making identifying areas of interest and making positive changes to your security stance.
However, Network Security Monitoring, as a practice, is not a solution you can plug into your network, make sure you see blinking lights and tell people you are “secure.” It requires active intervention from an analyst to qualify the quantity of information presented. One of those regular interventions is to ensure that you are tuning properly and proactively attempting to reach an acceptable level of signal to noise.
Testing to make sure the IDS is working
Below, we’ll provide a few ways we can test our IDS (Snort/Suricata) to make sure it is working as expected.
The easiest way to test might be simply accessing
testmyids.comfrom a machine who’s traffic is being monitored:curl testmyids.com
We should see a corresponding alert (
GPL ATTACK_RESPONSE id check returned root) pop up in Sguil if everything is configured correctly. If you do not see this alert, try checking to see if the rule is enabled in/etc/nsm/rules/downloaded.rules. If it is not enabled, try enabling it via/etc/nsm/pulledpork/enablesid.confand runrule-update(if this is a distributed deployment, update the master first, runrule-update, then push the changes out to the other sensor(s)).If running a test or evaluation version of Security Onion, consider replaying some of the example PCAP files present in
/opt/samples/:sudo so-test
Alerts for various signatures should appear in Sguil.
If in a production environment where you might not want to replay the example PCAPs, another way to test would be to use Scapy to craft a test PCAP file, in conjunction with a custom Snort rule added to
/etc/nsm/rules/local.rules:
Snort Rule
alert tcp any any -> any any (msg: "Security Onion - testing"; content: "SecurityOnion"; nocase; sid:1234567;)
Now update your ruleset:
sudo rule-update
Scapy
sudo scapy
pkt = Ether()/IP(dst="192.168.1.30")/TCP()/"SecurityOnion"
wrpcap("so-testing.pcap", pkt)
Press
CTRL+Dto exit scapy. Then use tcpreplay to replay the pcap to your sniffing interface:sudo tcpreplay -i ens34 -M10 so-testing.pcap
If everything went as planned, an alert should pop up in Sguil with the message
Security Onion - testing.
Identifying overly active signatures
Given the large number of analyst tools available in Security Onion by default there are multiple ways to see signatures that are producing too many alerts. We’ll take a look at identifying the alerts using Squert, Sguil, and the command line.
From Squert
You can access the Squert interface from a web browser using the URL: https://IP_ADDRESS/squert/. You will need to log in using the username and password you set for Sguil. Click the Summary tab and then look at the TOP SIGNATURES section.
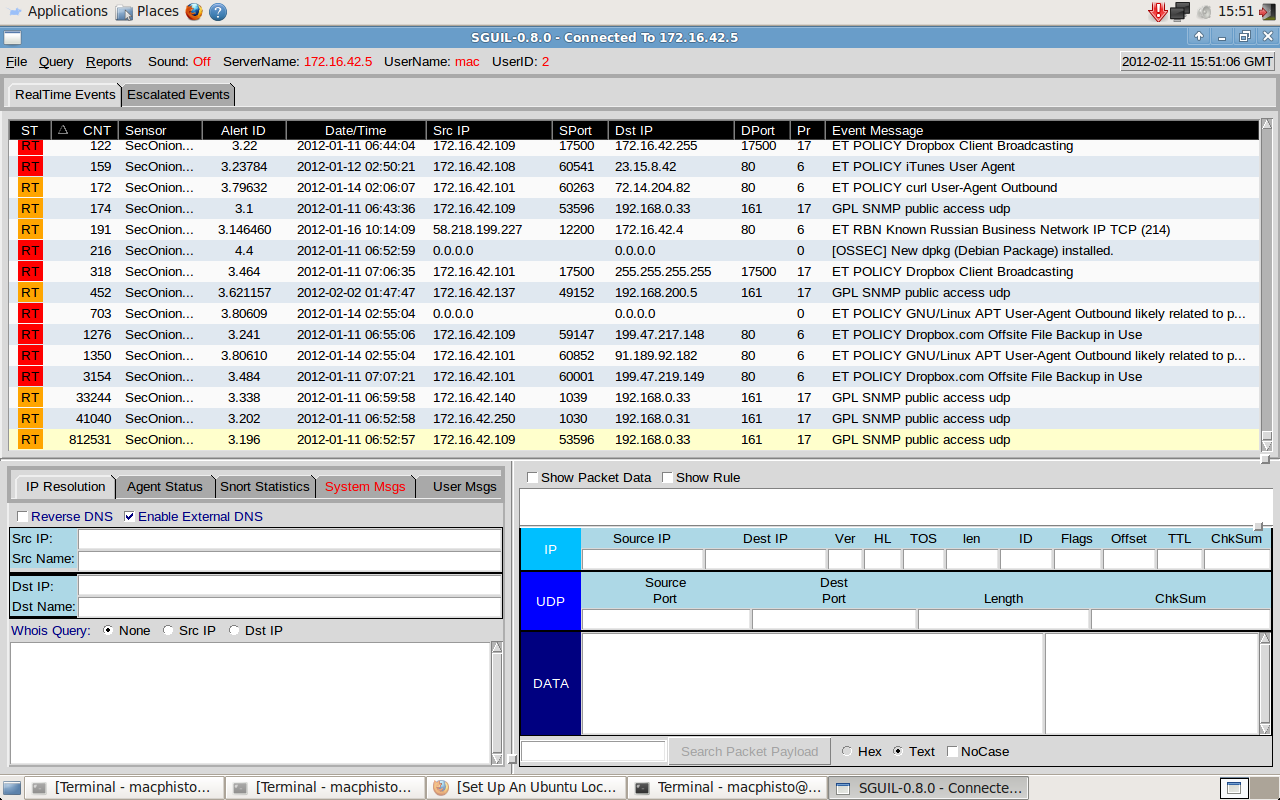
From Sguil
Sguil is a powerhouse of an interface for alerts and we since it allows us a more direct interaction with the database holding our alerts, we can gain a little bit more insight into the alerts, the associated IPs, and the rules in general.
Here, I have logged into the sguil interface and clicked on the “CNT” column to sort the alerts by the number of correlated alerts.
From the Command Line
If there are a large number of uncategorized events in the securityonion_db database, sguil can have a hard time of managing the vast amount of data it needs to process to present a comprehensive overview of the alerts.
At those times, it can be useful to query the database from the commandline. Interacting with the mysql database directly demands caution. Issuing SELECT queries should not have any adverse effect on your database, but if you attempt to UPDATE while the various NSM framework tools are also accessing the database it has the potential to introduce corruption.
You can enter the mysql shell or issue mysql one-liner’s from the command line.
To enter the mysql shell, issue the following command:
sudo mysql --defaults-file=/etc/mysql/debian.cnf -Dsecurityonion_db
To issue commandline one-liners use the following template:
sudo mysql --defaults-file=/etc/mysql/debian.cnf -Dsecurityonion_db -e "QUERY"
Listing the top twenty signatures
Giving the following query to mysql will return a table much like you see below. Here, we are asking mysql to return the columns “signature and signature_id” as well as a count of each row returned. We also want the output grouped by the signature message and ordered by the count (cnt) in descending order.
SELECT COUNT(*) AS cnt, signature, signature_id FROM event WHERE status=0 GROUP BY signature ORDER BY cnt DESC LIMIT 20;
+--------+----------------------------------------------------------------------------------+--------------+
| cnt    | signature                                                                        | signature_id |
+--------+----------------------------------------------------------------------------------+--------------+
| 900286 | GPL SNMP public access udp                                                       |      2101411 |
|   4709 | ET POLICY Dropbox.com Offsite File Backup in Use                                 |      2012647 |
|   2334 | ET POLICY GNU/Linux APT User-Agent Outbound likely related to package management |      2013504 |
|   1169 | GPL SHELLCODE x86 inc ebx NOOP                                                   |         1390 |
|    464 | ET POLICY Dropbox Client Broadcasting                                            |      2012648 |
|    343 | ET POLICY iTunes User Agent                                                      |      2002878 |
|    270 | ET POLICY Executable served from Amazon S3                                       |      2013437 |
|    216 | [OSSEC] New dpkg (Debian Package) installed.                                     |         2902 |
|    191 | ET RBN Known Russian Business Network IP TCP (214)                               |      2406426 |
|    188 | ET POLICY curl User-Agent Outbound                                               |      2013028 |
|    119 | [OSSEC] Integrity checksum changed.                                              |          550 |
|    106 | ET GAMES STEAM Connection (v2)                                                   |      2003089 |
|     84 | GPL ICMP_INFO PING *NIX                                                          |      2100366 |
|     69 | GPL CHAT MISC Jabber/Google Talk Outgoing Traffic                                |    100000230 |
|     65 | ET CHAT Google IM traffic Jabber client sign-on                                  |      2002334 |
|     59 | ET CHAT Google Talk (Jabber) Client Login                                        |      2002327 |
|     56 | [OSSEC] Attempt to login using a non-existent user                               |         5710 |
|     47 | ET SCAN Potential SSH Scan OUTBOUND                                              |      2003068 |
|     44 | ET SCAN Potential SSH Scan                                                       |      2001219 |
|     38 | GPL ICMP_INFO PING BSDtype                                                       |      2100368 |
+--------+----------------------------------------------------------------------------------+--------------+
20 rows in set (32.65 sec)
Again we can see that the top signature is the “GPL SNMP public access udp” alert and here we can see there are over 900,000 uncategorized events. Not only will the processing of these uncategorized events slow our use of tools they will cost the analyst time which could be better used in responding to alerts of greater significance.
If we’re going to take action on this alert, it’s best to ensure that these alerts are benign as part of our tuning process. See which machines generated these alerts can be helpful in making that decision.
SELECT COUNT(*) AS ip_cnt, INET_NTOA(src_ip) FROM event WHERE status=0 AND signature_id=2101411 GROUP BY src_ip ORDER BY ip_cnt DESC;
+--------+-------------------+
| ip_cnt | INET_NTOA(src_ip) |
+--------+-------------------+
| 824459 | 172.16.42.109     |
|  41643 | 172.16.42.250     |
|  33732 | 172.16.42.140     |
|    452 | 172.16.42.137     |
+--------+-------------------+
4 rows in set (9.60 sec)
We can gather a little more information by using a query that also returns the destination IP address as well.
SELECT COUNT(*) as ip_cnt, INET_NTOA(src_ip), INET_NTOA(dst_ip) FROM event WHERE status=0 and signature_id=2101411 GROUP BY dst_ip ORDER BY ip_cnt DESC;
+--------+-------------------+-------------------+
| ip_cnt | INET_NTOA(src_ip) | INET_NTOA(dst_ip) |
+--------+-------------------+-------------------+
| 858191 | 172.16.42.109     | 192.168.0.33      |
|  41643 | 172.16.42.250     | 192.168.0.31      |
|    226 | 172.16.42.137     | 192.168.200.5     |
|    226 | 172.16.42.137     | 192.168.200.51    |
+--------+-------------------+-------------------+
4 rows in set (9.65 sec)
Identifying rule categories
Both the Snort Subscriber (Talos) and the Emerging Threats rulesets come with a large number of rules enabled (over 15,000 by default). You should only run the rules necessary for your environment. So you may want to disable entire categories of rules that don’t apply to you. Run the following command to get a listing of categories and the number of rules in each:
cut -d\" -f2 /etc/nsm/rules/downloaded.rules | grep -v "^$" | grep -v "^#" | awk '{print $1, $2}'|sort |uniq -c |sort -nr
Recovering from too many alerts
Sometimes we may get flooded with a barrage of alerts that make it difficult or not possible to categorize within Sguil or Squert. When this happens, we can perform mass categorization of alerts using MySQL on the master server, where sguild (the Sguil server) runs. The steps below outline an example of this:
Stop the Sguil server:
sudo so-sguild-stop
List the top twenty signatures (descending) pertaining to uncategorized alerts (with a status of
0):sudo mysql --defaults-file=/etc/mysql/debian.cnf -Dsecurityonion_db -e 'SELECT COUNT(signature)as count, signature FROM event WHERE status=0 GROUP BY signature ORDER BY count DESC LIMIT 20;'
Update any records (to have a status value of
1) with a signature that contains the textET INFO:sudo mysql --defaults-file=/etc/mysql/debian.cnf -Dsecurityonion_db -e "UPDATE event SET status=1, last_modified='2018-06-27 01:00:00', last_uid='sguil' WHERE event.status='0' and event.signature LIKE '%ET INFO%';"
- Check again to see if our alerts have been categorized as
acknowledged( these should no longer be visible in the output):
sudo mysql --defaults-file=/etc/mysql/debian.cnf -Dsecurityonion_db -e 'SELECT COUNT(signature)as count, signature FROM event WHERE status=0 GROUP BY signature ORDER BY count DESC LIMIT 20;'
- Check again to see if our alerts have been categorized as
Bring the Sguil server back up:
sudo so-sguild-start
Adapted from https://taosecurity.blogspot.com/2013/02/recovering-from-suricata-gone-wild.html.
So what’s next?
Firstly, in tuning your sensor, you must understand whether or not taking corrective actions on this signature will lower your overall security stance. For some alerts, your understanding of your own network and the business being transacted across it will be the deciding factor. If you don’t care that users are accessing facebook, you can silence the policy-based signatures that will generate alerts.
This signature, sid:1411, /is/ a useful signature to have on hand. Attackers will often search for SNMP enabled devices with default community strings in their attempts to pivot to other parts of the network. In this case, I know the alerts are being generated by benign traffic but I cannot guarantee that further alerts will be.
Another consideration to take into mind is determine whether or not the traffic is being generated by a misconfigured piece of equipment. If so, the most expedient measure is to correctly configure said equipment and then reinvestigate tuning.
There are multiple ways to handle overly productive signatures and we’ll try to cover as many as we can without producing a full novel on the subject.
Disable the sid
Security Onion uses PulledPork to download new signatures every night and process them against a set list of user generated configurations.
In a distributed Security Onion environment, you only need to change the configuration file on the server and the rule-update script will sync with the signatures from the Server.
As mentioned before, take care in disabling signatures as it can be likely that a more appropriate response is warranted.
Edit the disablesid.conf configuration file:
sudo vi /etc/nsm/pulledpork/disablesid.conf
Append the signature you wish to disable in the format gid:sid. gid is the generator ID and will usually be “1”. You can check the generator ID by checking the exact signature. If a gid is not listed, it is assumed to be “1”. A common exception would be rules that start with “SURICATA” having a gid of “0” and Talos VRT Shared Object (compiled) rules having a gid of “3”. Here are some examples:
# Disable the "GPL SNMP public access udp" signature
1:2101411

# Disable the "SURICATA HTTP unable to match response to request" signature
0:2221010
Update rules as shown in the Updating Rules section.
Disable the category
In /etc/nsm/pulledpork/disablesid.conf, instead of providing a sid,
we can use a PCRE (Perl-compatible regular expression) or refer to the
rule category (found in the header above the rule grouping in
/etc/nsm/rules/downloaded.rules).
For example, if we wanted to disable the entire ET-emerging-misc
category, we could do so by putting the following in
/etc/nsm/pulledpork/disablesid.conf:
ET-emerging-misc
If we wanted to disable all rules with ET MISC in the rule
description, we could put the following in
/etc/nsm/pulledpork/disablesid.conf:
pcre:ET MISC
After making changes to the file, update your rules as shown in the Updating Rules section.
modifysid.conf
PulledPork’s modifysid.conf will allow you to write modifications to rules that are applied every time PulledPork downloads the latest ruleset. There are several examples in the modifysid.conf file, so we won’t repeat them here. Edit the modifysid.conf configuration file:
sudo vi /etc/nsm/pulledpork/modifysid.conf
Update rules as shown in the Updating Rules section.
Rewrite the signature
In some cases, you may not want to use Pulledpork’s modifysid.conf, but instead create a copy of the rule and disable the original. In Security Onion, locally created rules are stored in /etc/nsm/rules/local.rules
Edit the /etc/nsm/rules/local.rules file:
sudo vi /etc/nsm/rules/local.rules
Snort rules are incredibly flexible, this is a bird’s eye view of the rule format:
Action Protocol SrcIP SrcPort Direction DestIP DestPort (rule options)
Here is the rule that has been generating so many alerts on our sensor(s)
macphisto@SecOnion-Dev:~$ grep -i "GPL SNMP public access udp" /etc/nsm/rules/downloaded.rules
 alert udp $EXTERNAL_NET any -> $HOME_NET 161 (msg:"GPL SNMP public access udp"; content:"public"; fast_pattern:only; reference:bugtraq,2112; reference:bugtraq,4088; reference:bugtraq,4089; reference:cve,1999-0517; reference:cve,2002-0012; reference:cve,2002-0013; classtype:attempted-recon; sid:2101411; rev:11;)
We can rewrite the rule so it’s a little less active. We will rewrite the rule to ignore this kind of alert if the destination is any of the hosts we’ve identified.
For starters let’s create some variables in /etc/nsm/rules/local.rules to define the traffic. First we’re going to define a variable for our called overactive hosts called OVERACTIVE
var OVERACTIVE [192.168.0.31,192.168.0.33,192.168.0.5,192.168.0.51]
We can plug this information into our snort rule format,
alert udp $HOME_NET any -> !$OVERACTIVE any (msg:"GPL SNMP public access udp"; content:"public"; fast_pattern:only; reference:bugtraq,2112; reference:bugtraq,4088; reference:bugtraq,4089; reference:cve,1999-0517; reference:cve,2002-0012; reference:cve,2002-0013; classtype:attempted-recon; sid:9001411; rev:1;)
We also gave the alert a unique signature id (sid) by bumping it into the 90,000,000 range and set the revision to 1.
Now that we have a signature that will generate alerts a little more selectively, we need to disable the original signature. Like above, we edit the disablesid.conf file and add:
1:2101411
Update rules as shown in the Updating Rules section.
Threshold
See /etc/nsm/rules/threshold.conf for more information and examples.
Suppressions
A suppression rule allows you to make some finer grained decisions about certain rules without the onus of rewriting them. With this functionality we can suppress rules based on their signature, the source or destination address and even the IP or full CIDR network block. This way, you still have the basic ruleset, but the situations in which they fire are altered. It’s important to note that with this functionality, care should be given to the suppressions being written to make sure they do not suppress legitimate alerts.
Sticking with our current example of disabling the GPL SNMP public access udp alert we can build a suppression rule that limits this signature from firing for machines in which this behavior is deemed acceptable. For example, you would often see this rule firing rapidly for any service that queries SNMP on a regular basic. Services like Nagios produce a great many of these alerts. In this example, we will operate on the following known information:
| Source IP Address | 172.16.42.109 |
|---|---|
| Generator ID | 1 |
| Signature ID | 2101411 |
The format for a suppression is very straight forward. Below is the basic format for a suppression with the configurable areas marked in bold text.
suppress gen_id gen-id, sig_id sid-id, track [by_src|by_dst], ip IP/MASK-BITS
We can simply transplant the known information for the bold text above and place the following in /etc/nsm/rules/threshold.conf:
suppress gen_id 1, sig_id 2101411, track by_src, ip 172.16.42.109
Once the correct suppression has been placed in threshold.conf, restart the alert engine:
sudo so-nids-restart
Autocategorize events
The sguild server can be set to autocategorize events as it processes them. This is a great way to have sguil process the events for us as it sees them, saving us from any laborious categorization. In the Sguil console, you can create an autocat by right-clicking the event status or by clicking File -> Autocat. In Squert, you can click the Autocat icon in the upper right corner.
Why is pulledpork ignoring disabled rules in downloaded.rules
If your syntax is correct, you are likely trying to disable a rule that has flowbits set. For a quick primer on flowbits see http://blog.snort.org/2011/05/resolving-flowbit-dependancies.html and section 3.6.10 of the Snort Manual (http://www.snort.org/docs).
Let’s look at the following rules using:
alert tcp $HOME_NET any -> $EXTERNAL_NET !1433 (msg:"ET POLICY Outbound MSSQL Connection to Non-Standard Port - Likely Malware"; flow:to_server,established; content:"|12 01 00|"; depth:3; content:"|00 00 00 00 00 00 15 00 06 01 00 1b 00 01 02 00 1c 00|"; distance:1; within:18; content:"|03 00|"; distance:1; within:2; content:"|00 04 ff 08 00 01 55 00 00 00|"; distance:1; within:10; flowbits:set,ET.MSSQL; classtype:bad-unknown; sid:2013409; rev:3;)

alert tcp $HOME_NET any -> $EXTERNAL_NET 1433 (msg:"ET POLICY Outbound MSSQL Connection to Standard port (1433)"; flow:to_server,established; content:"|12 01 00|"; depth:3; content:"|00 00 00 00 00 00 15 00 06 01 00 1b 00 01 02 00 1c 00|"; distance:1; within:18; content:"|03 00|"; distance:1; within:2; content:"|00 04 ff 08 00 01 55 00 00 00|"; distance:1; within:10; flowbits:set,ET.MSSQL; classtype:bad-unknown; sid:2013410; rev:4;)

alert tcp $HOME_NET any -> $EXTERNAL_NET !1433 (msg:"ET TROJAN Bancos.DV MSSQL CnC Connection Outbound"; flow:to_server,established; flowbits:isset,ET.MSSQL; content:"|49 00 B4 00 4D 00 20 00 54 00 48 00 45 00 20 00 4D 00 41 00 53 00 54 00 45 00 52 00|"; classtype:trojan-activity; sid:2013411; rev:1;)
If you try to disable the first two rules without disabling the third rule (which has “flowbits:isset…) the third rule could never fire due to one of the first two rules needing to fire first. Pulled Pork (helpfully) resolves all of your flowbit dependencies, and in this case, is “re-enabling” that rule for you on the fly. Disabling all three of those rules by adding the following to disablesid.conf has the obvious negative effect of disabling all three of the rules:
1:2013409
1:2013410
1:2013411
When you run sudo rule-update, watch the “Setting Flowbit State…” section and you can see that if you disable all three (or however many rules share that flowbit) that the “Enabled XX flowbits” line is decrimented and all three rules should then be disabled in your downloaded.rules.
Sguil Days To Keep
You can configure Sguil’s database retention by editing securityonion.conf and changing the DAYSTOKEEP setting (the default is 30 days):
/etc/nsm/securityonion.conf
You can also use this setting to perform a Sguil database purge by lowering the DAYSTOKEEP variable to a small number (like 7 or 1) and manually running:
sudo sguil-db-purge