Oscar Wahlberg has developed fw1_alert.pl, written in PERL
Roberson Andrew has written alert.zip, written mainly in Windows Script Host 5.1
New Features with ver 1.4.2:
Tested and runs on most Unix flavors, including Linux, Solaris, and Nokia
Other Features Include:
An installation script that builds, installs, and tests everything
for you. Includes an optional feature that automatically determines the
the admin of the scanning source and notifies them via email. Also
new with FW-1 ver 4.0, you have the option to automatically block systems
that are scanning you. You should also find this version much easier
to read and understand. You can add your own alerting modules, such
as page alerts or snmp traps.
Download the latest version here.
The Problem
How do you know if someone is probing your network? Logs are
a great place to start, especially your FW-1 logs. Unfortunately,
those logs can be difficult and time consuming to sift through (especially
if you are logging 400+ MB every day). Wouldn't it be great if there was
an automated method of alerting you? Well, this article does just
that.
There are a variety of different probes and attacks black-hats will attempt. The type we will be focusing on is port scans. Port scans are where an individual attempts to connect to a variety of ports to identify what services a system is running. The scans can be used on a specific target, or used to scan entire IP ranges, often chosen at random. This is one of the most popular information gathering methods used by black-hats today as it identifies what ports and services are open. If you are interested in learning more about these techniques, check out Know Your Enemy.
The Goal
The goal is to receive an email alert whenever someone is attempting
to scan or probe your network. We want to automate the entire process,
saving you time and energy. We also want to archive this information
in a database for future use. Our definition of an email alert would
look as follows:
Date:
Wed, 31 Dec 1997 15:40:01 -0600 (CST)
From:
ids@example.net
To:
fwadmin@example.net
Subject:
#### Firewall ALERT ####
You have received this message because someone is potentially scanning your systems. The information below is the packet that was denied and logged by the Firewall. This is email alert number 3, with a limit of 5 from evil.example.org.
----- CRITICAL INFORMATION -----
Date:
31Dec1997
Time:
15:39:59
Source:
evil.example.org
Destination:
ns1
Service:
domain-tcp
----- ACTUAL LOG ENTRY -----
31Dec1997 15:39:59 drop fw1 >elx0 mail proto tcp src evil.example.org dst ns1 service domain-tcp s_port 37401 len 44 rule 6
As you see, this email is alerting the fwadmin that someone has attempted to conduct an un-authorized zone transfer from the nameserver. However, the firewall denied the attempt, logged it, AND alerted the fwadmin. In the email alert, we have parsed the critical information for easy reading, and also included the actual log entry for more data. You can also creat your own alerts, such as text pages or snmp traps.
The Solution
To detect and monitor these scans, we will build a script that first
logs whenever someone connects to a predetermined port, and then emails
us an alert. To do this, we will be using the User Defined Alert.
The User Defined Alert will be our script, alert.sh.
Whenever the User Defined Alert is activated, it will launch our script,
which parses the data and does all the work for us. We set up our
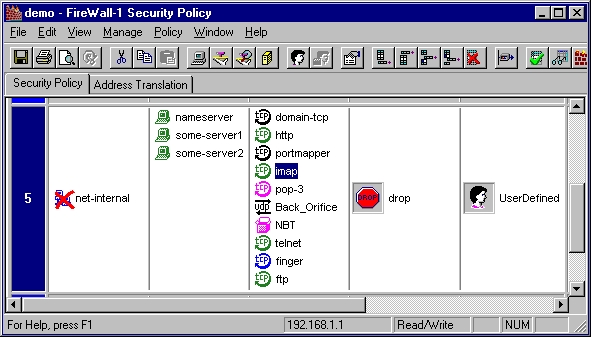
Firewall rule base as follows.. First, we identify the most commonly
scanned ports we want to monitor. Then we select several systems to listen
on these ports. When an intruder scans our network, he will most
likely hit our systems listening on these ports. When these ports are scanned,
the Firewall logs the attempts then executes the User Defined Alert..
The end result is you receive an email for each port scanned. If you have 3 systems, each listening on 4 ports, then you may get up to 12 emails from a single network port scan. However, this is normally not the case. If hackers are scanning an entire network, they are normally looking for a single vulnerability, such as imap (port 143). In this case, we would have received only three emails, one from each system. When they scan a single target, often they scan a range of ports, such as 1-1024. In that case, we would have received only 4 emails, one for each port on the system. Based on what emails you get, you can quickly determine what the intruder is interested in. Also, the script alert.sh is configurable to limit the total amount of emails as a result of a scan (the default limit is 5). All scans are also logged to a database.
Implementation
To implement this methodology, we first identify two to three systems
to use for monitoring. I often select DNS servers, as these are primary
targets, many scanning tools start by scanning these systems. Once you
have identified the systems you will monitor, create a workstation object
in your Firewall 1 GUI for each of the systems. The systems do not
necessarily have to actually exist. Create an object for a non-existing
system, give it a valid IP that your are not using, and use this as one
of your scannable objects. Once you have created your workstation
objects, then select the most commonly scanned ports. Ensure that your
systems are not using these ports, or every time someone connects to it,
you will be alerted. To identify commonly scanned ports, CERT alerts are
a great place to start, you can find these alerts at http://www.cert.org.
Some ports that you can use are:
dns zone transfer
53/TCP
portmapper
111/TCP
http
80/TCP
SMB
139/TCP
imap
143/TCP
BackOrrifce
31337/UDP --> Yes, people are STILL scanning for old BO.
I like these ports since hackers commonly look for them, but most of your systems will not be using them. Make sure these ports are not already blocked by a screening router. We will then set several system to listen on these ports, alerting us when there is a connection. Below is an example of a rule that monitors and detects the scans. Notice that quite a few ports are being monitored for these systems.
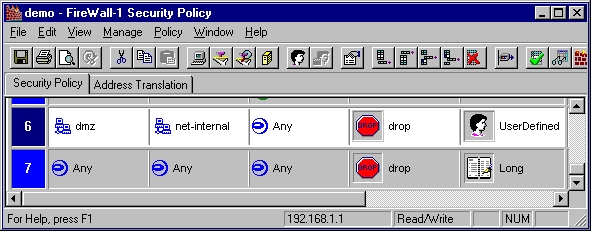
Below is another example of how to use the alert.sh script. Your DMZ should never initiate traffic to your internal network. By design, you do not trust your DMZ since it is accessible by the Internet. So, I created an additional rule to log and alert me whenever the DMZ attempts to initiate a connection to the internal network. If the DMZ does attempt to reach your internal network, it may mean one of the DMZ systems has been compromised and the bad guys are trying to get in. Notice how I put this rule just before the last "catch all and drop" rule.
That's it, you are done. All you have to do is
download
the latest version and run the installation script. If you want to learn
how the script works or modify it, read below.
--- This is informational only, you DON'T have to read this ---
The whole alerting process works as follows. First, we define the User Defined Alert (shown in the image above) as our alert.sh script.. The User Defined Alert produces a log entry for every connection that it monitors. The log entry looks as follows:
31Dec1997 15:39:59 drop fw1 >elx0 mail proto tcp src evil.example.org dst firewall service domain-tcp s_port 37401 len 44 rule 6
The Firewall then pipes this log entry into our alert.sh script. The script then parses the data and executes various functions we define. The script alert.sh uses the following files to store and track the logs.
alert.uniq - A single, permanent log is added to this file whenever a system scans you. Regardless of how many ports are scanned, there will only be one entry per unique source. This way you can easily track who scanned you when.
alert.log - This file temporarily stores every port scanned for that day. This is how the alert.sh script tracks how many times/ports have been scanned from a single source. Every time the User Defined Alert executes alert.sh, the first thing the script does is count how many times the source ($src) has scanned us for that day by looking in alert.log. When the script alert.sh is done, it adds an entry to the alert.log file. So, the first time a source scans a port, alert.sh will not find anything logged in the alert.log. The second time the sources scans a port, it will find one, and so on. You set a limit on how many ports are scanned before the alert.sh stops reacting (this protects against DOS attacks). At the end of the day, a cronjob (rotate.sh) will clear this file out and add all the entries to archive.log. This way if the same source scans you again at a later date, alert.sh will log the attempt.
alert.archive - This file permanently archives every port scanned and logged. This is an archivial database that can be used for research. This file stores the actual log entries, so it tends to be difficult to read. I find the file alert.uniq to be much easier to read.
rotate.sh - This is a cronjob you need to run every day. It clears the file alert.log, saving all the logged entries to archive.log. This resets the counter for the alert.sh script. If the same source scans you two days in a row, this allows you to log it.
To get a better understanding of how our alert.sh script works, read below. The script is broken down into 6 parts.
1. First, we need to customize our script, which is done in the beginning of the script. This should be self explanatory.
#################################################################
#
BEGIN CUSTOMIZING SCRIPT HERE
#
#################################################################
# INSTALL DIRECTORY
# Define the directory
that this script is in.
# Do NOT put a slash
at the end.
# EXAMPLE: dir=/home/fwadmin/alert
dir=
# FW ADMIN
# Define the name of
who gets the email alerts
# EXAMPLE: user=fwadmin@example.com
user=
# SCAN LIMIT
# Define maixmum number
of scans/email alerts
limit=5
# EMAIL REMOTE SYSTEM
# Define as "true" if
you want to automatically email
# the remote admin when
you reach your scan limit.
email=false
# SAM
# Define as "true" if
you want to autotmatically block
# the source if you
reach your scan limit.
sam=false
# SAM TIMEOUT
# How long do you want
the source blocked
# Default is 3600 seconds
(1 hour).
timeout=3600
#################################################################
#
FINISH CUSTOMIZING SCRIPT HERE
#
#################################################################
2. We then define our system variables. Also, we check to see if we have met our scan limit. If we have, bail now to save CPU cycles. This is where the speed optimization happens.
### Script variables
message=/tmp/.message_$$
send=/tmp/.send_$$

### Good code is secure code
umask=177
PATH=/usr/bin:/sbin:/usr/sbin:/usr/local/bin
export PATH

if test -a $message
then
        rm $message
fi

if test -a $send
then
	rm $send
fi

### Set trap in case of abrupt exit
trap "rm $send $message ; exit 5" 1 2 15

### Grab User Defined Alert log, pipe to $message.
cat - | tail -1 > $message

### Determine number of scans.
ip=`awk '{print $10}' $message`
number=`grep -c $ip $dir/alert.log`
scan=`expr $number + 1`

### Check number of scans.  If we have reached our limit, lets bail
### now and save CPU cycles.
if [ $scan -gt $limit ];then
	cat $message >> $dir/alert.log
	rm $message
	exit 10
fi

### Parse log file
date=`awk '{print $1}' $message`
time=`awk '{print $2}' $message`
dst=`awk '{print $12}' $message`

### Determine service (check some variables first)
#Determine if "Valid Address" is in log files for NAT
nat_check=`grep -c "(Valid Address)" $message`

#Determine if protocol is icmp
icmp_check=`grep -c " icmp " $message`

if [ "$nat_check" -eq 0 ];then
	if [ "$icmp_check" -eq 0 ];then
		service=`awk '{print $14}' $message`
	else
		service=`awk '{print $15,$16,$17,$18}' $message`
	fi
else
	if [ "$icmp_check" -eq 0 ];then
		service=`awk '{print $16}' $message`
	else
		service=`awk '{print $17,$18,$19,$20}' $message`
	fi
fi
3. We then define all functions / modules used in the script. The script comes with three predifined modules, you can add more of your own.
- Resolve () - If the source is an IP, resolve it to a fully qualified host name.
- TrackDown () - Determine who the points of contact are for the remote source. Works only for .com, .edu, .net, .org, and .gov sites.
- Block () - Blocks any remote system that reaches its scan limit. Works on FW-1 ver 4.0 only.
4. We then build our alert emails. This is the template
used for every email alert that is generated.
cat <<EOF > $send
You have received this
message because someone is potentially
scanning your systems.
The information below is the packet
that was denied and
logged by the Firewall. This is email alert
number $scan, with a
limit of $limit from $src.
----- CRITICAL INFORMATION -----
Date: $date
Time: $time
Source: $src
Destination: $dst
Service: $service
----- ACTUAL FW-1 LOG ENTRY -----
`cat $message`
EOF
5. Last, we reach the phases part. This is where we define what the script does (in addition to the alert emails) based on how many time the source has probed us. This is broken down into three parts, or phases. Feel free to change/modify these phases as you see fit. I've tried to make this as modular as possible for just that reason. Regardless, once we are done, we send off the email alert.
- PHASE 1: This is when we receive the very first packet. The entry is logged in the alert.uniq file.
- PHASE 2: This is when we receive the 2nd to $limit-1 packets. Currently nothing happens during phase 2
- PHASE 3: This is when we receive our $limit packets (default is 5). Here is where most of the action happens. This is where the functions Blocked(), TrackDown(), and anything else you want to add.
/usr/bin/mailx -s "####
SCAN ALERT ####" $user < $send
cat $message >> $dir/alert.log
6. Don't forget, at the end of the day, run the cronjob rotate.sh. The purpose of this cronjob is to take all the logged entries from alert.log and move them to the permanent archive file alert.archive. This also clears out the alert.log file, allowing it to start counting new sessions.
Thats it! I hope this does not sound complicated. Once you
get it up and running, you will see how simple it is. I
hope this helps you in your intrusion detection. While this is not
the ultimate end-all solution, it is a great and easy start to automating
your intrusion detection. If you have any recommendations or corrections,
I would love to hear from you. Please email me at lance@spitzner.net.
Author's bio
Lance Spitzner enjoys learning by blowing up his Unix systems athome.
Before this, he was an Officer
in the Rapid Deployment Force, where he blew up things of a different
nature. You can reach him at lance@spitzner.net
.
| Whitepapers / Publications |