Jeff Richard
May 3, 2001
Overview
This guide will provide the basic information required to configure Snort for the Win32 platform with logging to a MySQL database, and data analysis using the ACID console. This paper will only focus on the installation and configuration of the noted software on Windows NT. It is assumed that the user is familiar with intrusion detection systems, and the proper placement of the network based sensors. It is also assumed that the user has knowledge of protecting the underlying operating system from being hacked. A personal firewall product works well in this case. I have successfully tested both ZoneAlarm and Blackice with this configuration.
This installation guide also assumes the user is installing Snort, MySQL, NT Option Pack and ACID on the same computer. In a high traffic installation this may not be the best configuration and configuring MySQL and web services on a separate machine would allow for better scalability, and multiple IDS sensors.
Why install on the NT platform? Contrary to what most open source evangelist think, NT is actually a very good product. NT network performance is in line with *BSD making it an excellent IDS operating system. Another deciding factor is the amount of knowledge you have in house. Are you an NT shop? If so, running it on an OS that you have expertise with makes sense.
While the focus of this paper is on Windows NT, the same configuration should work with few changes on Windows 2000. It is also recommended that Workstation version of the OS be used instead of server versions. Windows NT workstation provides better performance for IDS applications because of Kernel tuning differences between the workstation and server versions.
Technology Overview
The following is a list of software required to make the configuration work. Some of the software listed below can be substituted for similar products, such as FireDaemon, and NT Option Pack. I have tested the noted configuration at great lengths and it works extremely well.
All versions of tested software are listed below. Software in the open source community seems to change on a daily basis. While these versions of software will change over time, the general configuration of the products should remain fairly consistent.
Required for Snort
WinPcap v2.1 is an open source packet capture driver for the Win32 platform. WinPcap exports a set of high-level capture primitives that are compatible with libpcap, the famous UNIX capture library. WinPcap is how Snort captures packets for analysis.
Snort v1.70 is an open source intrusion detection system originally written by Marty Roesch, and ported to the Win32 platform by Michael Davis. Snort currently runs on several Unix, Linux, and *BSD platforms. Make sure to download the version of Snort with MySQL support compiled into the executable! You may also need to download the Snort for Win32 source code to get the MySQL installation script. While at the Snort web site you should also grab the latest rule set. This will be required to have Snort act as an IDS!
FireDaemon v1.0R3 is a utility that allows you to install and run virtually any application as a Windows NT/2K service. This will allow you to start Snort as an NT/Windows 2000 service, instead of running it as an interactive program.
Required for SQL logging
MySQL v3.23.36 is an open source SQL database. MySQL is required to capture and store Snort log information, for further analysis by the ACID console. If you are not familiar with MySQL there is an add on product called DbTools that I have found very helpful. DbTools is a database administration tool that simplifies tasks such as adding tables, users, and MySQL configuration. I’ll refer to using this tool during the MySQL configuration section.
Required For ACID
ACID v.0.9.6b7 (Analysis Console for Intrusion Detection) is a PHP based analysis engine to analyze incidents generated by security related software such as IDS, and firewalls.
PHP v4.0.5+ is an open source scripting language similar to Perl. The ACID console is written in PHP, and the PHP parsing engine is required.
ADODB v1.00+ is an open source database abstraction library. ADODB stands for Active Data Objects Data Base, and should not be confused with Microsoft’s Active Data Objects (ADO) object model.
Windows NT 4.0 Option Pack is Microsoft’s free web server, and application server required to host the web pages for ACID. It is beyond the scope of this installation guide to discuss the installation of the NT option pack. It is recommended you search Microsoft’s web site for installation, and security information regarding this product. This guide will assume you have a minimum of the Web and MTS components installed.
Installing Software
There are several orders in which the software can be installed. I’ll illustrate installing the software from a bottom up approach. Installing the base pieces of the required software, then layering the additional parts next. The assumption is that you have Windows NT 4.0 installed, with the most recent service pack (SP6), and IIS or PWS Web services running.
Installing WinPcap
WinPcap is installed using an InstallShield installation wizard. Assuming the downloaded version of WinPcap is called WinPcap.exe run the application. After installing the WinPcap program it is recommended that you restart the computer to ensure that the drivers are properly bound to the network card.
Installing Snort
There is no installation program currently available for Snort so you will need to create the directories and unpack the files manually. Create the following directories on your computer; c:\snort, c:\snort\logs, c:\snort\rules. Copy the snort.exe found in the archive you downloaded from Snort.org to the c:\snort directory. You should also unpack the create_mysql script file found in \contrib directory of the source code archive to the c:\snort directory. Extract the rules archive to the c:\snort\rules directory.
The snort.conf file is required to tell Snort what to do when it starts up. The default snort.conf file is very well commented. I’ll break out the key parts of the file that you will need to modify.
Define your address space
var HOME_NET 10.1.1.1/32 – Indicates what your home address range is. Several rules are written to use the home address range as the source or destination of traffic. The /32 is CIDR block addressing that indicates the netmask of the address. A CIDR block mask of /24 indicates a Class C network, /16 a Class B network, and /32 indicates a single address.
var EXTERNAL_NET !$HOME_NET – Indicates the external network address space used in rules. Use the logical indicator ! to indicate a negative meaning, IE: NOT HOME_NET. Place a $ in front of variable names to have them evaluated by Snort.
var SMTP $HOME_NET – Indicates your SMTP servers.
var HTTP_SERVERS $HOME_NET – Indicates your Web servers.
var DNS_SERVERS [10.1.1.1/32,10.1.1.2/32] – Indicates your DNS servers. These will be ignored during port scan rule evaluations. Use a comma to separate multiple hosts.
Configure Preprocessors
Preprocessors are used to process packets before the Snort rules are used to evaluate the packets signature. Preprocessors also allow a simple plugin interface so you can write special packet handling routines without touching the Snort source code. You should review the detailed notes about the preprocessors to determine which are best for your environment.
Configure Output Plugins
We will detail using the MySQL plugin, which is required to dump information to MySQL from Snort. Various other plugins are available for Snort, but may are not currently be support on the Win32 platform.
output database: log, mysql, user=snort password=snortpassword dbname=snort port=3306 host=localhost encoding=hex detail=full
log – Tells the plugin to log events to the MySQL database server.
mysql – indicates you are using the MySQL database plugin.
user – Is the user you are telling the plugin to use when logging into MySQL. This should NOT be the admin account of MySQL!!!
password – Password for the user in MySQL.
dbname – Name of the database in MySQL where the Snort logs will be stored.
port – is the TCP/IP port that MySQL is listening on.
host – Host machine where the MySQL server is located. If MySQL is running on a different machine you would indicate that machines IP address here.
encoding – Hex indicates that packet information should be logged in hex format.
detail – indicates full detail of the alert should be logged to the database. This will include the packet payload information.
Rule Sets
You define your rule sets by including the rules you want Snort to use. I recommend supplying the full path to your rules, so you know exactly what rule files are being used by Snort. Place a # in front of any rule file you do NOT wish to use.
include c:\snort\rules\local.rules
#include c:\snort\rules\exploit.rules
include c:\snort\rules\scan.rules
Installing FireDaemon
FireDaemon is installed using an InstallShield installation wizard. Install FireDaemon to a location on the HD that makes sense in your environment. Normally accepting the defaults work best. Locate the FireDaemon program group, and navigate to the UI folder below the group. Run the FireDaemonUI program. Configuring the Snort service is very simple, follow the snap shot below to complete the installation. We’ll address the application options, and how they relate to starting Snort later.
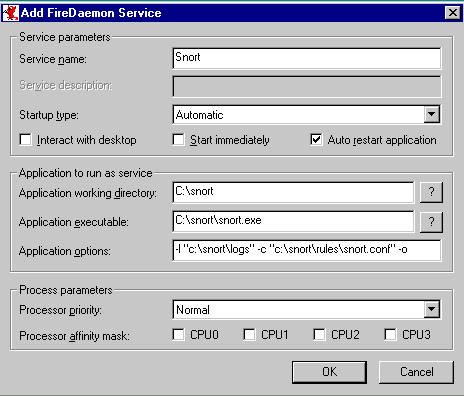
This will create an NT service called FireDaemon Service: Snort which will be set for automatic startup. Because you did not check the start immediately option the service will not be running. This is desired until we have all required pieces properly installed.
Installing MySQL
Extract the MySQL installation programs and start the installation program. We’ll use the default installation directory of c:\mysql. Choose the custom installation option, and check Program Files, Help Files, and Privilege Tables. Accept the remaining default options.
Configuring MySQL
Locate and run the winmysqladmin.exe program located in the c:\mysql\bin directory. The first time you start the program you will be prompted for the user name and password of the Admin for MySQL. Make sure you note what you have entered here as you will need this information to configure MySQL later! This will place a file my.ini in your c:\winnt directory. This file contains the configuration information for your installation of MySQL. The admin console will minimize itself to the system tray after you enter your user name and password. Click on the console and maximize it to the display. Click the my.ini setup tab to access the current settings that MySQL will use when run. Make sure the mysqld-nt radio button on the left of the screen is selected. This will create an NT service for MySQL when you click save settings. For security reasons it’s a good idea to change the default TCP/IP port that MySQL uses, from 3306. This port number should be identical to the one you entered in the snort.conf, output plugin. Make sure to remove the # from the port rule to make your port change active. Save your setting changes and start the NT service if it has not already started.
Install dbTools
Install dbTools to the location C:\Program Files\DBTools. Accept the default installation group. Right click on the MySQL Servers icon on the left side of the display and select add server. Set the server type to MySQL, the server name to Snort, hostname to localhost, port number to 3306, set the user and password to those that you entered when starting the winmysqladmin.exe program.
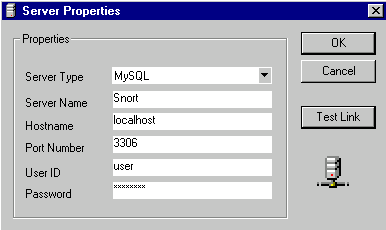
You should now be connected to the MySQL Server on the localhost. If you have problems connecting to the server verify the port number, user, and password entered in the registration screen to the information in the my.ini file in the c:\winnt directory. If you continue to have problems make sure to restart the MySQL Server NT service after making the changes to the my.ini file.
Choose Tools/Database Manager and enter the name snort for your new database. Please note, the database name is case sensitive.
Choose Tools/SQL Query Editor. Choose snort from the drop down at the top of the window. Choose File/Load and open the create_mysql text file that was included in the Win32 distribution of Snort. If the file is not included in the archive you downloaded from Snort.org download the full source for Snort, which contains the file under the contrib directory. Now choose Query/Run Query to execute the SQL query, which will create the required tables in the snort database.
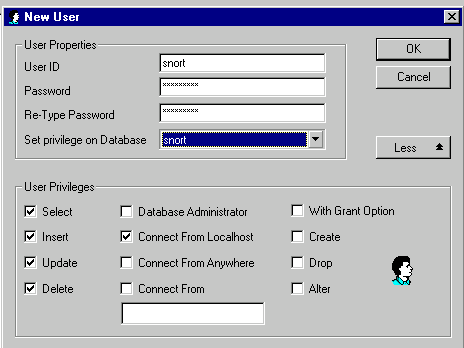
Choose Tools/User Manager and create a new user called snort. Set the snort password to snortpassword. Set the privilege on database to the snort database, and select the Select, Insert, Update, Delete, Create privileges. After you have run ACID for the first time you should remove the table create privilege. Make sure to also select the connect from Localhost option. All other check boxes should be cleared. Make sure to delete all other users EXCEPT for your admin account! This will provide a higher level of security.
Install PHP
Start the PHP installation routine, choose the advanced installation option. Accept the default installation location of c:\php. If you choose to install the product to an alternate directory make sure that the IIS guest account has access to the directory. Accept the default locations for upload, and session information. Enter the location and from address information of your mail server. ACID will use this information for its email feature. On the Error Report Level screen choose to display all errors only. Do not display warnings, or notices. Choose the appropriate server OS, and web server. Select the .php file associations. If you choose to install with IIS, on the IIS Scriptmap Node Selection choose the WWW Service Master Properties option. Complete the installation, and reboot if required.
Install ADODB
Extract all files found in the ADODB archive file to the c:\php\adodb directory. That’s it!
Install ACID
Unpack all files from the ACID archive file to the c:\inetpub\wwwroot directory. If you would rather have the files installed to a sub web (http://www.example.com/acid) install to that subdirectory instead.
To configure ACID edit the acid_conf.php file exactly as follows:
$DBtype = "mysql";
$alert_dbname = "snort";
$alert_host = "localhost";
$alert_port = "3306";
$alert_user = "snort";
$alert_password = "snortpassword";
$show_rows = 25;
Starting ACID
From the computer that you have installed Snort start your web browser and navigate to http://localhost/index.html. You should change the default load page in IIS to start with index.html first, as it defaults to default.asp.
The first time you start ACID you will be show the following screen:
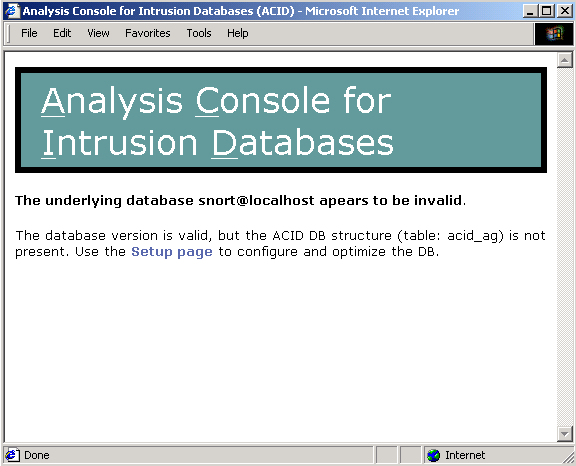
This is because ACID modifies the underlying Snort database table architecture. Click on the Setup Page link on the screen.
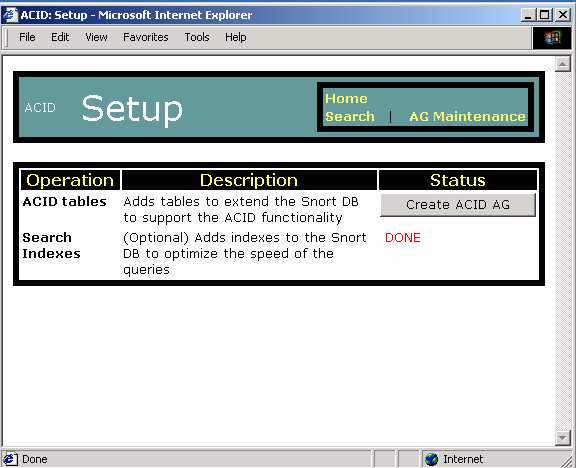
Click the Create ACID AG button on the following page. This will create additional tables required for ACIDs operation.
ACID should be completely configured at this time. If you receive error messages when creating the ACID tables you probably did not give the snort user table creation privileges in MySQL. Give the user the correct rights, and try again. Make sure to remove that right after you have configured ACID.
Testing
Wow, that’s a lot of software to install! It was even more painful to install it and write this document! Now that you have the required software installed, and hopefully configured correctly you are ready to start Snort and start testing. Open the services application and start the FireDaemon Service: Snort. Snort should start almost immediately. Check your event viewer, if FireDaemon indicates that the Snort service has died, and that it’s restarting the service you probably have a problem with your snort.conf file, or the communications to the MySQL database. The easiest way to debug Snort when it fails to start is to run the command line we told FireDaemon to run c:\snort\snort.exe –l "c:\snort\logs" –c "c:\snort\rules\snort.conf" –o
Execute this command in a DOS window, and watch what Snort tells you when it starts.
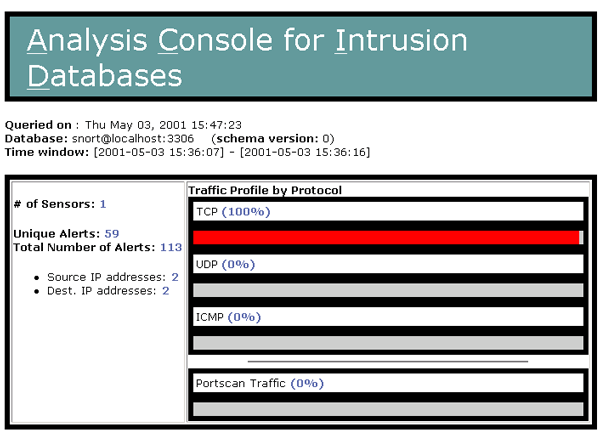
Now that you have Snort running it’s time to test that alerts are being logged to the database properly. I have a copy of my favorite vulnerability tools handy for just this occasion, a great freeware program is Cerberus Internet Scanner. As always, before hacking a network make sure you have permissions from the system administrator! When you run a vulnerability tool against your Snort box, or against your home network, make sure you are running from a machine that would fall under the external network definition you setup in the snort.conf file. I suggest setting up your home net as your Snort box only, and try hacking from a separate machine. Then change your home net setting when you have everything running correctly. After running your favorite hack tool against Snort load up the ACID console and you should notice that you have unique and total alerts. You screen will look something like this:
References
- The Snort web site http://www.snort.org/
- The MySQL web site http://www.mysql.com/
- The PHP web site http://www.php.net/
- The FireDaemon web site http://www.firedaemon.com/
- The WinPcap web site http://netgroup-serv.polito.it/winpcap/
- The ADODB web site http://php.weblogs.com/adodb
- The ACID web site http://www.cert.org/kb/acid/
- Information about CIDR netmasks http://public.pacbell.net/dedicated/cidr.html
- Cerberus Internet Scanner web site http://www.cerberus-infosec.co.uk/cis.shtml
to top of page | to Intrusion Detection | to Reading Room Home
